Overview
Thank you for purchasing TrolMaster’s ARS-1 AC Remote Station. ARS-1 offers a universal remote control for any IR
(infrared) remote controlled AC such as a mini-split AC system. Connecting to the Hydro-X Control System, the user
can use the ARS-1 Remote Station to learn and control any remote-controlled air conditioner easily and
automatically. Choose your desired temperature setpoint for the Day / Night mode (see Temperature Settings in
Hydro-X’s instructions), the ARS-1 will send the day / night setpoint to the remote-controlled AC based on the
photocell sensor status automatically.
Features
Installation
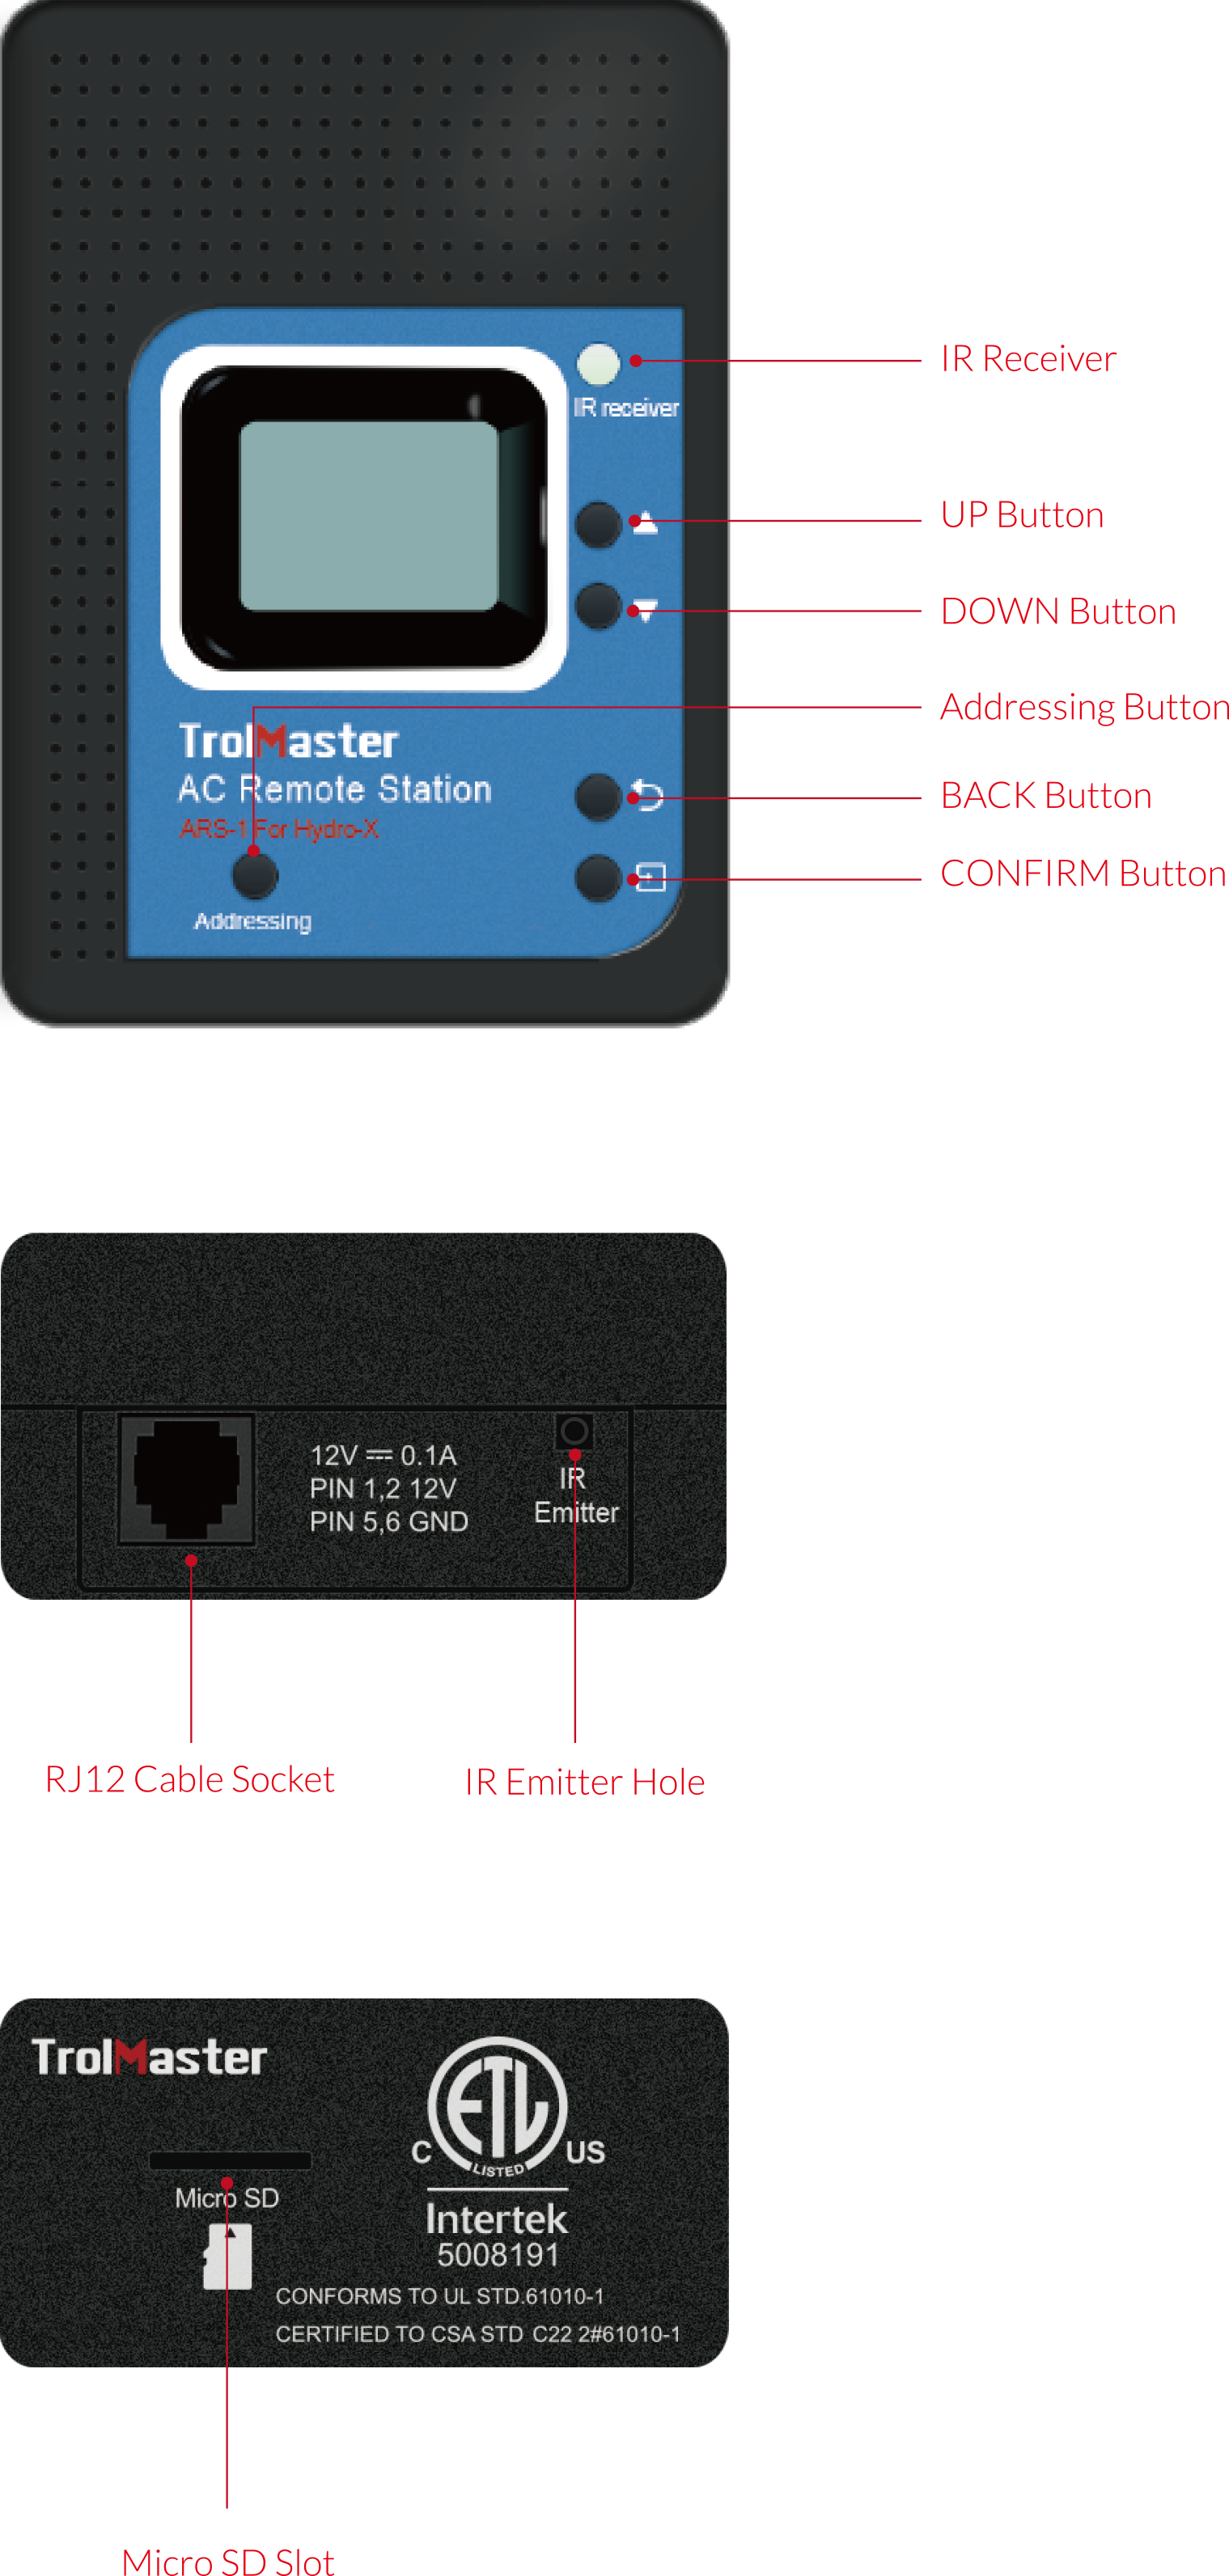
1. Pull the 2 tabs outward to release the bracket from the unit.
Mount the bracket to wall or surface near the remote controlled AC."
2. Connect the ARS-1 to the Hydro-X with a RJ12 cable.
3. Connect the accessory IR Emitter to the ARS-1 unit through the jack on the top panel.
Finally, fix the IR Emitter on the wall or surface and point the IR Emitter to the AC receiver. "
Operation Instructions
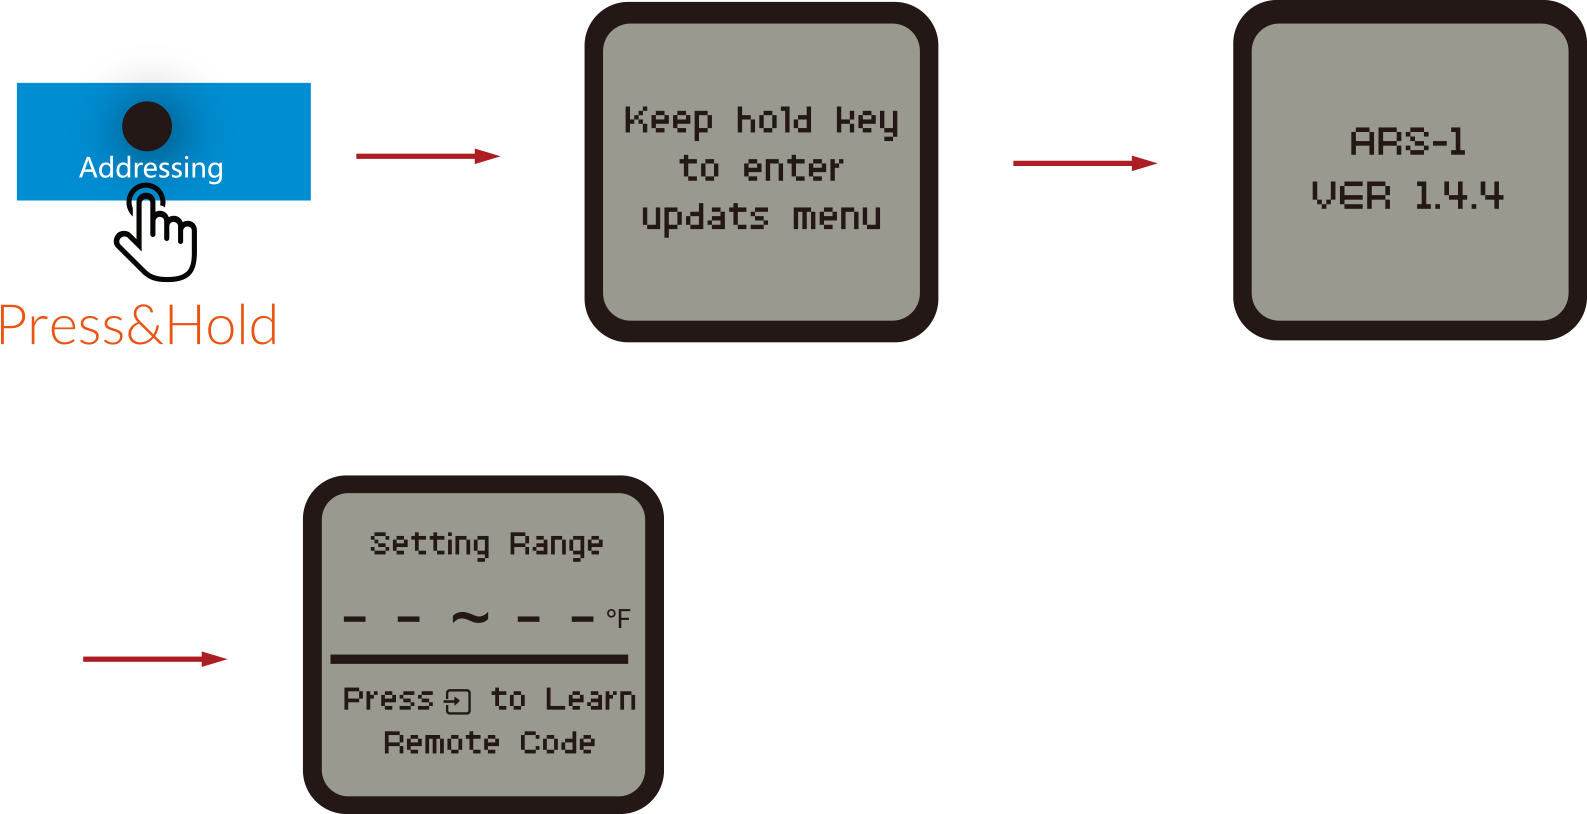
1. Address Assignment
For the first time to use the AC Remote Station, the LCD screen will display “Please press Addressing key” after
power-on. It indicates that the Hydro-X Control System has not assigned an address to the AC unit. Press the
Addressing button for address assignment so that the Hydro-X will assign an address for the connected AC unit
accordingly. The LCD screen of Hydro-X will display “Station T2 has been added”. T2 is not the constant product
code, it can be T1, T3, T4 -- depending on the connection sequence of the temperature devices. The first one is
marked as T1, the second one as T2, and so on.
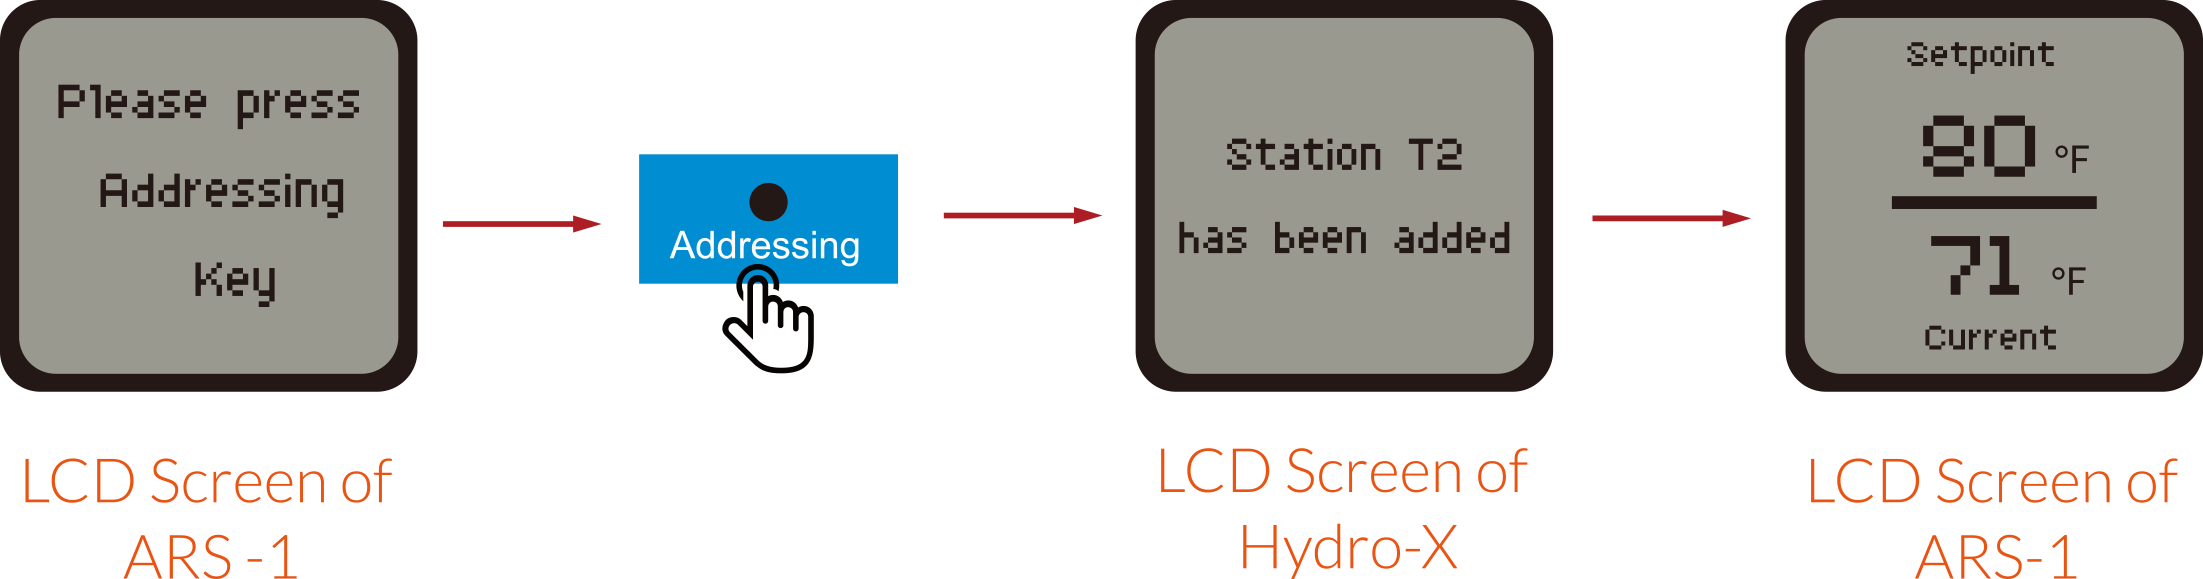
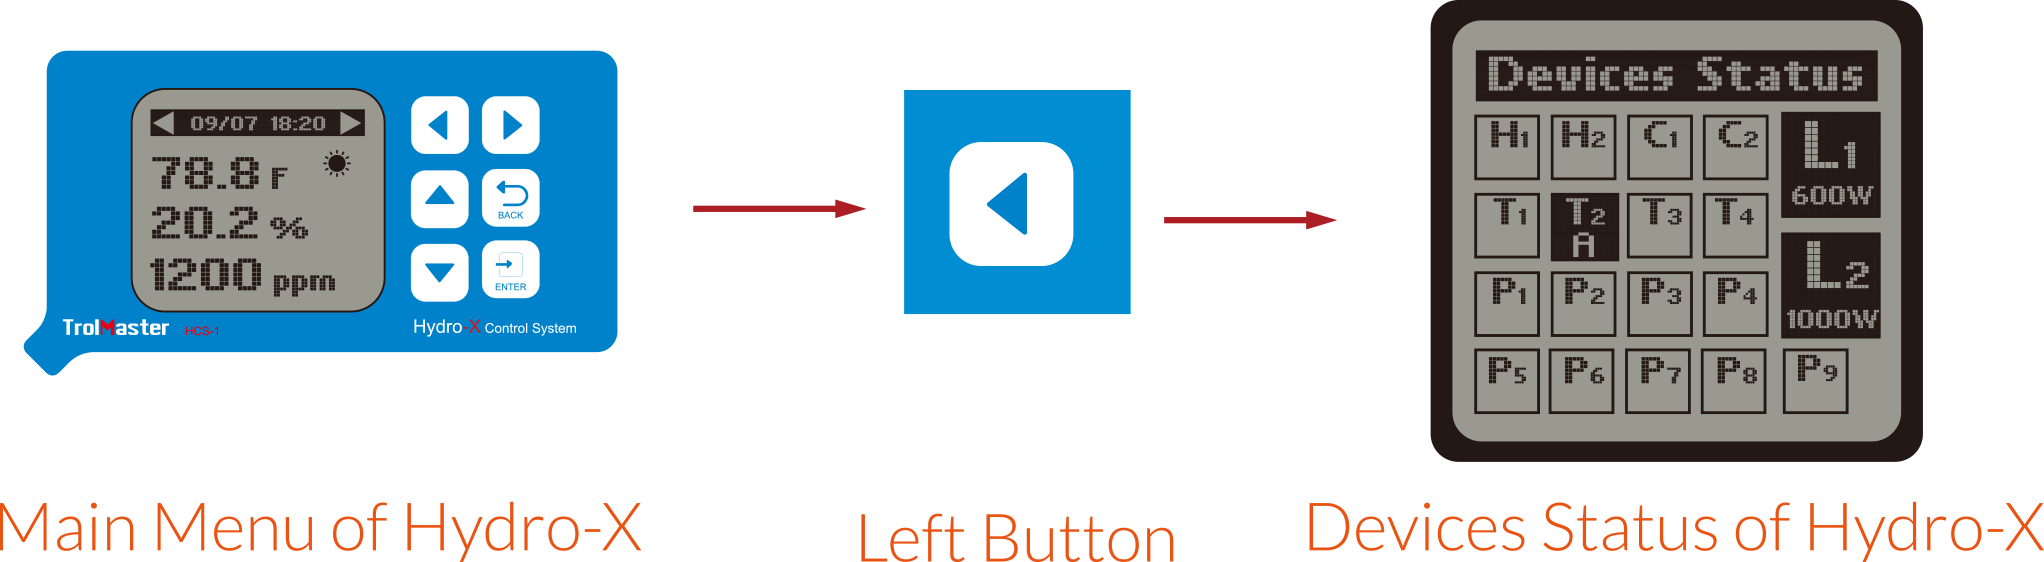
You can also check on the assigned address such asT2A on the Hydro-X as shown below:
2. Remote Code leaning Process
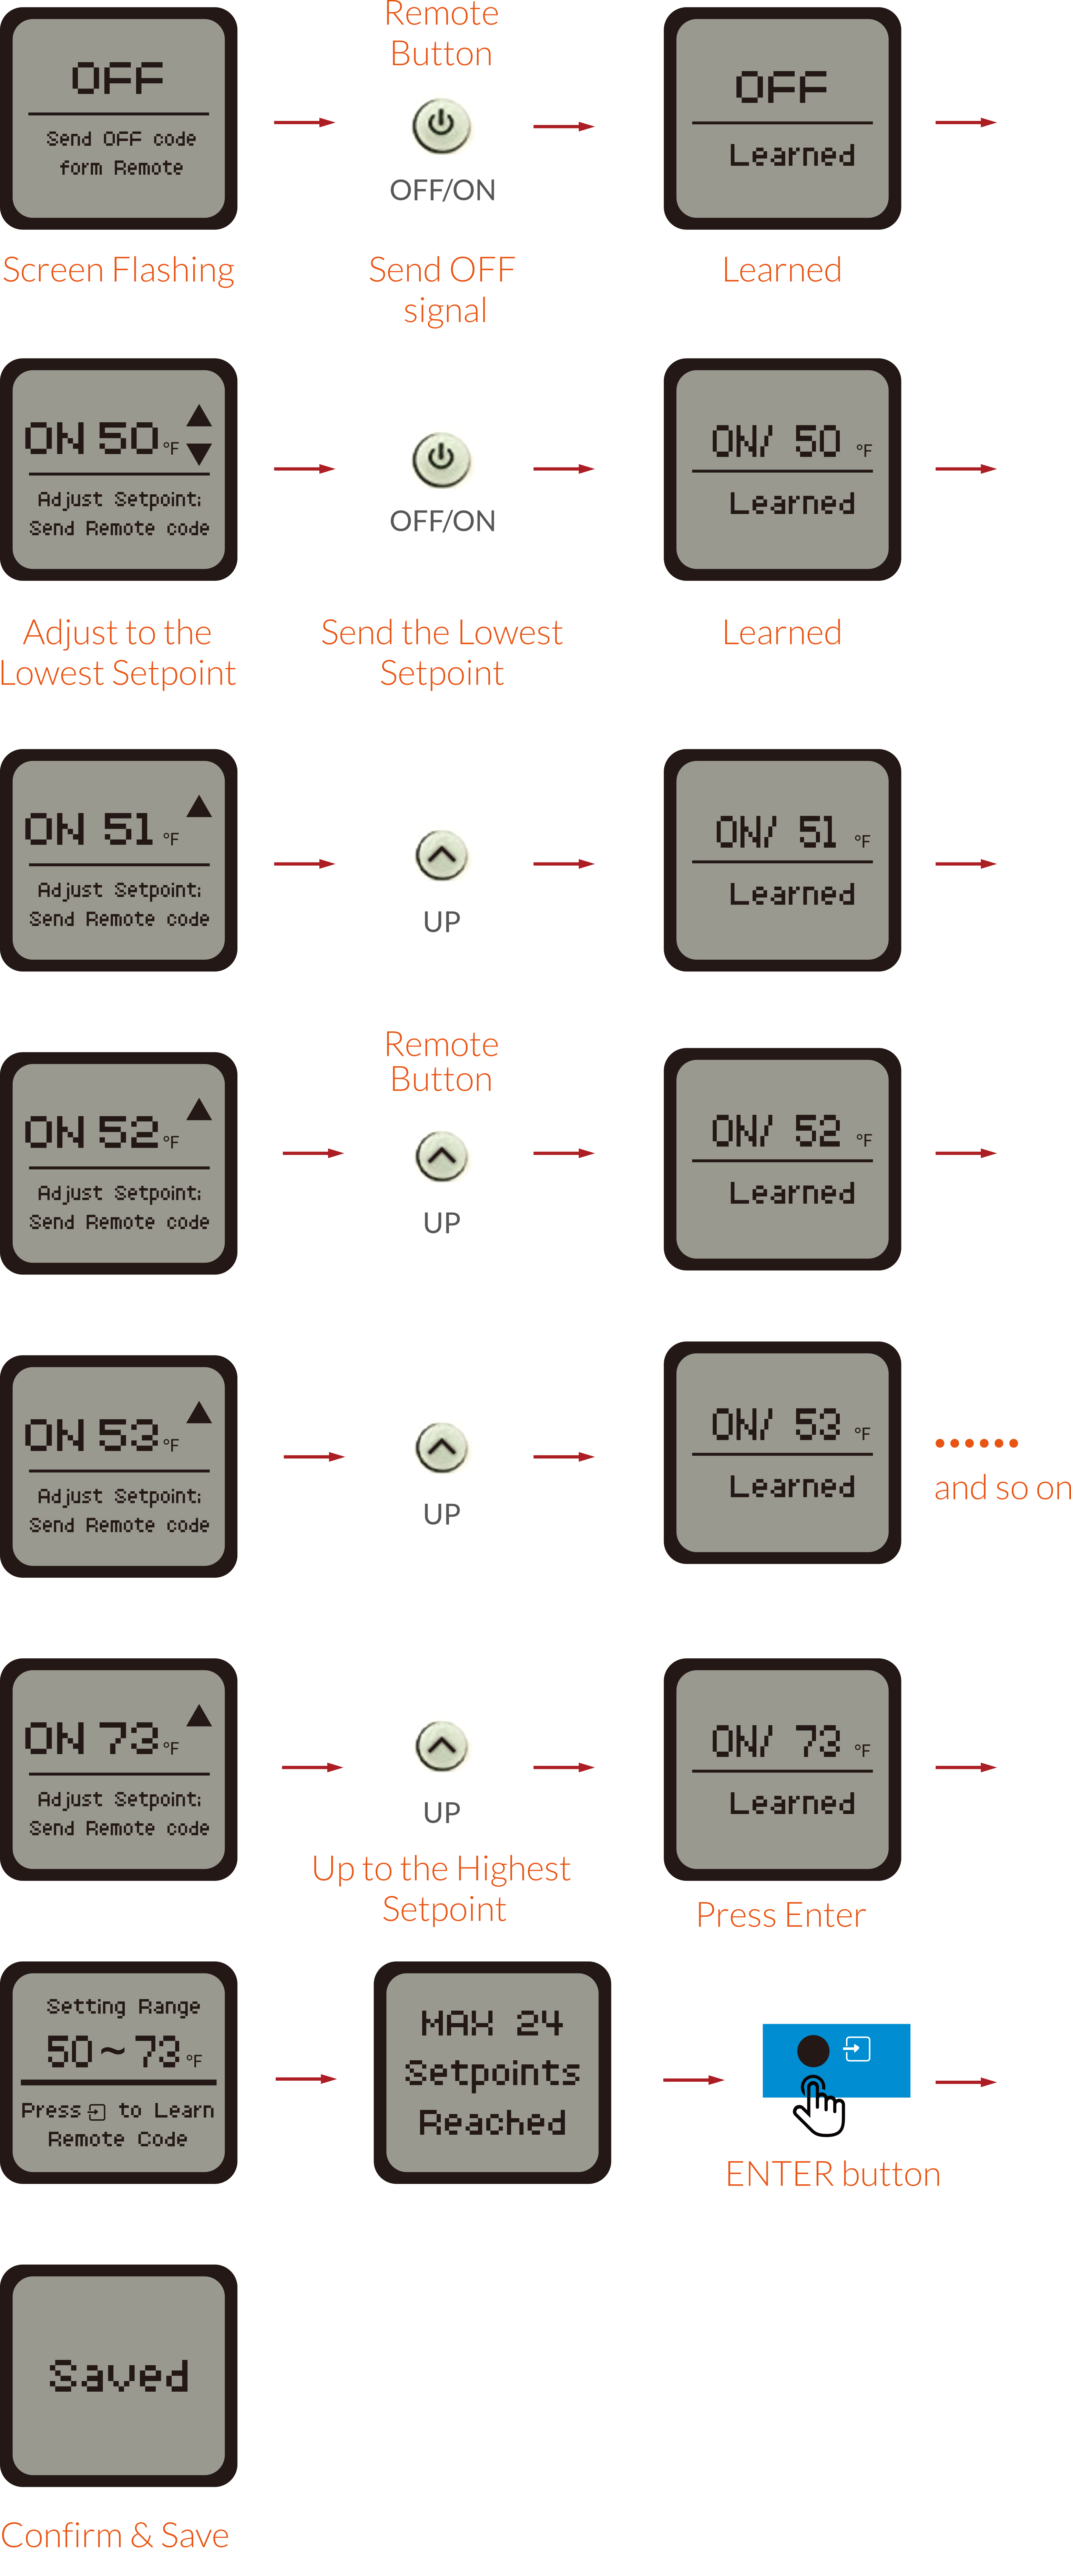
When the ARS-1 has not yet learned your infrared remote control codes, the LCD screen will show the Setting Range
page as below. The upper half part of the LCD will show the Setting Range as “----F “. It indicates that the ARS-1
unit has not learned the infrared remote control codes. The lower half part of the LCD screen will show “Press
Enter To Learn Remote Code”. User can press Enter button to relearn the setting range for an AC unit. Press the
Enter button to relearn the infrared remote control codes accordingly. The upper part of the LCD screen will
display OFF and keep flashing for 2 minutes before it returns to previous menu

Tip : Point your remote to the IR receiver on ARS-1 during the programming process
When the screen display “OFF” is flashing, adjust the remote setting to the ON mode, then point the remote to the
IR receiver on the ARS-1,send the OFF signal by pressing the POWER button of the remote. The lower part of LCD
screen will display “Learned”, it indicates that the ARS-1 just learned the infrared remote control code of “OFF”.
Then the LCD screen will show the first temperature code value, the lowest temperature value ( such as 500F or
100C), and it keeps flashing for 2 minutes. Adjust the remote setting to the lowest temperature set-point and OFF
mode. Then adjust the learning set-point showed on the ARS-1 LCD to the same as the remote’s lowest set-point.
Point the remote to the IR receiver on the ARS-1, and send the lowest set-point signal to the IR receiver on the
ARS-1.
The LCD will show “ Learned” in one second. The learning set point on the ARS-1 will be increased by 1 degree
automatically during the learning process. Use the UP button on the remote to send the counter set-point signal to
the IR receiver on the ARS-1. With the same procedure, the ARS-1 unit will learn the rest of the temperature code
values one by one until the highest temperature value (such as 730F or 230C) is reached. Finally, press ENTER
button on the ARS-1 unit to confirm and save the setting range (such as 50-730F or 10-230C) and the LCD screen will
display “ Saved”. If you don’t want to save the setting range, press the BACK button accordingly
 NOTES :
1. The lowest temperature ranges from 500-950F (100-350C). When the ARS-1 has finished learning the OFF code
from the Remote Control, the lowest temperature value and UP/DOWN buttons shown on the LCD display of ARS-1 will
begin blinking. User can press the UP button  or DOWN button
  on the ARS-1 to adjust the lowest temperature.
2. The Remote Station ( ARS-1) is also compatible with the binary Remote Control. Since the ARS-1 is set to
increase the temperature based on unary numeral system (one-degree increment), it’s necessary to adjust the display
number manually by pressing UP button on the ARS-1. For example, if the
ARS-1 has just learned the lowest
temperature code ( such as 500F), the next display number will be based on unary number ( such as 510F). You need
to press the UP button to increase the display number by one degree (such
as 520F) manually so as to match the
binary Remote Control ( two-degree increment).
3. Total 24 temperature setpoints for both unary Remote Control and binary Remote Control.
4. If the ARS-1 failed to learn the Remote code during the process, the LCD would show “Error” and stay at the
unlearned set-point. Adjust the remote set-point backwardly to send the same set-point signal to redo the learning
process.
5. When the ARS-1 has already learned the infrared remote control codes and the ARS-1 was set into “AUTO” mode
in the Hydro-X controller, the LCD screen of the ARS-1 will show the temperature setpoint ( based on Day/Night
mode) and the current temperature (lower part).
on the ARS-1 to adjust the lowest temperature.
2. The Remote Station ( ARS-1) is also compatible with the binary Remote Control. Since the ARS-1 is set to
increase the temperature based on unary numeral system (one-degree increment), it’s necessary to adjust the display
number manually by pressing UP button on the ARS-1. For example, if the
ARS-1 has just learned the lowest
temperature code ( such as 500F), the next display number will be based on unary number ( such as 510F). You need
to press the UP button to increase the display number by one degree (such
as 520F) manually so as to match the
binary Remote Control ( two-degree increment).
3. Total 24 temperature setpoints for both unary Remote Control and binary Remote Control.
4. If the ARS-1 failed to learn the Remote code during the process, the LCD would show “Error” and stay at the
unlearned set-point. Adjust the remote set-point backwardly to send the same set-point signal to redo the learning
process.
5. When the ARS-1 has already learned the infrared remote control codes and the ARS-1 was set into “AUTO” mode
in the Hydro-X controller, the LCD screen of the ARS-1 will show the temperature setpoint ( based on Day/Night
mode) and the current temperature (lower part).
or DOWN button on the ARS-1 to adjust the lowest temperature.
2. The Remote Station ( ARS-1) is also compatible with the binary Remote Control. Since the ARS-1 is set to
increase the temperature based on unary numeral system (one-degree increment), it’s necessary to adjust the display
number manually by pressing UP button on the ARS-1. For example, if the
ARS-1 has just learned the lowest
temperature code ( such as 500F), the next display number will be based on unary number ( such as 510F). You need
to press the UP button to increase the display number by one degree (such
as 520F) manually so as to match the
binary Remote Control ( two-degree increment).
3. Total 24 temperature setpoints for both unary Remote Control and binary Remote Control.
4. If the ARS-1 failed to learn the Remote code during the process, the LCD would show “Error” and stay at the
unlearned set-point. Adjust the remote set-point backwardly to send the same set-point signal to redo the learning
process.
5. When the ARS-1 has already learned the infrared remote control codes and the ARS-1 was set into “AUTO” mode
in the Hydro-X controller, the LCD screen of the ARS-1 will show the temperature setpoint ( based on Day/Night
mode) and the current temperature (lower part).
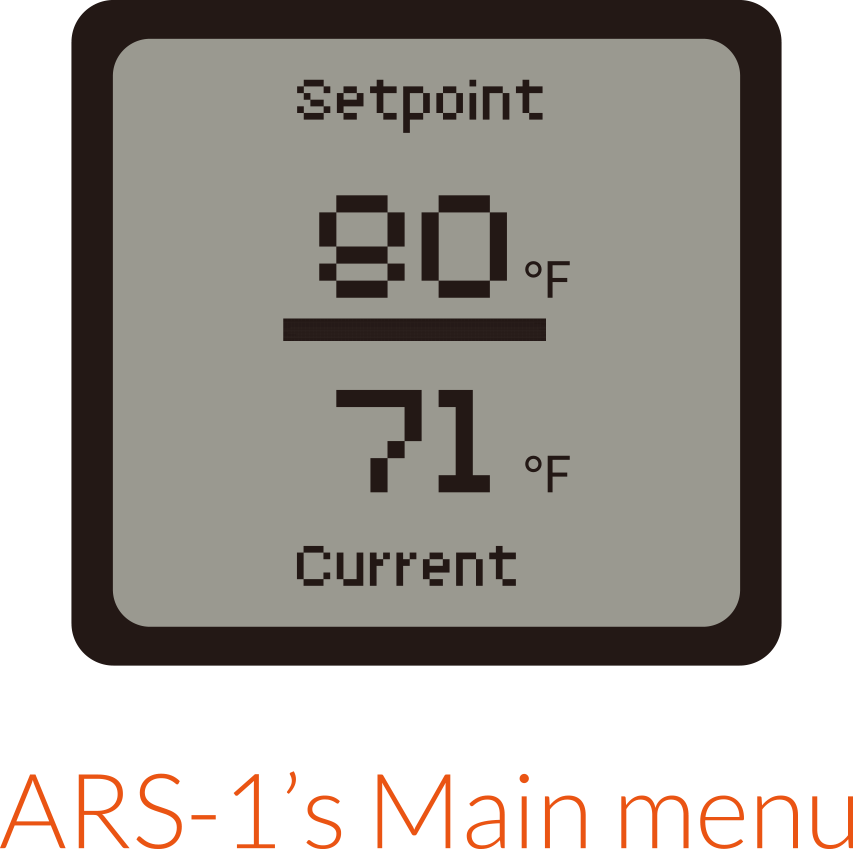
3. Temperature Mode – Auto Mode
When the ARS-1 is connected to the Hydro-X and the temperature setting is under AUTO mode in the Hydro-X, the LCD
of ARS-1 will display the temperature Setpoint ( upper part ) and Current temperature ( lower part). Please note
the current temperature is rounded up to the nearest value. When operating in Day mode, the LCD will display the
Day Setpoint. When operating in Night mode, the LCD will display the Night Setpoint.
When the current temperature is beyond the setpoints, the Hydro-X will send signal (work instructions) to
the ARS-1 via RJ12 cable. Then the ARS-1 will send the IR signal to the AC unit at the same time by the connected
IR Emitter. When the AC unit receives the IR signal from ARS-1, it will start to work (Cooling or Heating )
accordingly. When the measured temperature level reaches the Setpoint, the Hydro-X will instruct the ARS-1 to stop
working accordingly.

4. Temperature Mode – OFF Mode
When the ARS-1 is connected to the Hydro-X and the temperature setting is under OFF mode for the Hydro-X, the LCD
will display ‘OFF” (upper part) accordingly. The Hydro-X will not control the AC unit under OFF mode.

5. Firmware Upgrade
Press and hold “Addressing” button while replugging the RJ12 cable, the update progress will be done automatically.
*NOTE : Make sure the file name of firmware upgrade should be
named as “
ars1_update.hex”.
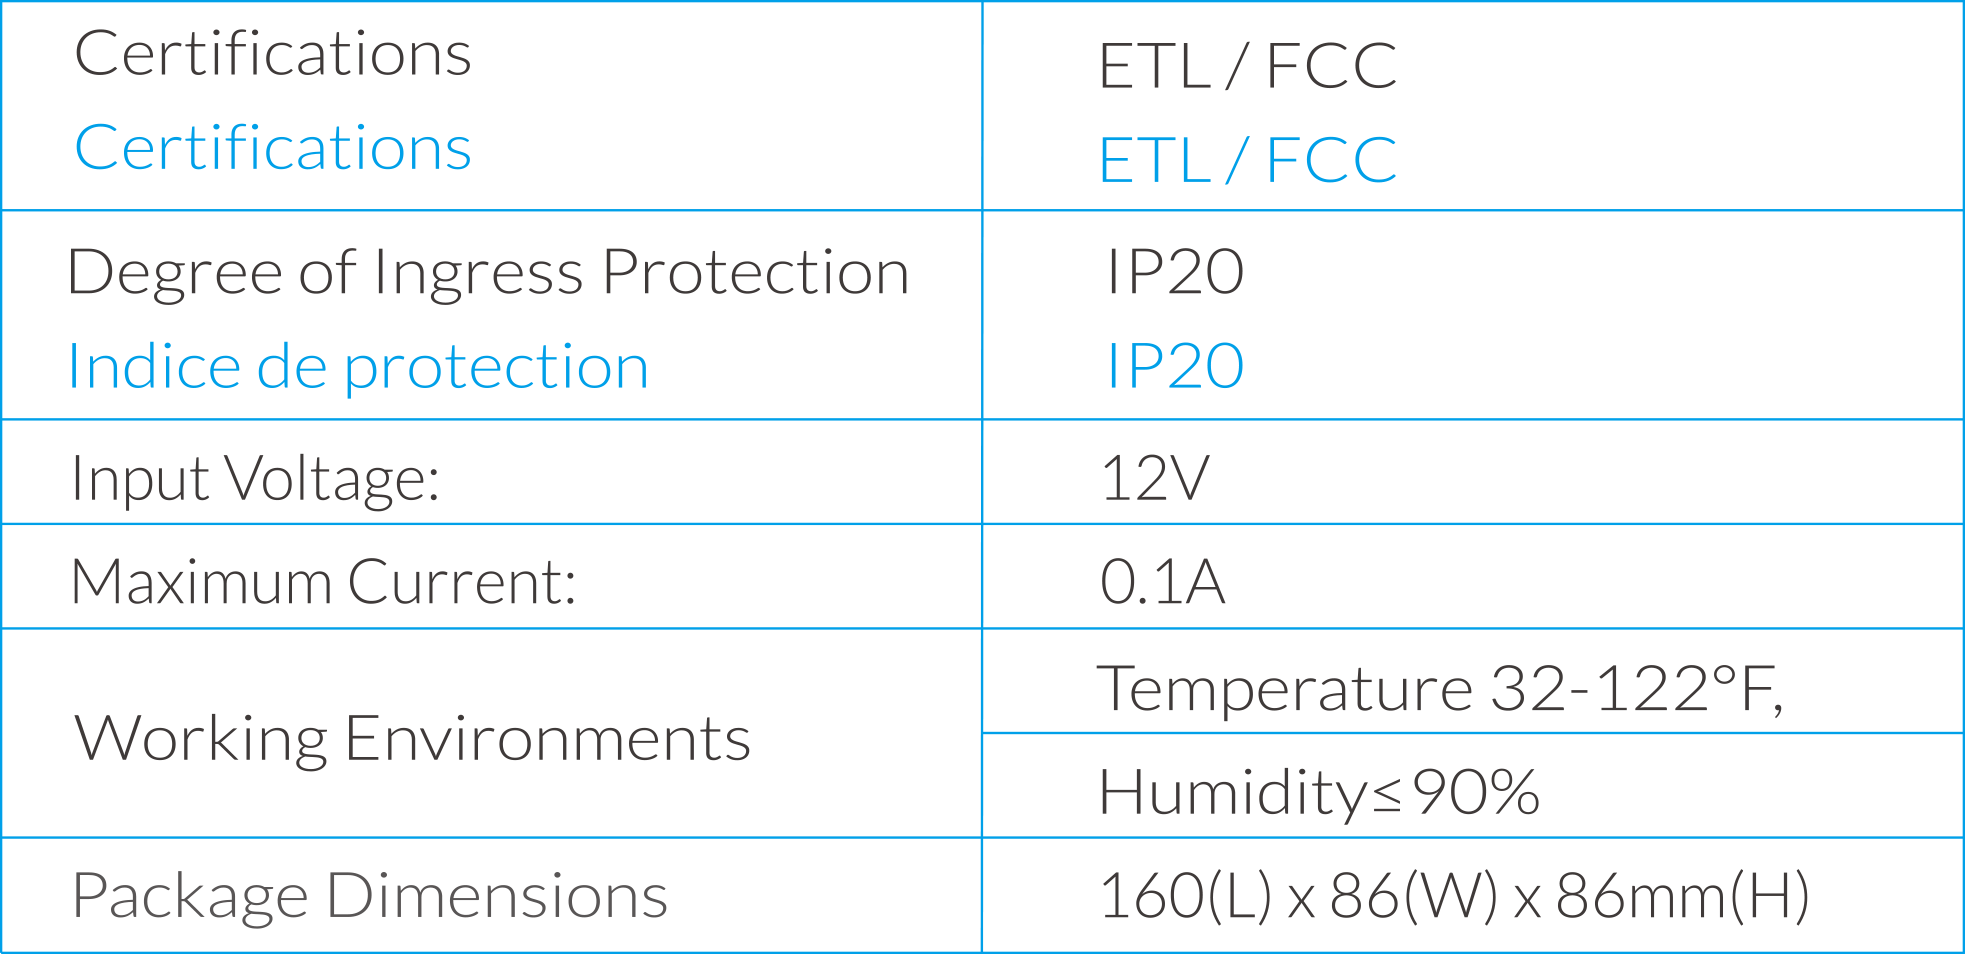
6. SPECIFICATIONS
7. GENERAL INFORMATION
a ) . Please use TrolMaster’s components for better performance
b ) . In the case of defects of the AC Remote Station, the AC Remote Station will either be replaced or required
using new or reconditioned products or parts by TrolMaster within three-year warranty from the original date of
purchase. For service, return the AC Remote Station in good packaging to our agent with the original sale receipt.
c ) . Non-professionals DO NOT open the cabinet to prevent electric shock or damage to the AC Remote Station.
 WARNING : DO NOT allow the AC Remote Station to be exposed to
water or excessive
heat. DO NOT open or attempt to
repair or disassemble the Remote Station, as there are no user-serviceable parts inside. Opening the controller
will
void the warranty.
WARNING : DO NOT allow the AC Remote Station to be exposed to
water or excessive
heat. DO NOT open or attempt to
repair or disassemble the Remote Station, as there are no user-serviceable parts inside. Opening the controller
will
void the warranty.
1. If the surface of AC Remote Station is dirty, wipe it with a dry towel.
2. The AC Remote Station is designed for indoor use only, it should be operated under natural ventilation
conditions.
3. For safety, it is necessary to connect the ground wire. If a short circuit did occur, the current would flow
through the ground wire, causing a blown fuse or tripped circuit breaker.
4. The AC Remote Station should be positioned in a place that it’s easily to be pulled out when a fault occurs.