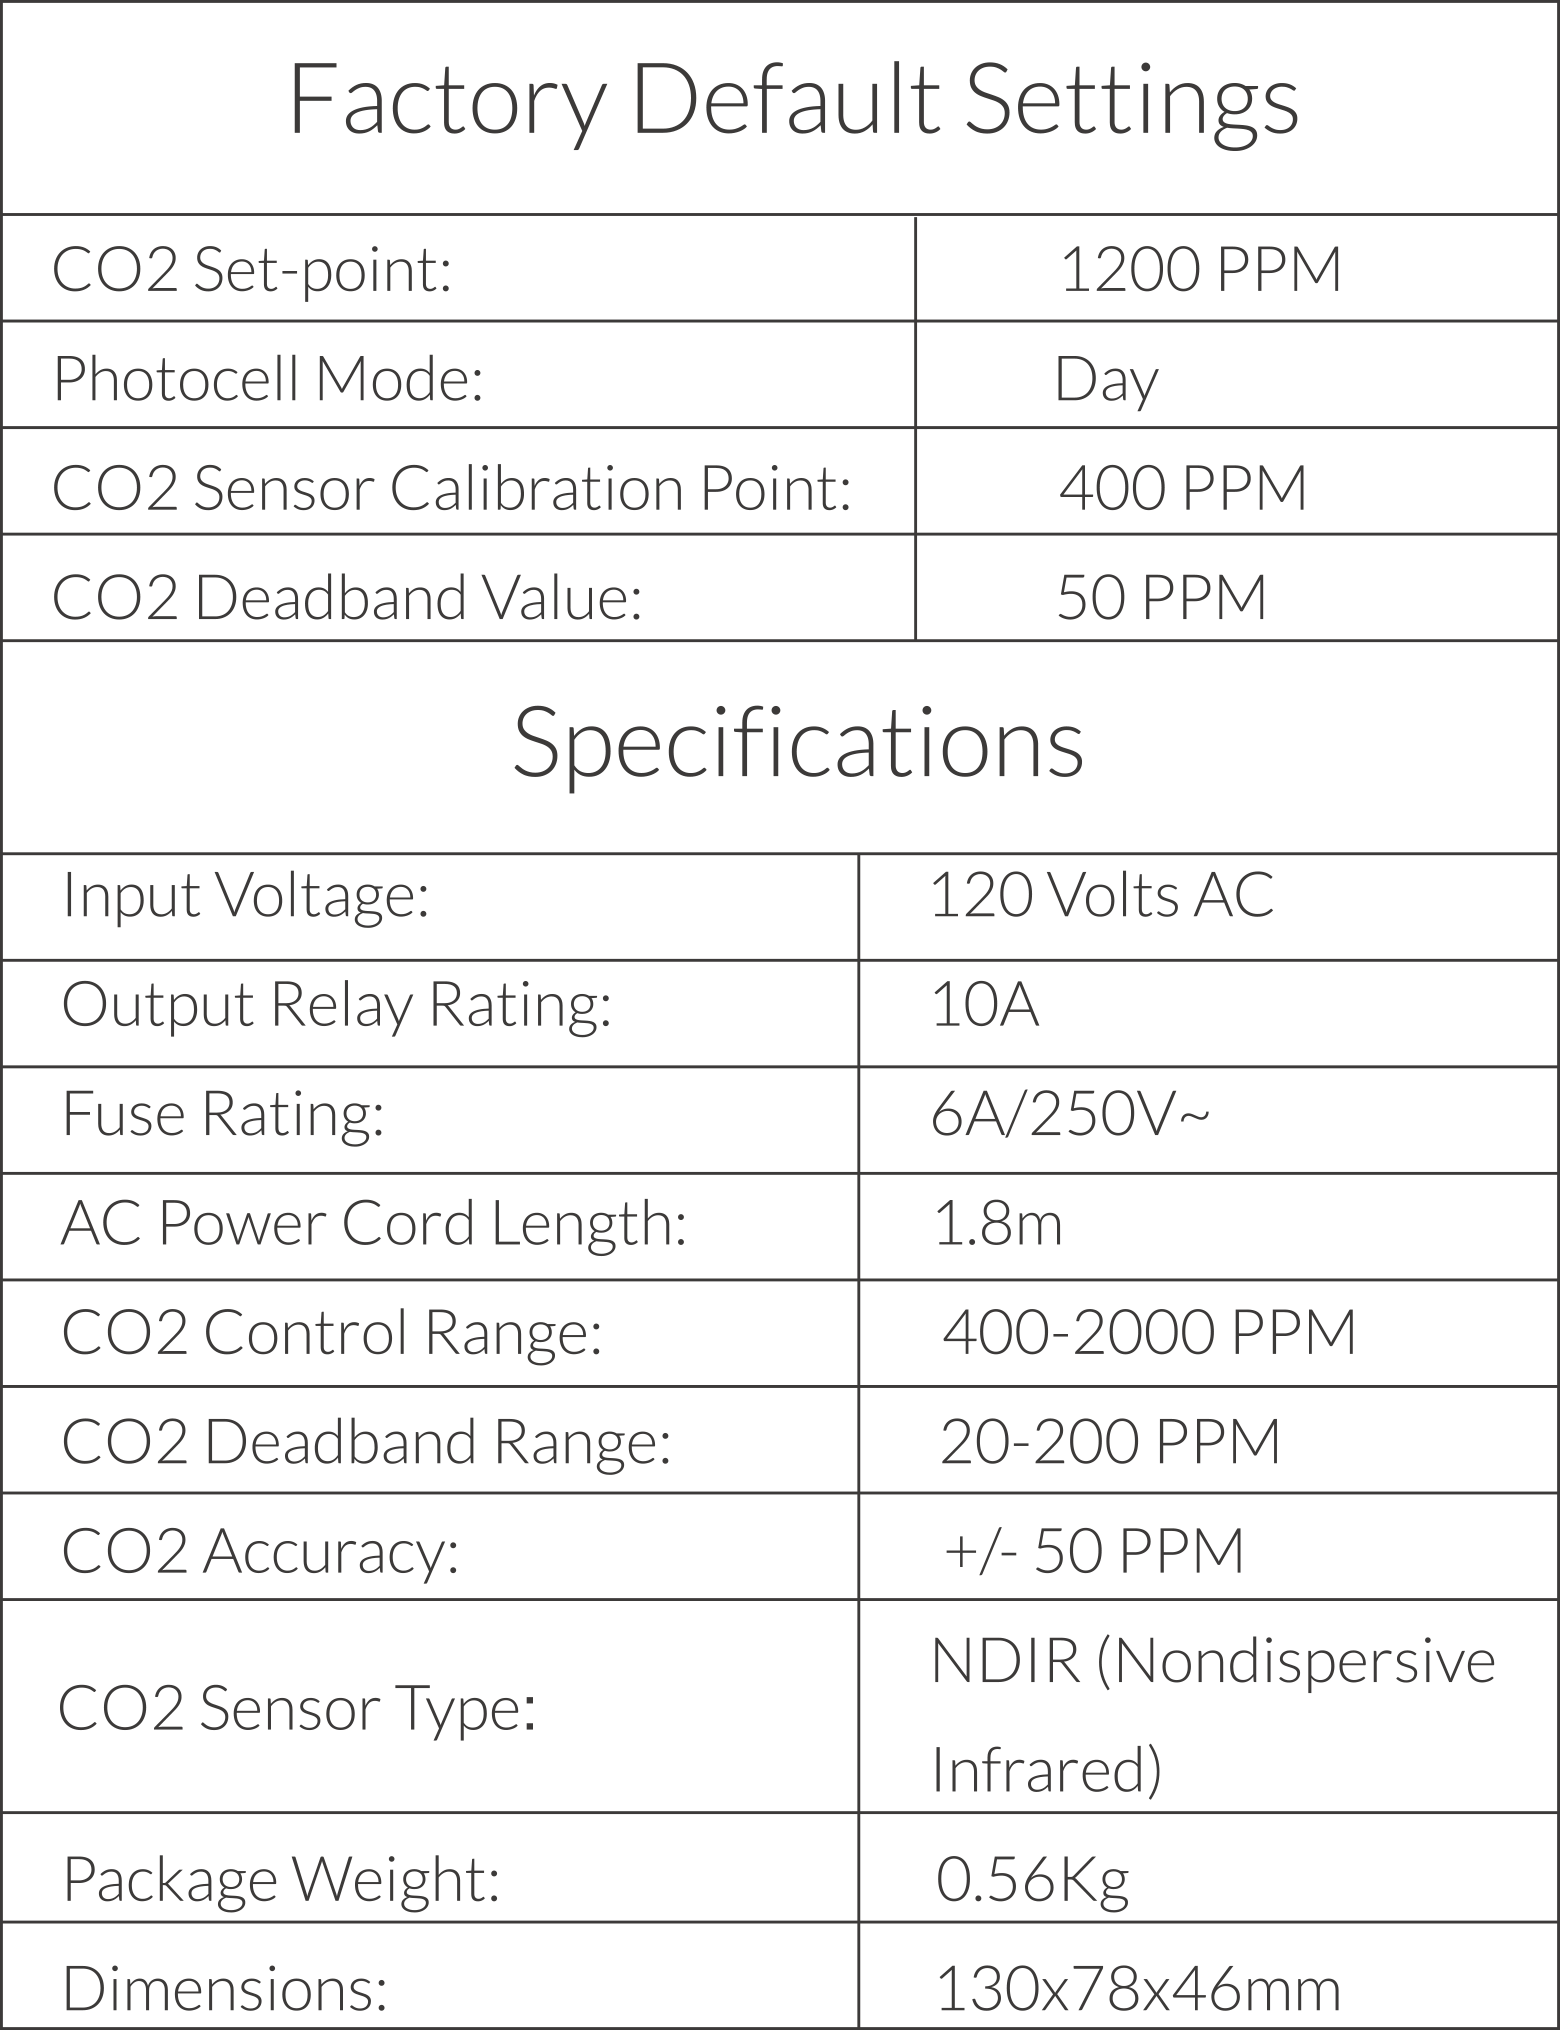
Overview
Thank you for purchasing our BETA-8 CO2 Controller, which is a simple and affordable way to control your CO2
injection device. Choose your desired CO2 level and the Controller will maintain that specified value. A built-in
photocell on the sensor will deactivate CO2 injection at night. A remote sensor with 16 ft long cable allows close
replacement to plant canopy. Night Mode: the Controller will turn off thhe output of CO2 device. Day Mode:
a ) If the Fuzzy Logic function disabled, the unit will OPEN the output of CO2 device when the current CO2 level is
less than setpoint, and CLOSE the output when the current CO2 level is greater than CO2 setpoint plus deaband
value.
b ) if the Fuzzy Logic function enabled, the unit will fully OPEN the output of CO2 device when the current CO2
level is much lower than teh setpoint. When the CO2 level is closing to the setpoint, the unit will calculate and
send PWM signal to control the output of CO2 device. The PWM cycle is 5 seconds.
Installation

Operation Instructions
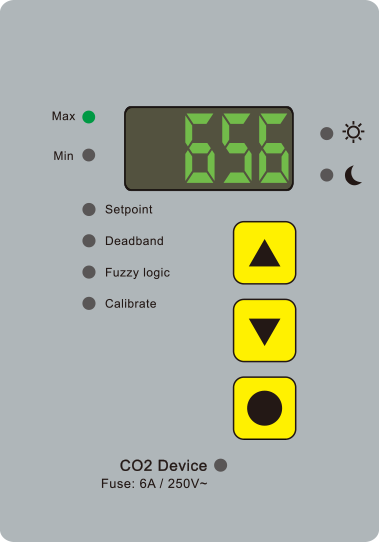
1. Reading CO2 Level
a ). Warm up the unit for approximately 1 minute
b ). After warm-up, the LED will display the current CO2 level ( as PPM ).
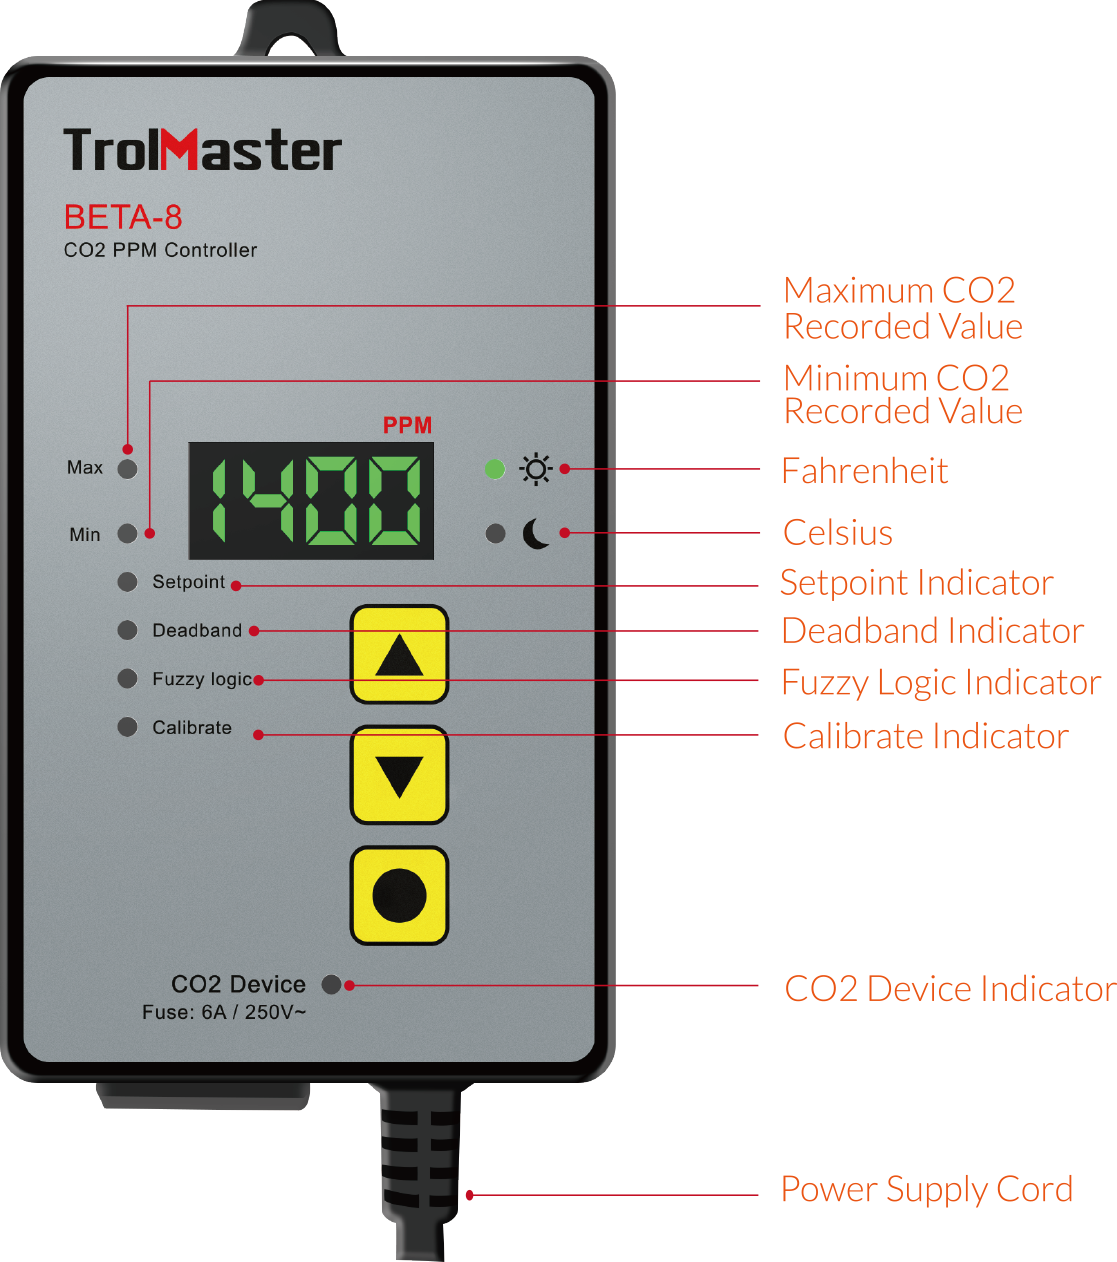
c ). The CO2 Device LED  will turn
green when corrected with CO2 generator or CO2 regulator
will turn
green when corrected with CO2 generator or CO2 regulator
will turn
green when corrected with CO2 generator or CO2 regulator
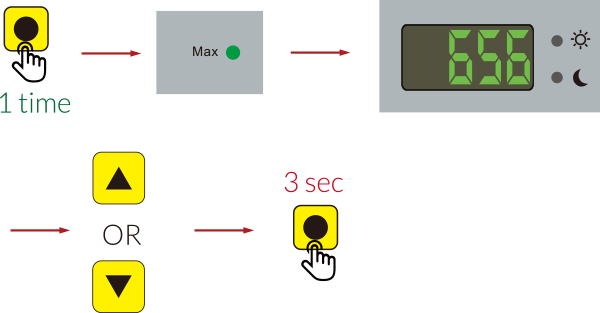
2. Maximum CO2 Recorded Value Recall
Press HOME button  on time, the LED
will display the maximum CO2 recorded value and the Max LED
on time, the LED
will display the maximum CO2 recorded value and the Max LED  indicator will be
blinking. To clear the record, press UP button
indicator will be
blinking. To clear the record, press UP button  or DOWN button
  , all digits on LED display will be blinking, press and hold
HOME button for 3 second to clear the record.
, all digits on LED display will be blinking, press and hold
HOME button for 3 second to clear the record.
on time, the LED
will display the maximum CO2 recorded value and the Max LED
indicator will be
blinking. To clear the record, press UP button or DOWN button , all digits on LED display will be blinking, press and hold
HOME button for 3 second to clear the record.
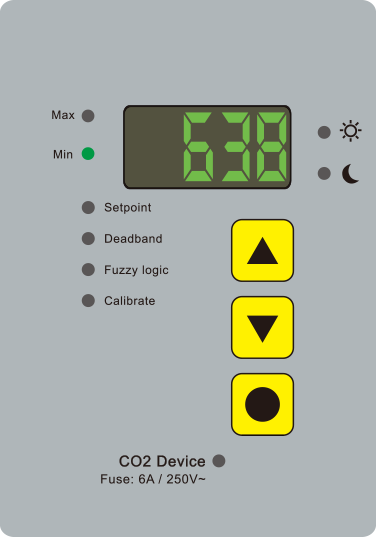
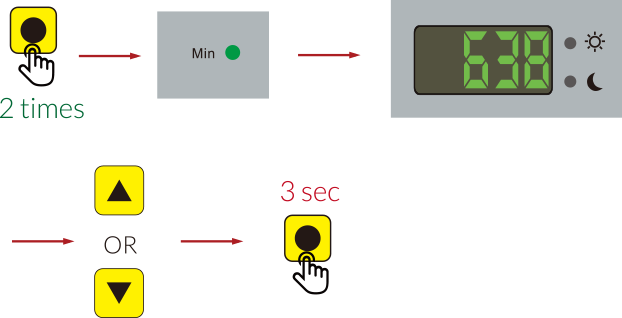
3. Minimum CO2 Recorded Value Recall
Press HOME button twice, the LED will display the minimum CO2 recorded value and the Min LED indicator
 will be
blinking. To clear the record, press UP button or DOWN button , all digits on LED display will be blinking, press and hold
HOME button for 3 second to clear the record.
will be
blinking. To clear the record, press UP button or DOWN button , all digits on LED display will be blinking, press and hold
HOME button for 3 second to clear the record.
twice, the LED will display the minimum CO2 recorded value and the Min LED indicator
will be
blinking. To clear the record, press UP button or DOWN button , all digits on LED display will be blinking, press and hold
HOME button for 3 second to clear the record.
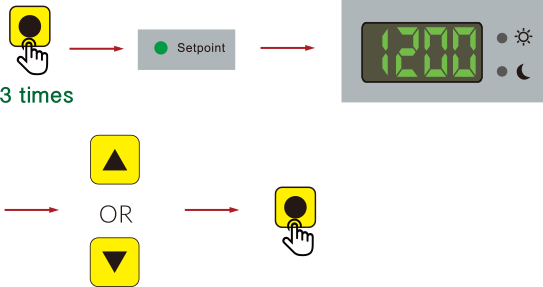
4. CO2 PPM Level Setpoint Ajustment
Factory setpoint is 1200 PPM, the CO2 sensor sensing the CO2 PPM level. If the CO2 level is lower than 1200 PPM,
the controller will turn on output relay to drive the CO2 device for enriching the CO2 in the grow area. When the
CO2 PPM level exceeds setpoint plus deadband (50 PPM), the controller will cut off the output. To adjust the
setpoint, press HOME button 3 times, the Setpoint LED indicator  will be blinking, the LED will display the current setpoint. Press UP
or DOWN
, all digits on the LED will be
blinking and then press UP or DOWN button to increase or decrease the setpoint.
will be blinking, the LED will display the current setpoint. Press UP
or DOWN
, all digits on the LED will be
blinking and then press UP or DOWN button to increase or decrease the setpoint.
3 times, the Setpoint LED indicator will be blinking, the LED will display the current setpoint. Press UP
or DOWN
, all digits on the LED will be
blinking and then press UP or DOWN button to increase or decrease the setpoint.

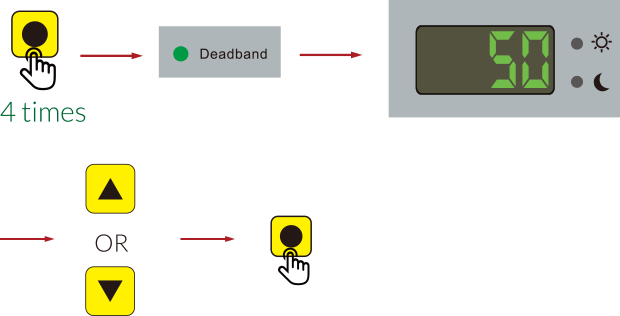
5. CO2 PPM Deadband Adjustment
Factory deadband setting is 50 PPM. To adjust the deadband, press HOME
button 4 times, the Deadband LED  will be blinking and the LED will display the current deadband setting. Press UP
or DOWN
, the digits on the LED will be
blinking and the press or to increase or decrease the deadband
will be blinking and the LED will display the current deadband setting. Press UP
or DOWN
, the digits on the LED will be
blinking and the press or to increase or decrease the deadband
4 times, the Deadband LED
will be blinking and the LED will display the current deadband setting. Press UP
or DOWN
, the digits on the LED will be
blinking and the press or to increase or decrease the deadband
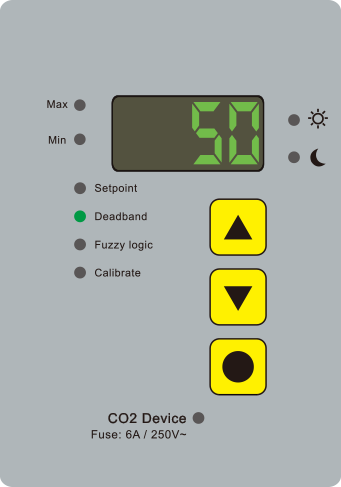
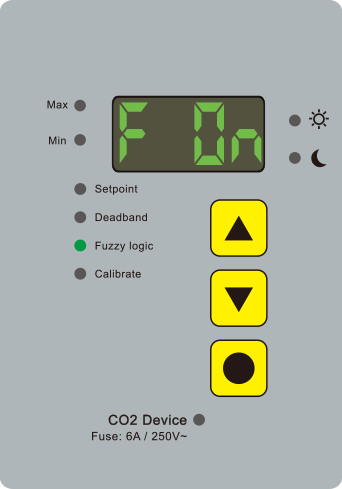
6. Fuzzy Logic Mode
a ). Fuzzy Logic mode counters rising or falling CO2 levels by quickly activating the CO2 solenoid valve, allowing
CO2 levels to be controlled more precisely.
b ). The Fuzzy Logic function is active if the Fuzzy Logic LED indicator  illuminated.
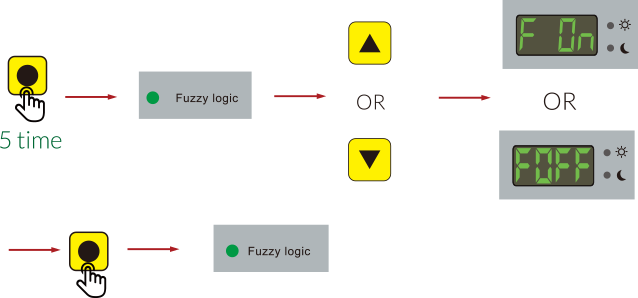
c ). Factory default setting of fuzzy logic is off. To activate the fuzzy logic, press HOME
button 5 times, the
Fuzzy Logic LED indicator will be
blinking. Press UP or DOWN , the LED display OFF. Press
or , the LED displays ON.
Press HOME button to confirm and activate the fuzzy logic and the Fuzzy Logic LED indicator will illuminate.
d ). This function can be used ONLY with compressed CO2.
e). Do not use Fuzzy Logic with a CO2 generator ! ! !
illuminated.
c ). Factory default setting of fuzzy logic is off. To activate the fuzzy logic, press HOME
button 5 times, the
Fuzzy Logic LED indicator will be
blinking. Press UP or DOWN , the LED display OFF. Press
or , the LED displays ON.
Press HOME button to confirm and activate the fuzzy logic and the Fuzzy Logic LED indicator will illuminate.
d ). This function can be used ONLY with compressed CO2.
e). Do not use Fuzzy Logic with a CO2 generator ! ! !
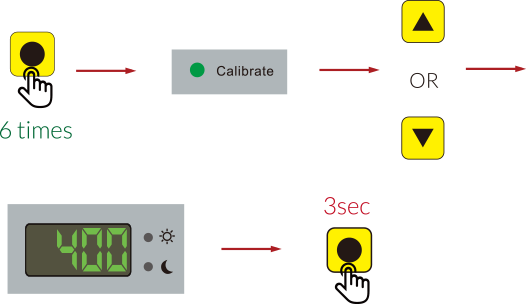
7. Calibrating the CO2 Sensor
a ). Place the sensor outdoors in a shaded area. Do not place in direct sunlight. Keep away from people, animals
and
other CO2 emitting units.
Note: if calibration will be in a high-traffic area or highly
populated area, a slightly higher calibration value of 400-475 ppm is recommended.
b ). Plug in the Controller and allow it to warm up for a minimum of 30 minutes but 1 hour is recommended.
c ). Press HOME button 6 times to activate the automatic calibration, the [ Calibrat] LED indicator  will be
blinking. Press UP
or DOWN
, the CO2 level ( 400 ppm ) will be
displayed on the LED and blinking. Press UP or DOWN
to adjust the calibration level if you have an accurate reference. Otherwise, the recommended level will be 400
ppm. Press and hold HOME button 3 seconds to activate the calibration.
Note: DO NOT exhale or breathe near the sensor while activating the
calibration function.
will be
blinking. Press UP
or DOWN
, the CO2 level ( 400 ppm ) will be
displayed on the LED and blinking. Press UP or DOWN
to adjust the calibration level if you have an accurate reference. Otherwise, the recommended level will be 400
ppm. Press and hold HOME button 3 seconds to activate the calibration.
Note: DO NOT exhale or breathe near the sensor while activating the
calibration function.
6 times to activate the automatic calibration, the [ Calibrat] LED indicator will be
blinking. Press UP
or DOWN
, the CO2 level ( 400 ppm ) will be
displayed on the LED and blinking. Press UP or DOWN
to adjust the calibration level if you have an accurate reference. Otherwise, the recommended level will be 400
ppm. Press and hold HOME button 3 seconds to activate the calibration.
Note: DO NOT exhale or breathe near the sensor while activating the
calibration function.
d ) The LED will display the countdown timing.
e ) When it is completed, the screen will display normal functions. Calibration will not affect any other settings.
Note: It may take up to 90 seconds to complete the calibraton
process.
8. Restore the Factory Settings
Press and hold HOME button before plugging controller into wall outlet. Power the controller,
the LED display "rESt " and blinks. Keep holding the HOME button
for 5 seconds
until the LED displays " donE ".
before plugging controller into wall outlet. Power the controller,
the LED display "rESt " and blinks. Keep holding the HOME button
for 5 seconds
until the LED displays " donE ".