GETTING STARTED
Thank you for purchasing the TrolMaster HAWKEYE Climate Monitor & Logger. This unit is a simple and affordable way
to monitor your grow room. To ensure safety, please read this instruction manual carefully before installation and
follow the instructions herein. It will provide detailed instructions and guidelines that will help to set up the
unit., and to understand the full capability of this unit. Any use or application of this product, other than for
its original intended purposes are prohibited. Store this manual in a secure place for future reference.
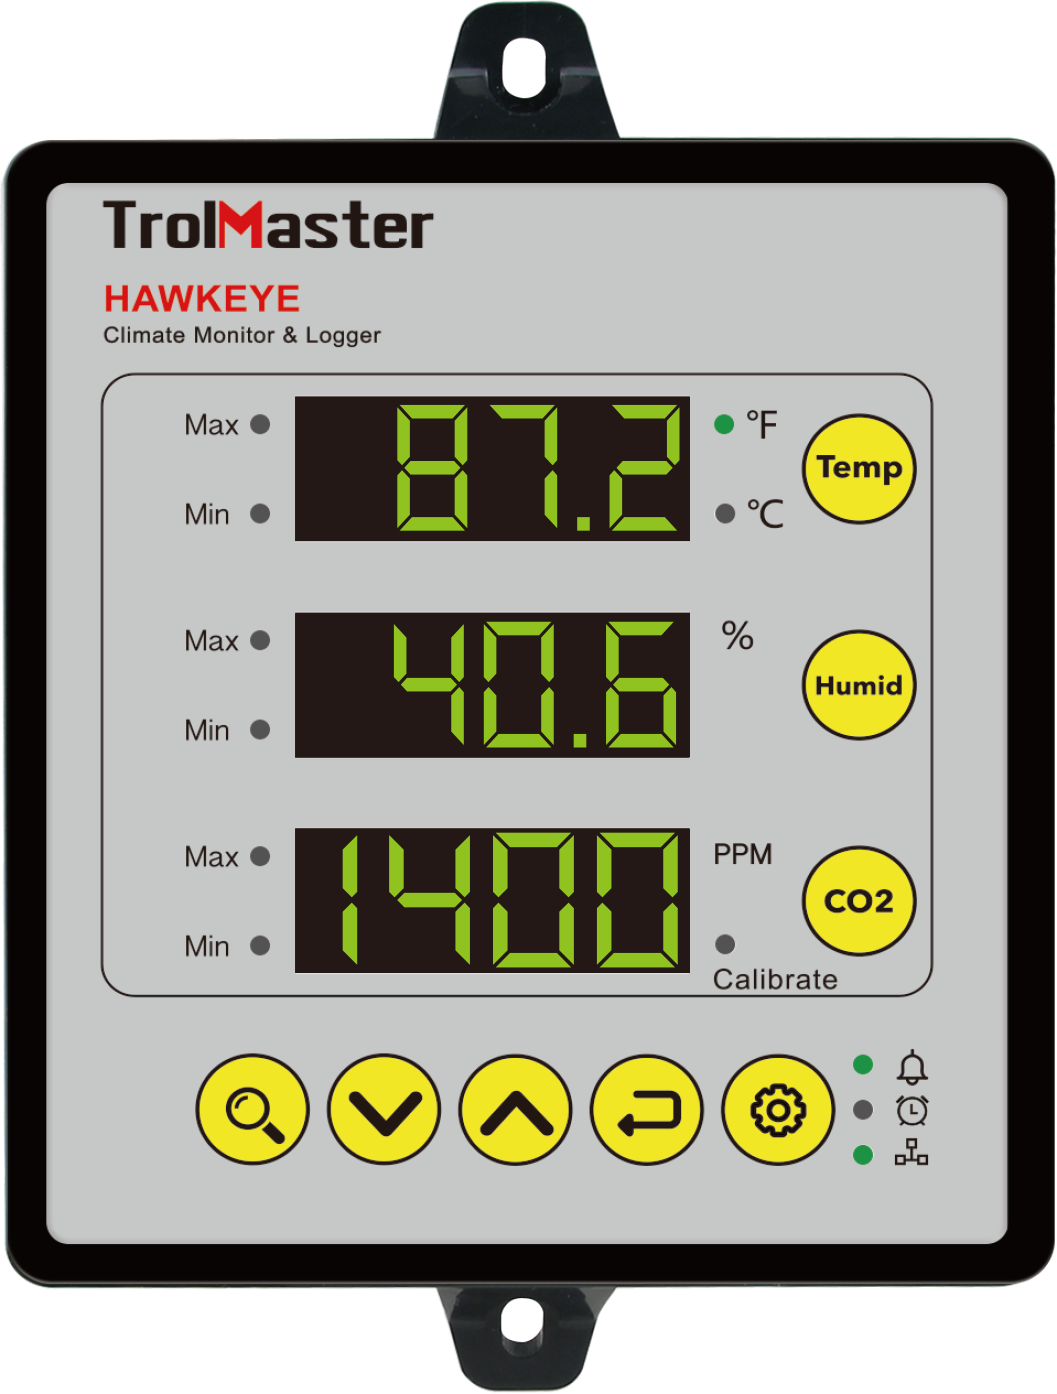
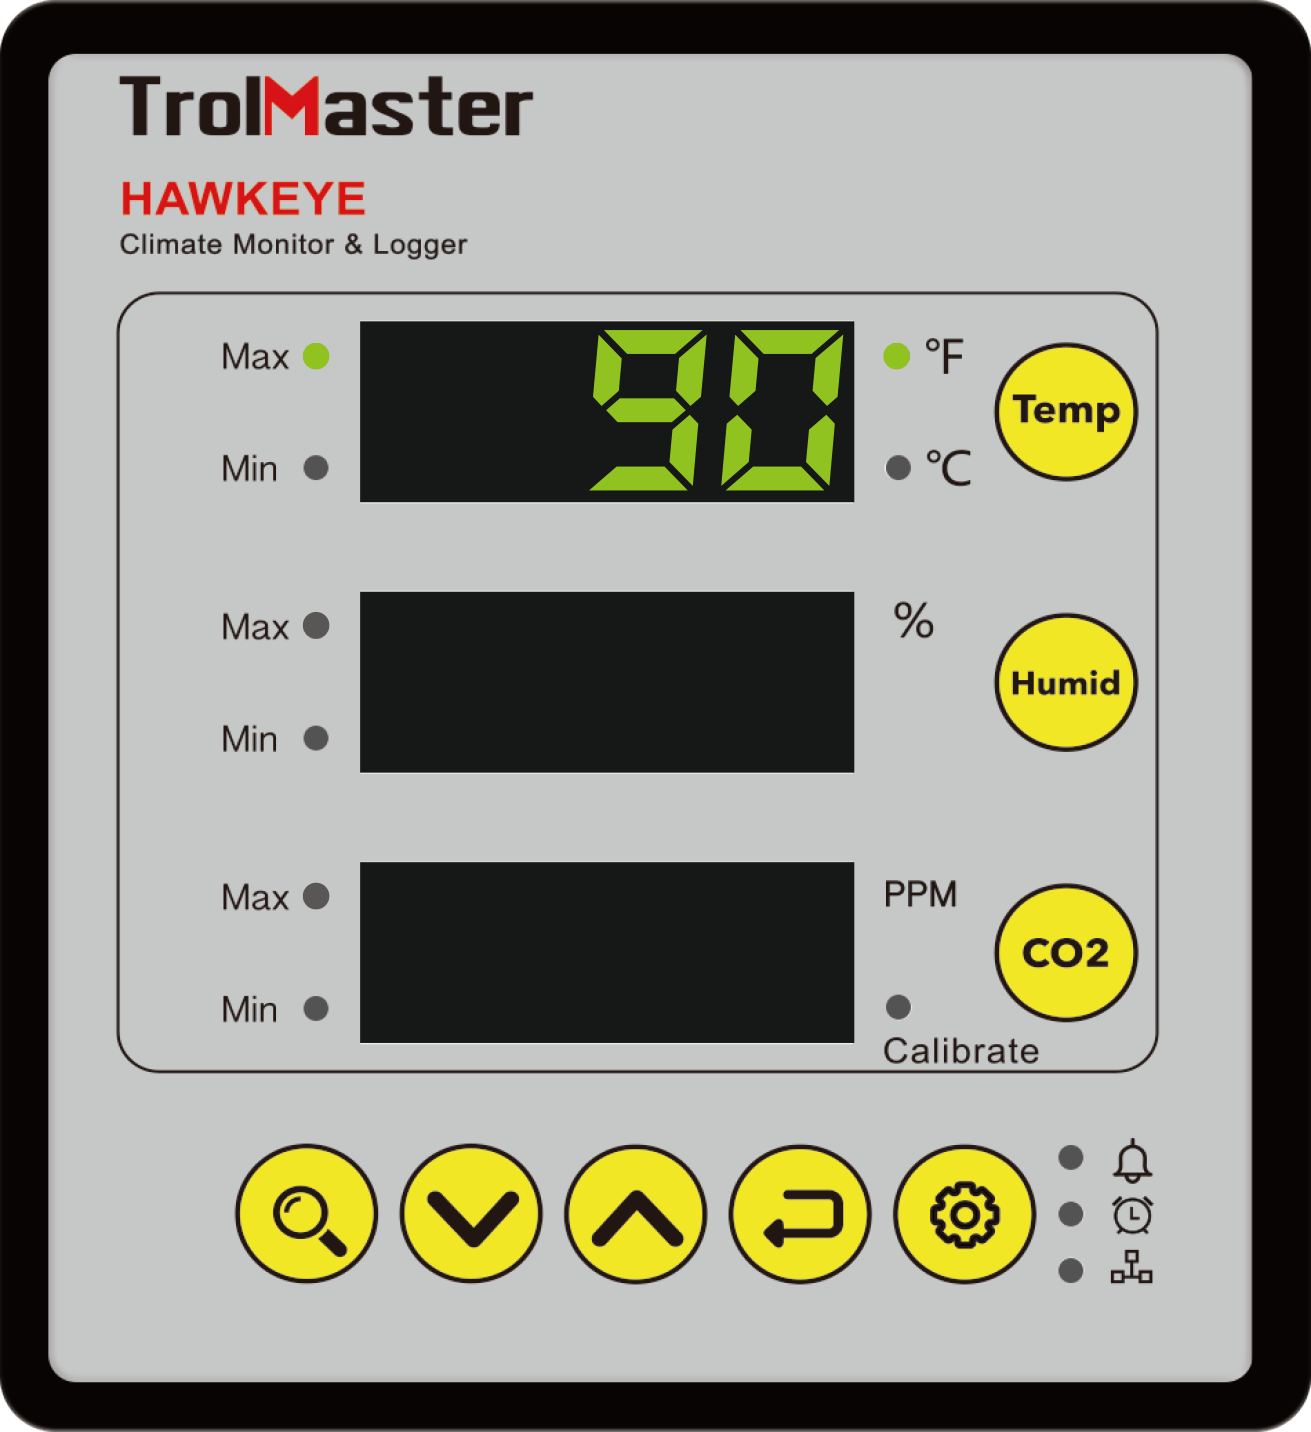
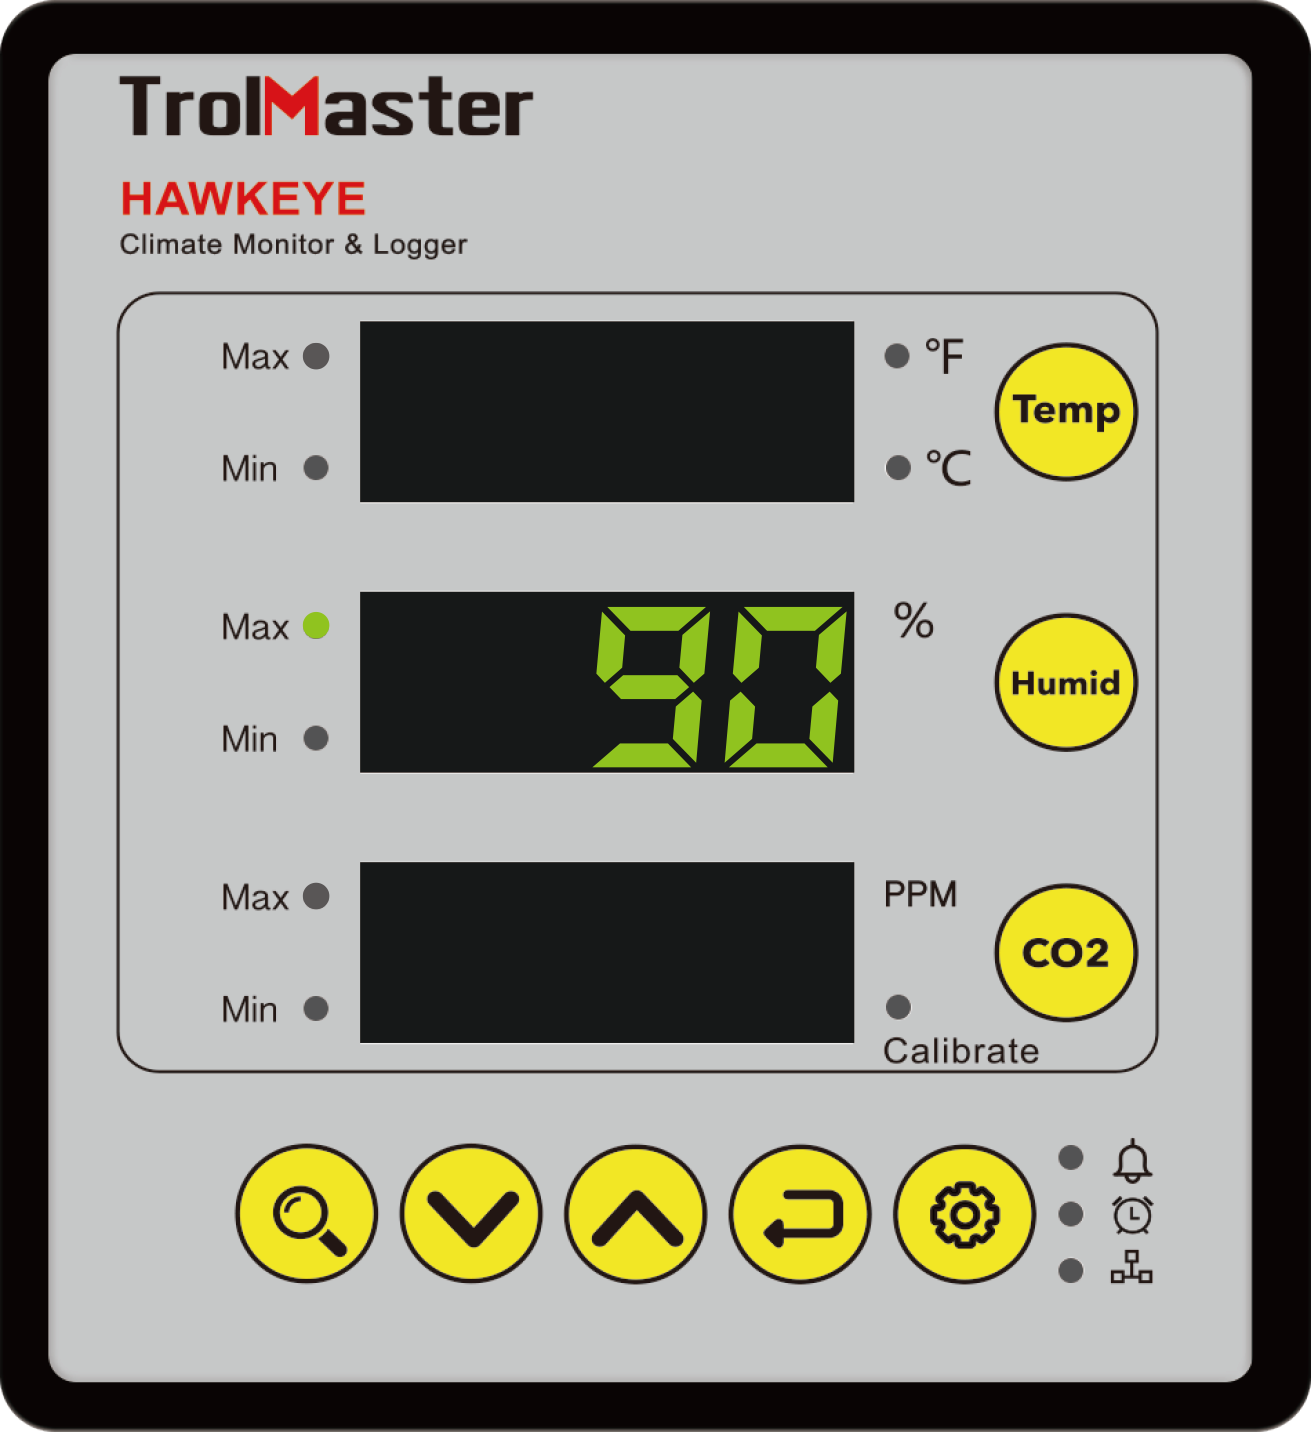
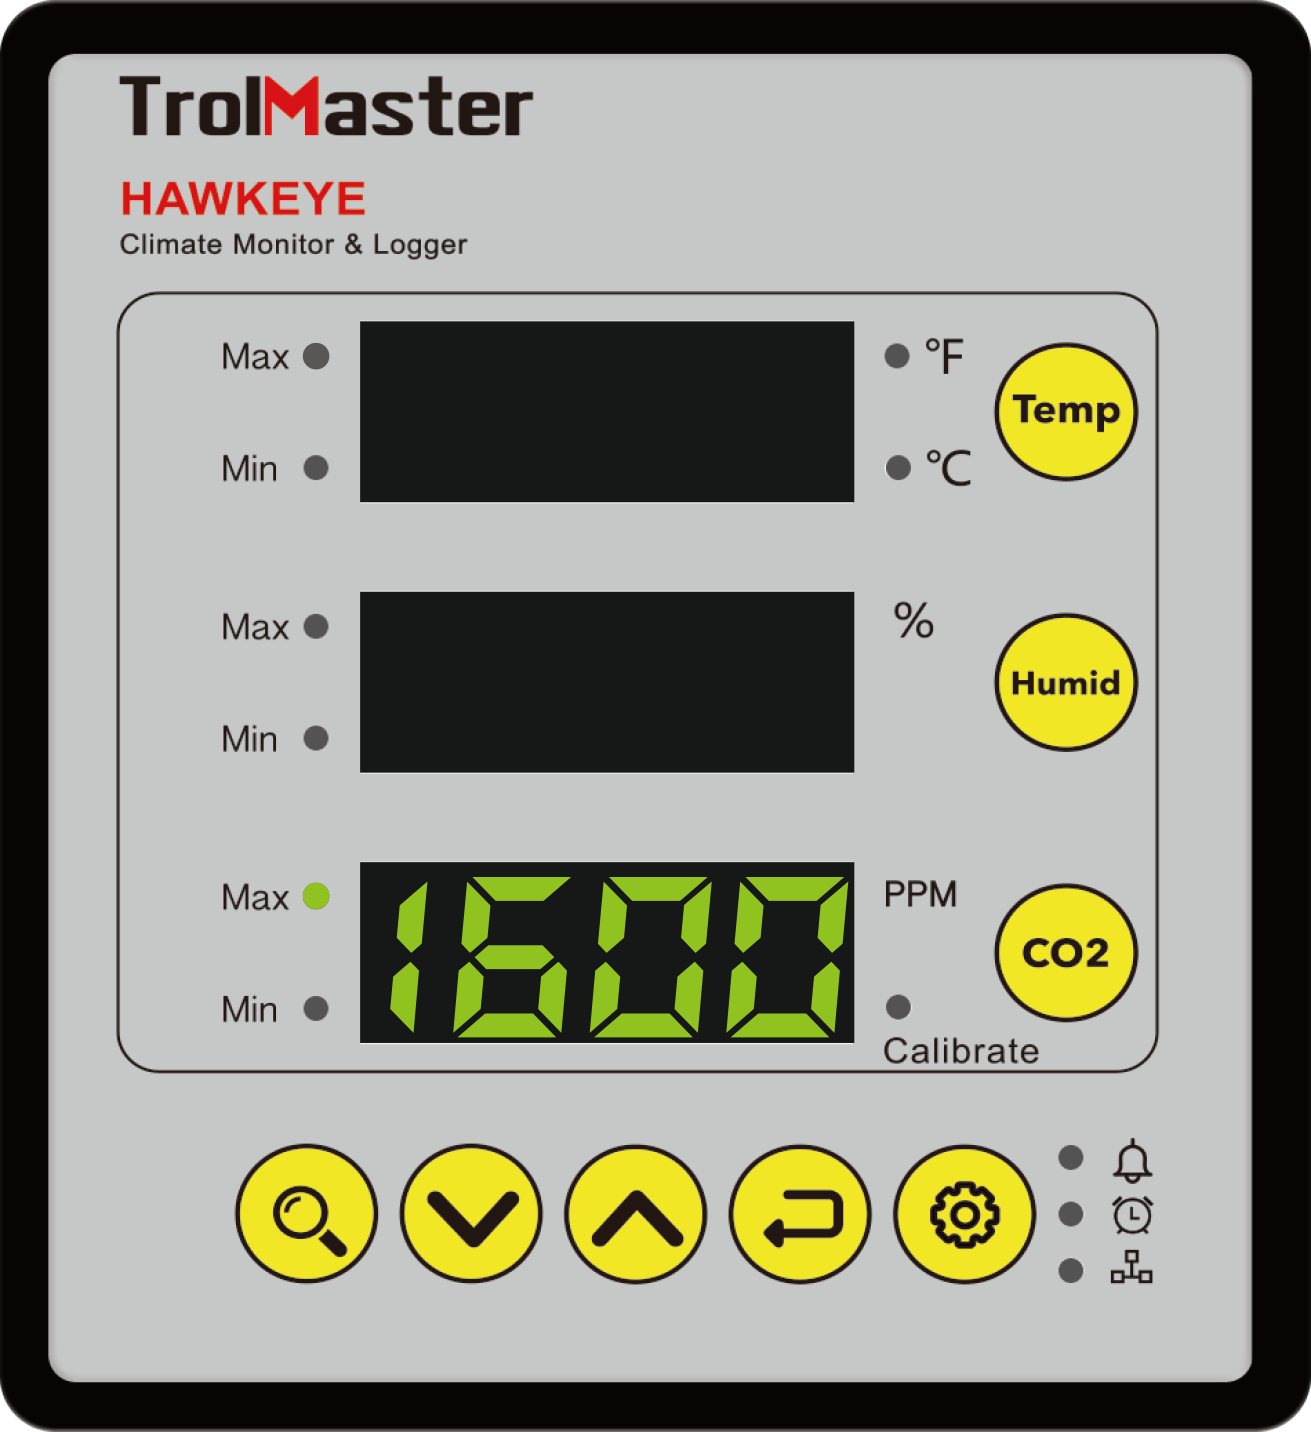
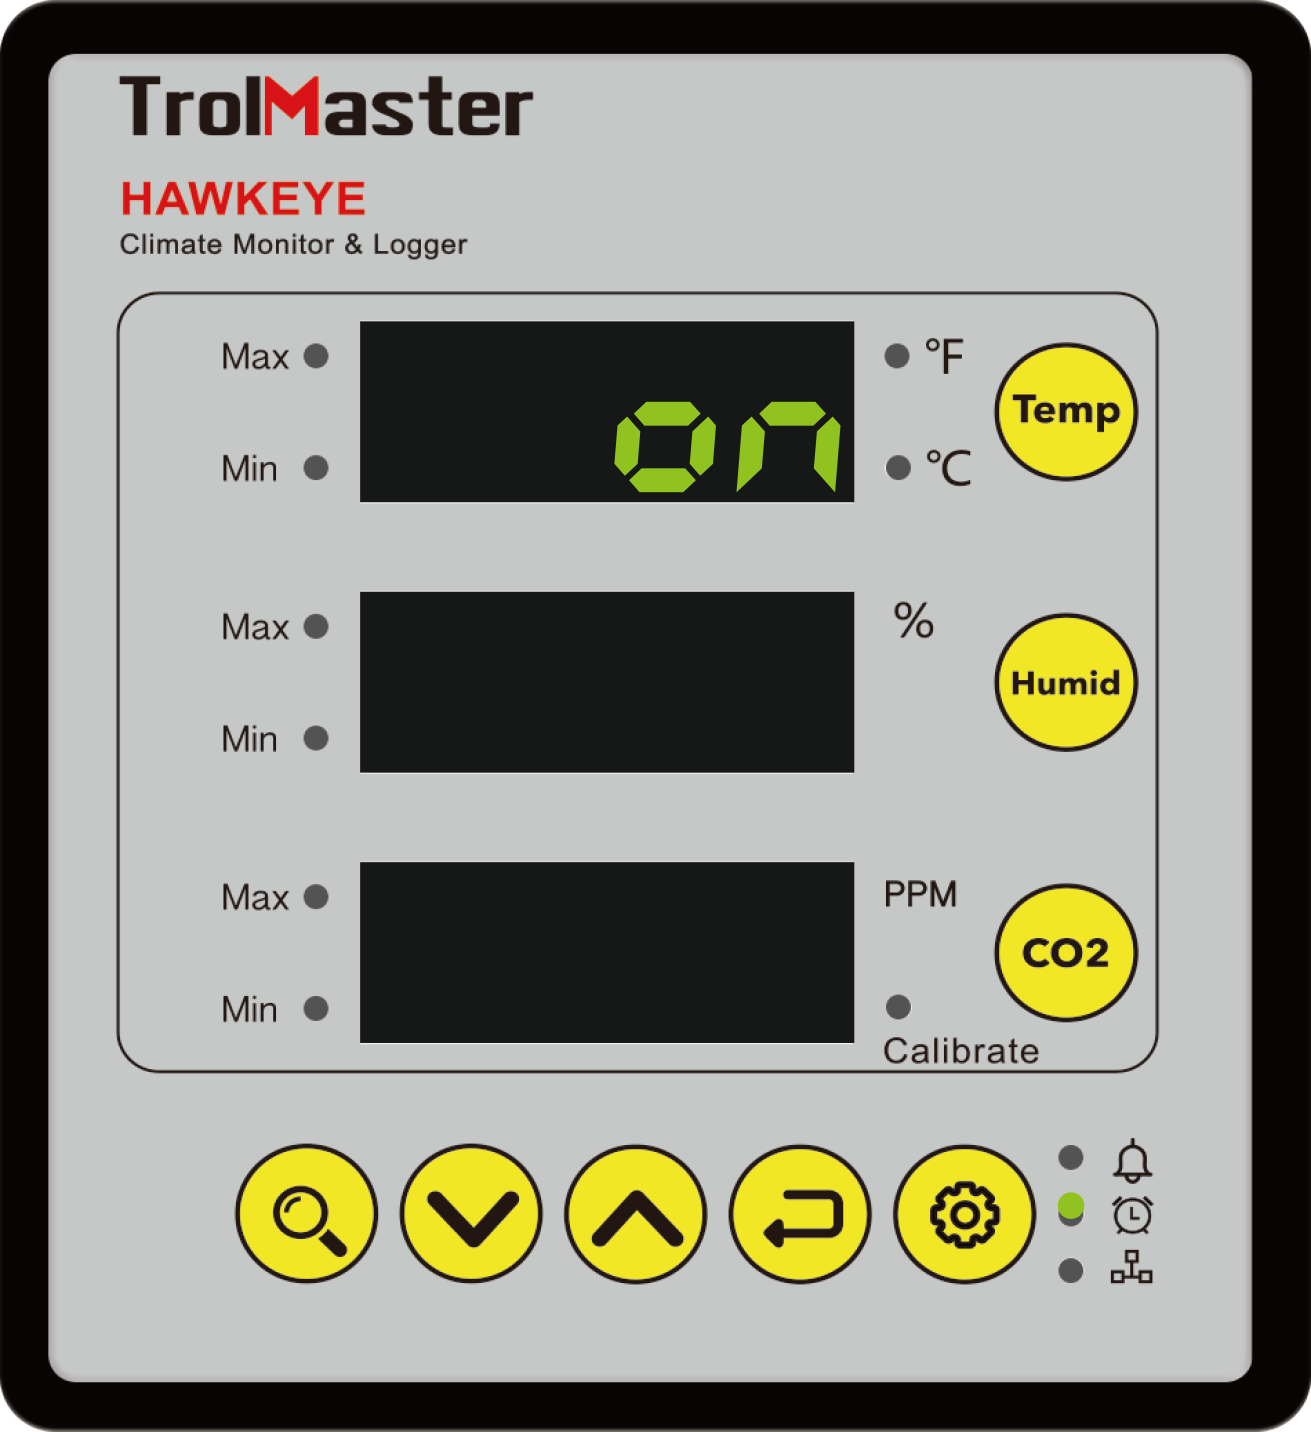
Overview
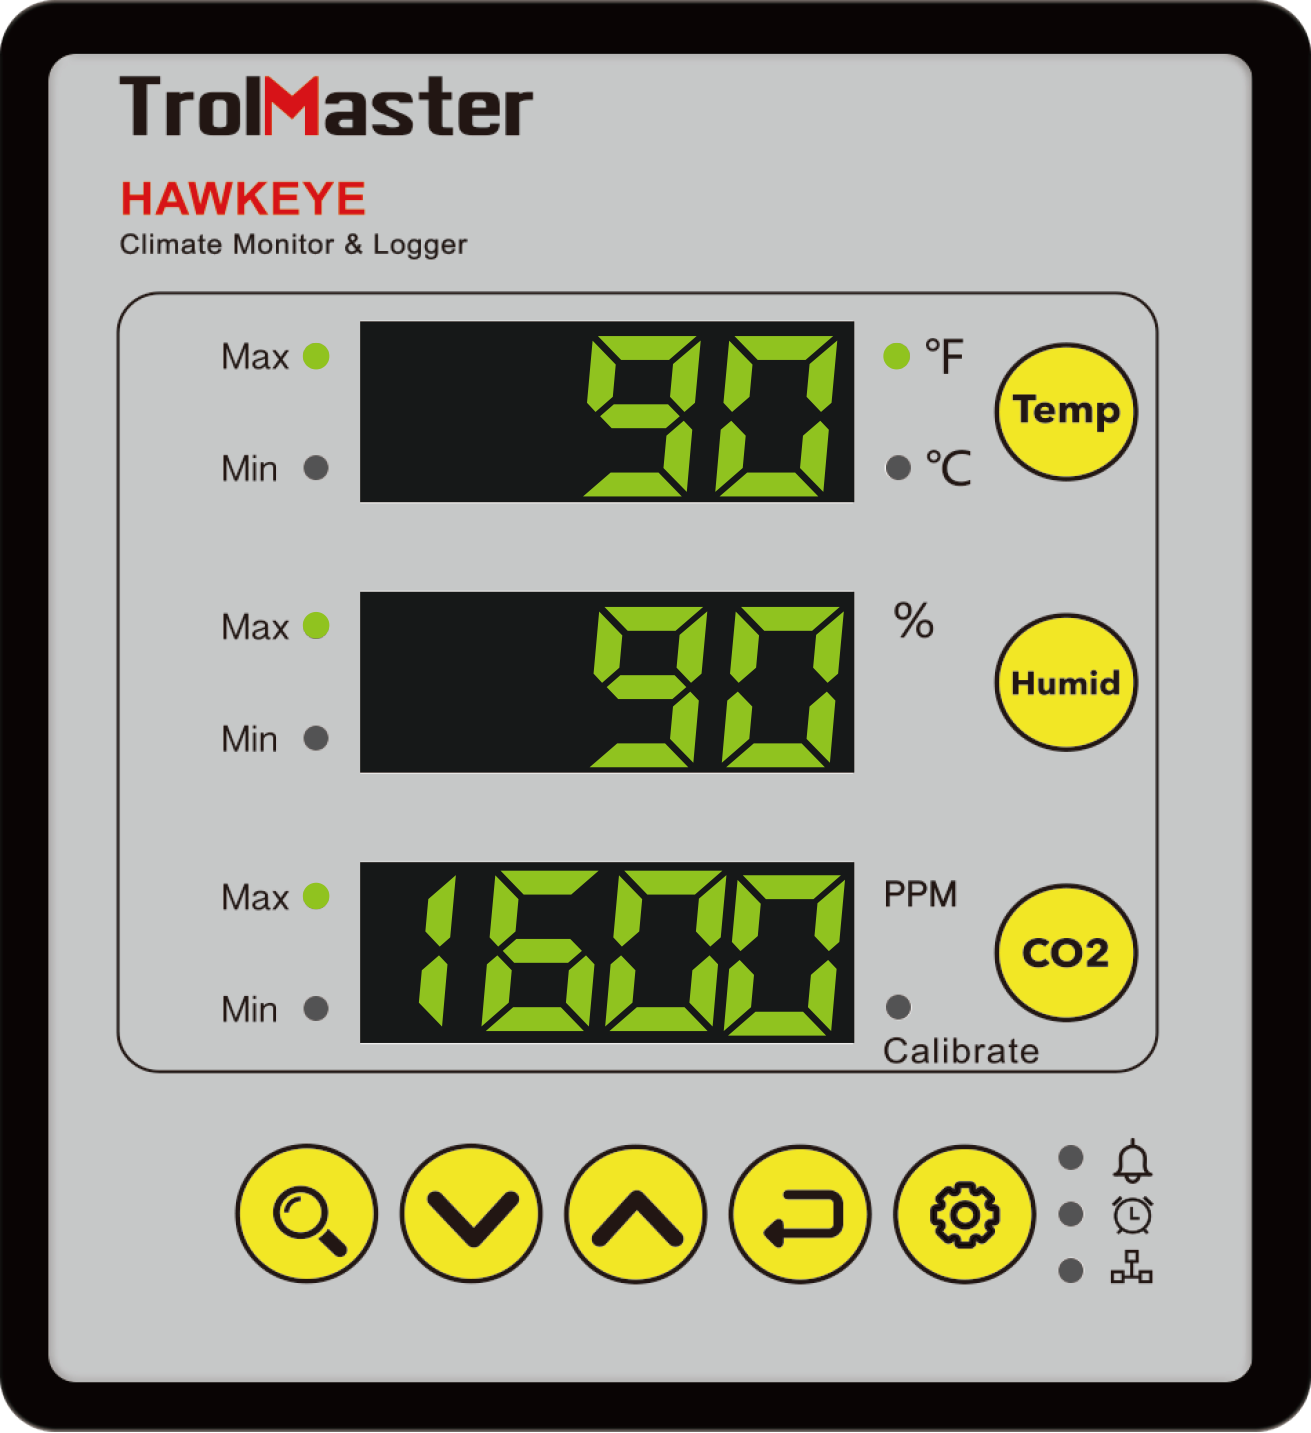
The front panel of the unit consists of three main LED screens for the display of temperature, humidity and CO2 PPM
status respectively. It is easy to monitor your grow room by setting the max/min setpoint of temperature, humidity
and CO2 your desired. The built-in alarm will ring when the actual measured value exceeds the setpoint range. Also,
it features a connection to the network to use our TrolMaster app for your Android, iOS smartphone or tablet, you
can monitor the enviorenment of your grow room anytime and anywhere and have warnings sent to your phone if the
growing environment exceeds your max/min setpoint. The three-in-one remote Sensor with 16 feet long cable is placed
in grow room to sense the growing enviroment while the HAWKEYE Monitor can be positioned outside for easy reading
and monitoring.

PRECAUTIONS
COMPONENTS
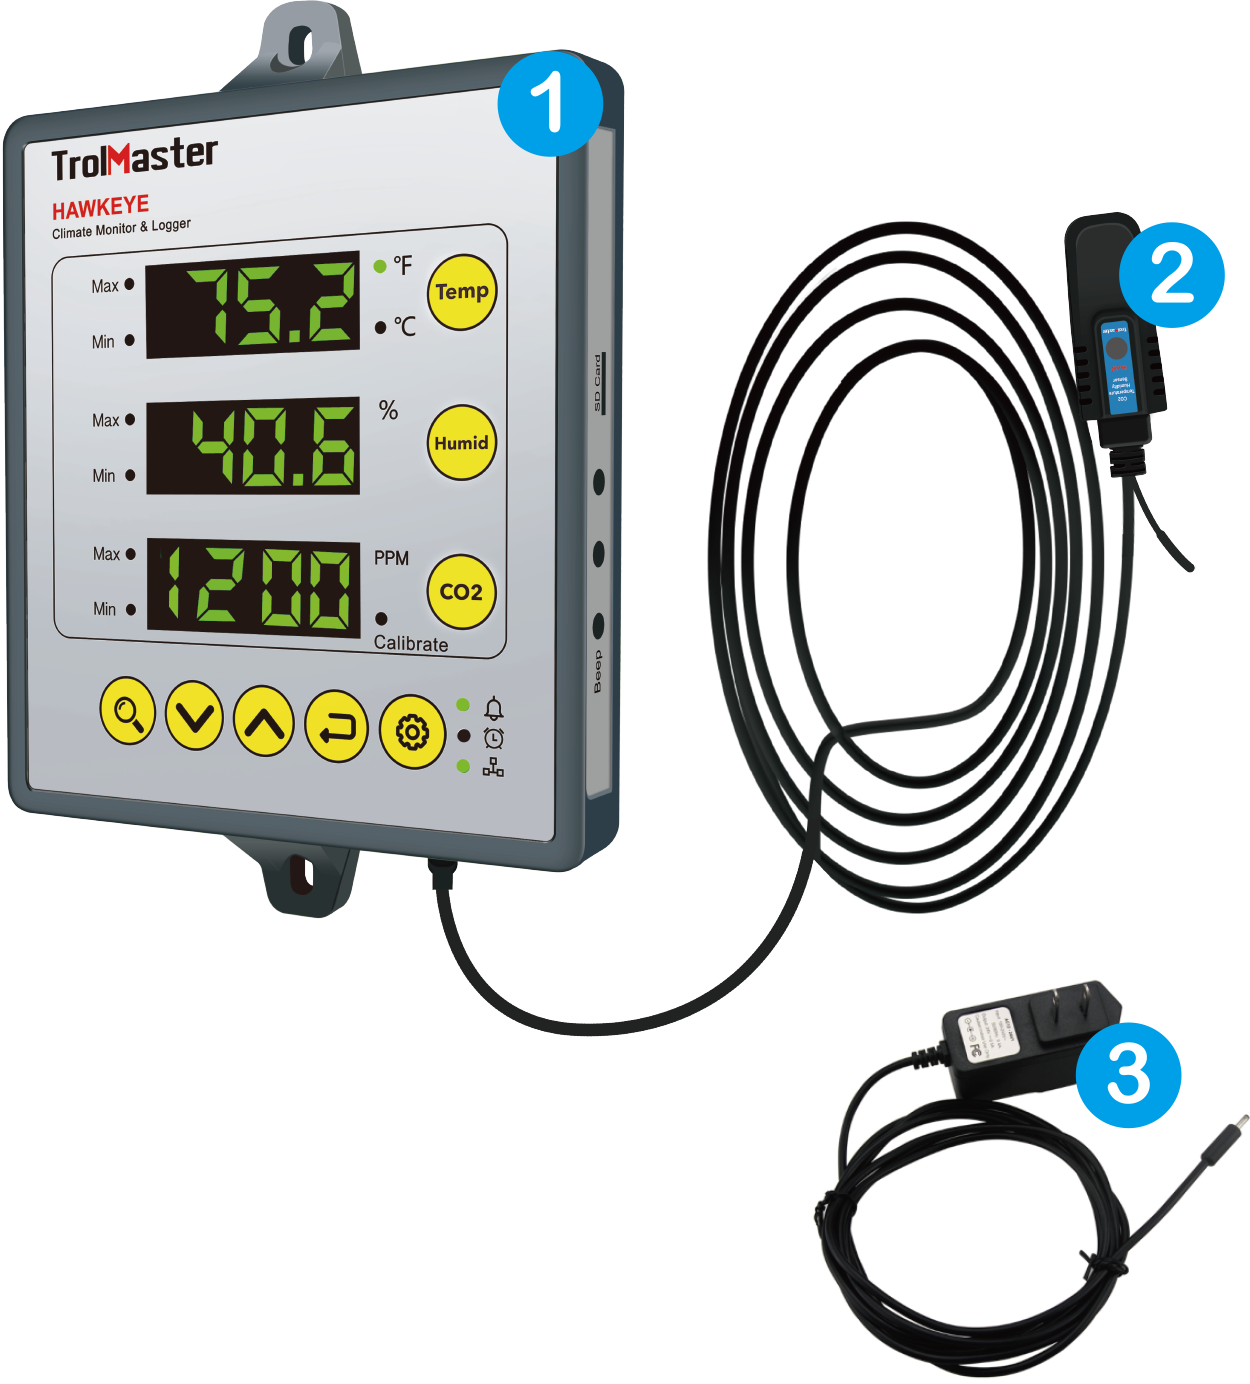
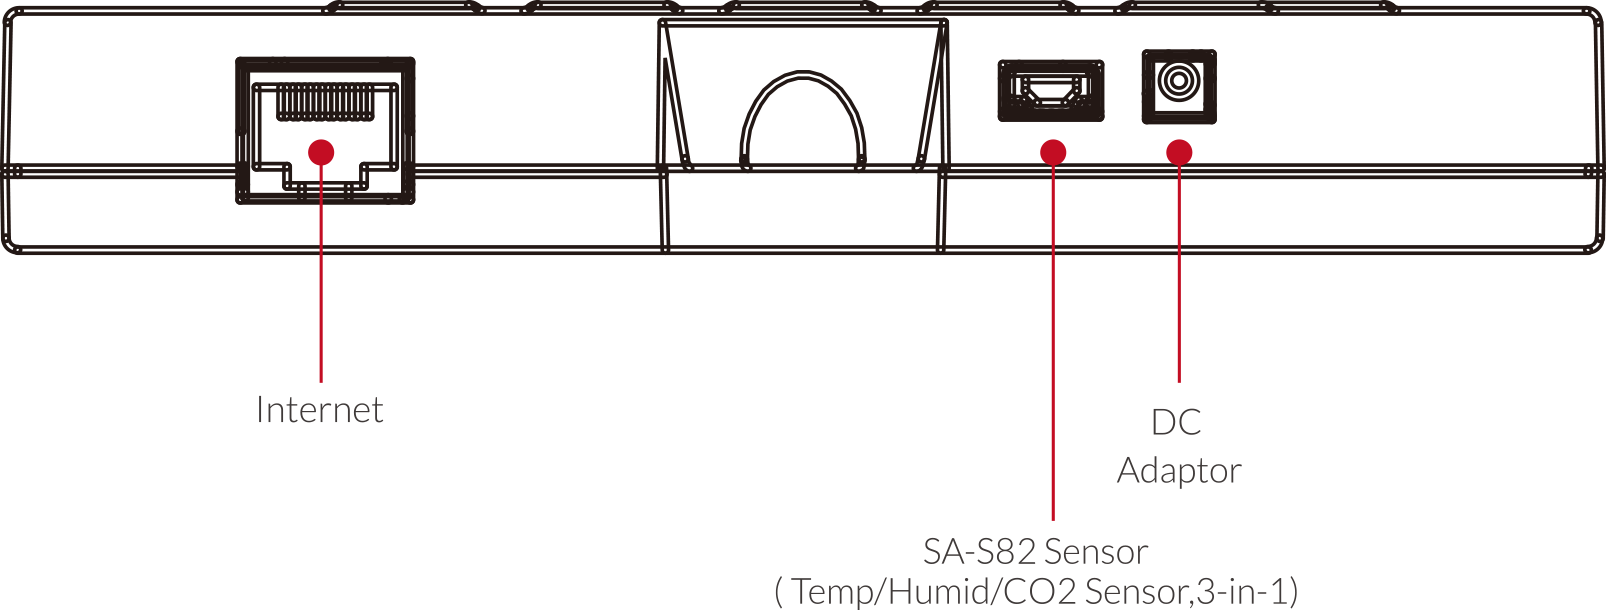
1. Climate Monitor & Logger
2. SA-S82 Sensor
3. DC Adaptor
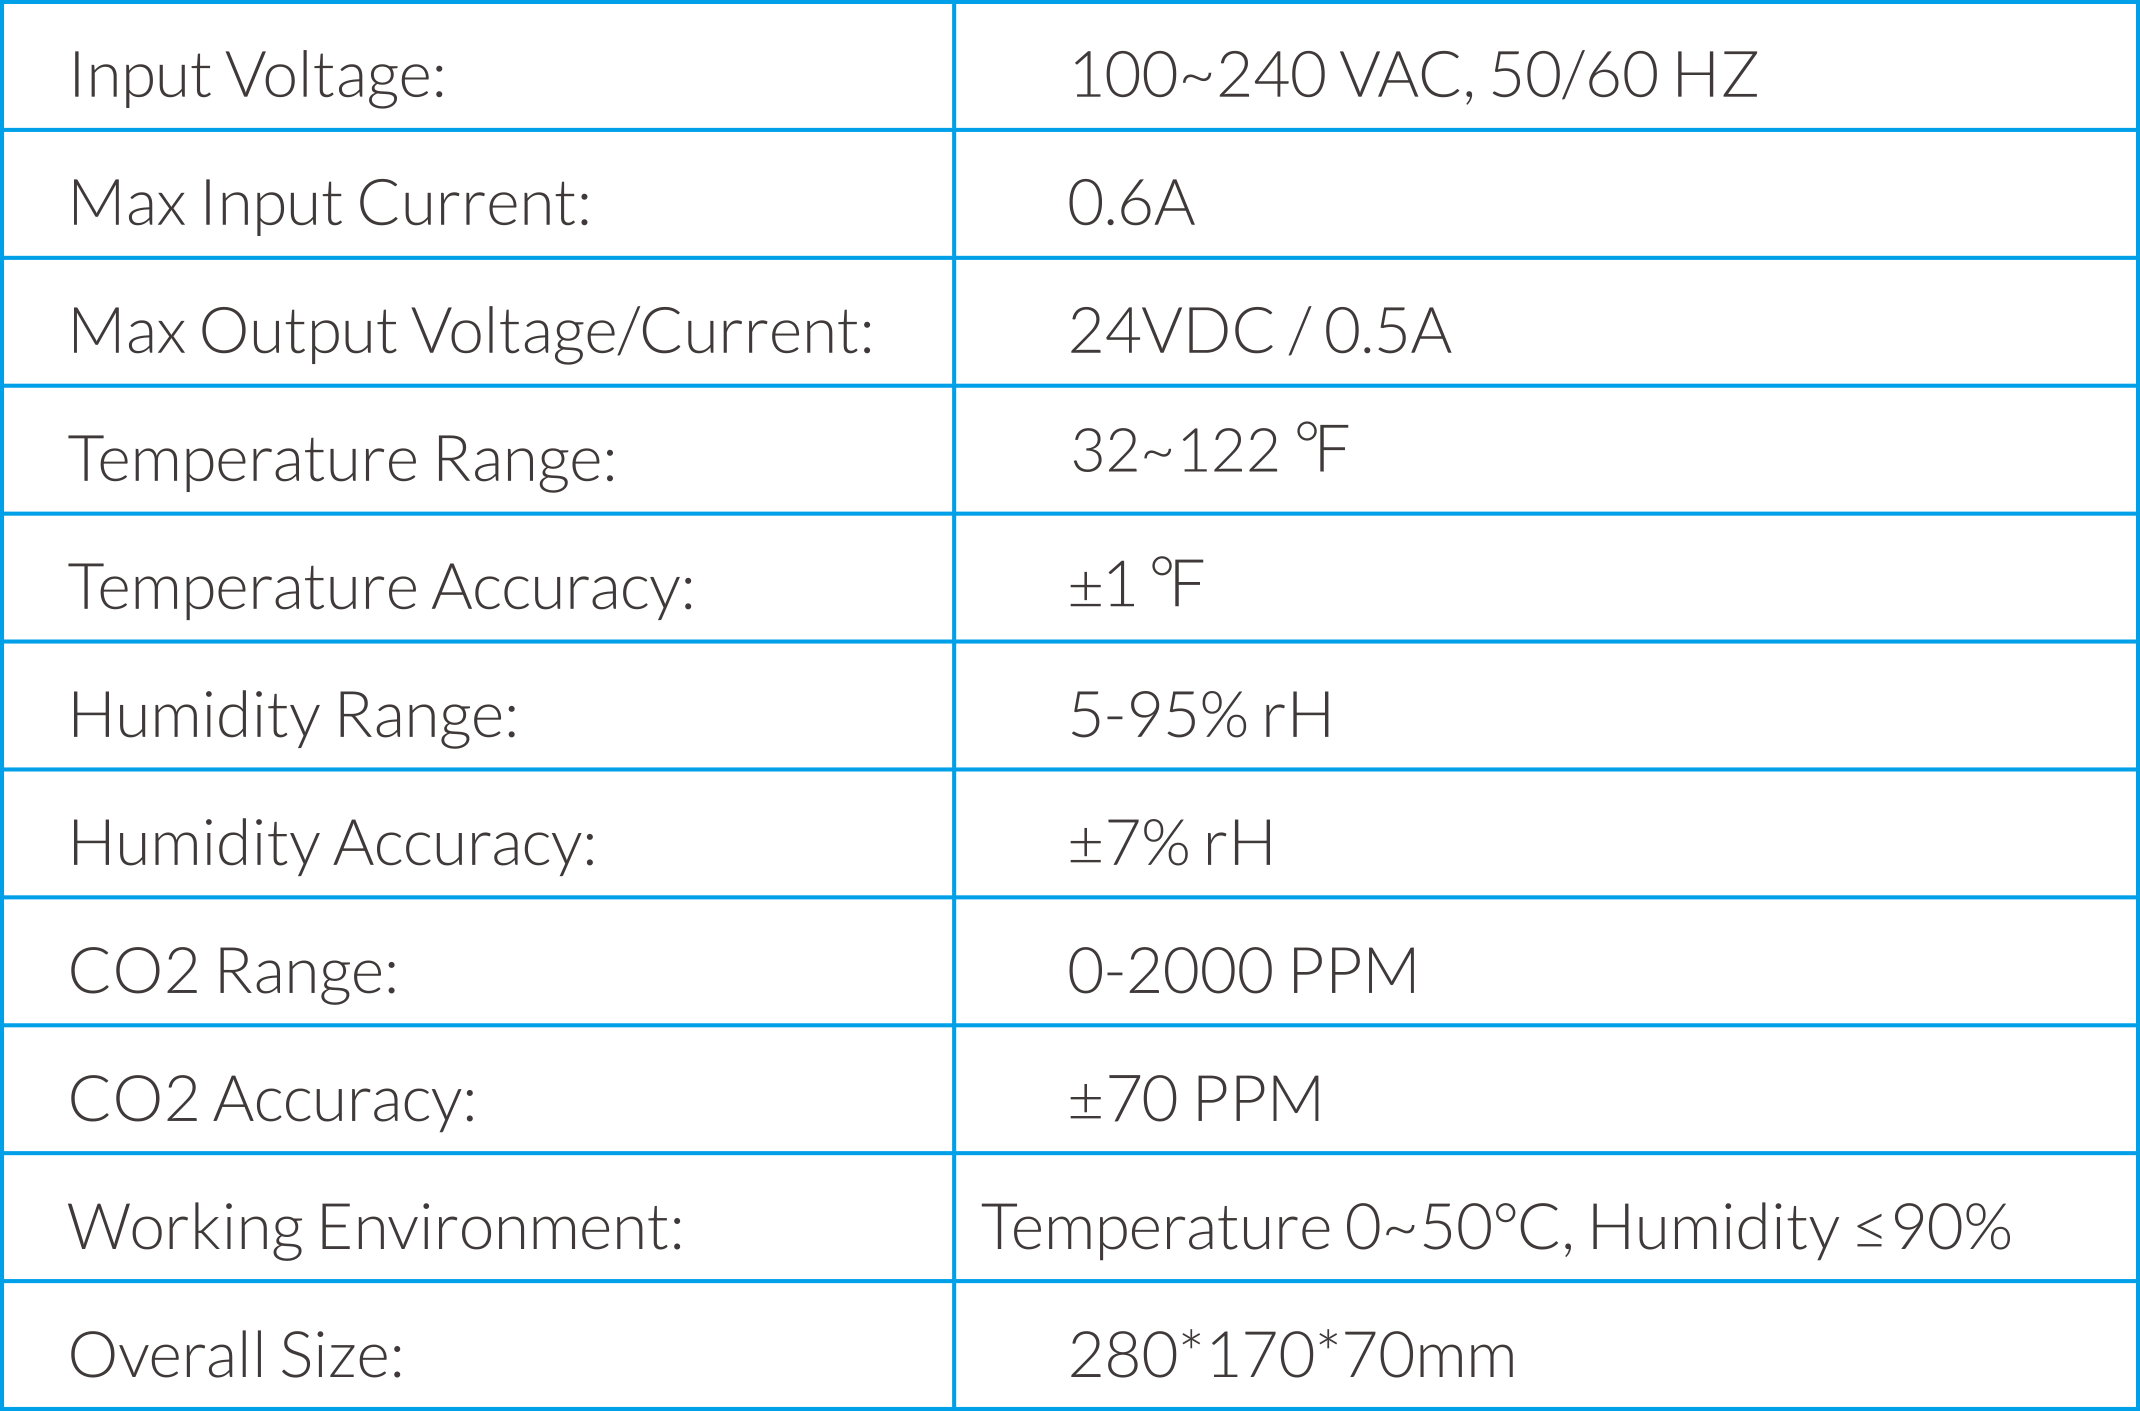
SPECIFICATIONS
START SETTING
TIME SETTINGS
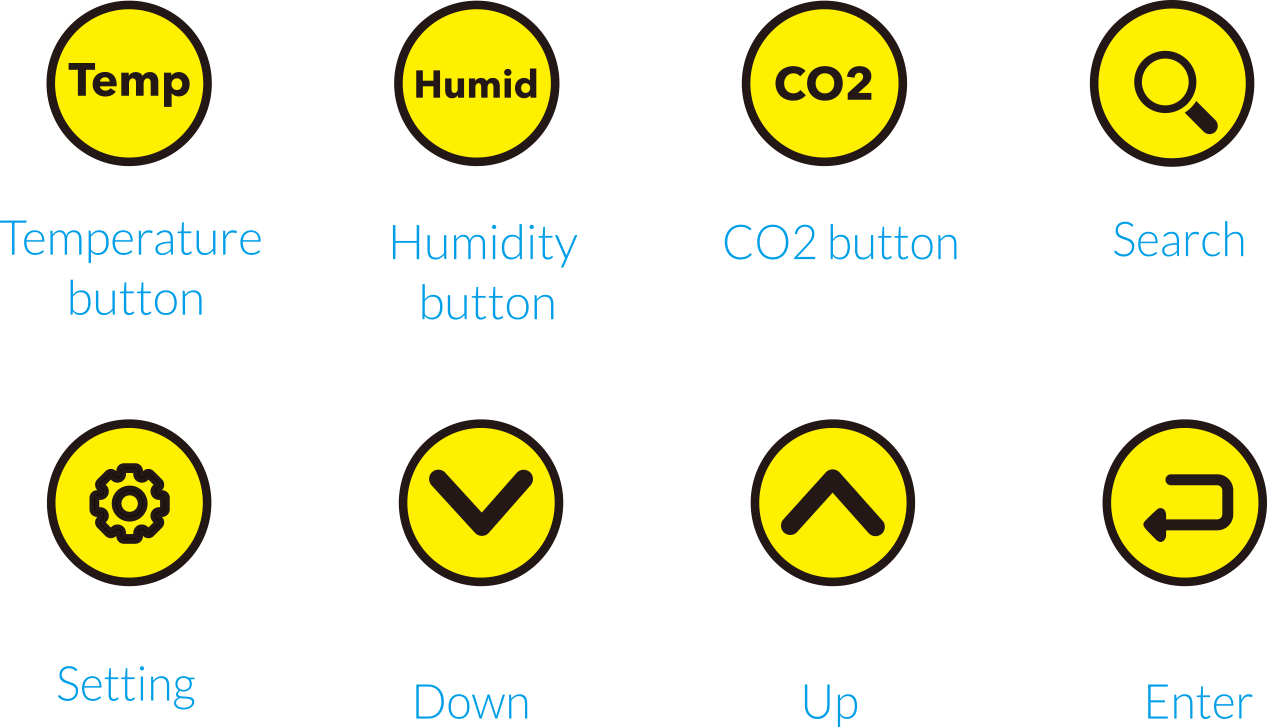
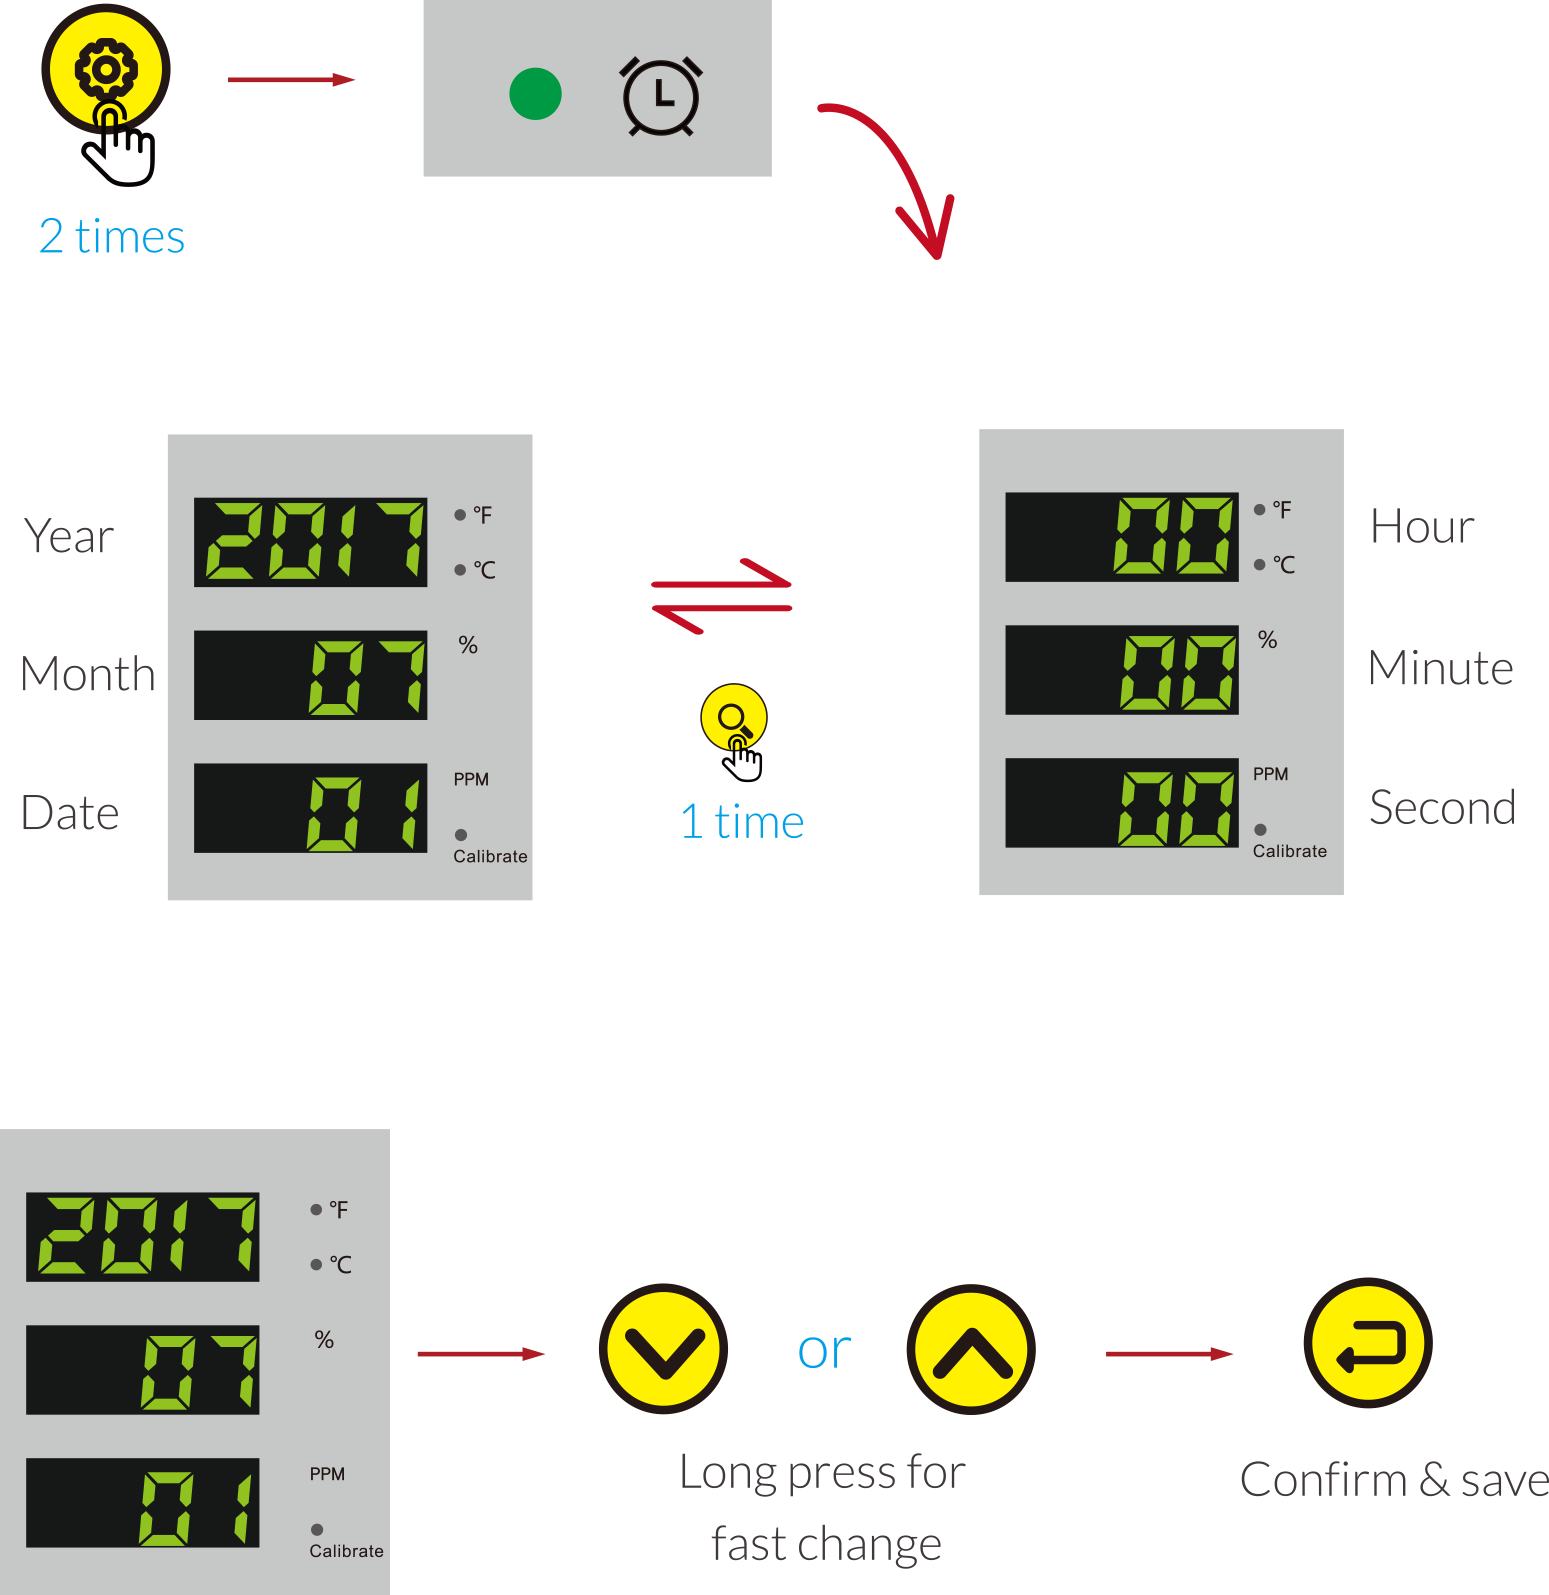
Press the Setting button  for two times, the Clock LED indicator
  will blink and the Temperature LED displays 2017 (Year), Humidity LED displays 07 (Month) and the CO2 LED displays
01 (Date). Press
the Search button
will blink and the Temperature LED displays 2017 (Year), Humidity LED displays 07 (Month) and the CO2 LED displays
01 (Date). Press
the Search button  for one time to convert into Hour-Minute-Second state. The Temperature LED displays 00 (Hour), Humidity LED
displays 00 (Minute) and the CO2 LED displays 00 (Second). Press the Search
button again and back to the
Year-Month-Date state. Press UP
for one time to convert into Hour-Minute-Second state. The Temperature LED displays 00 (Hour), Humidity LED
displays 00 (Minute) and the CO2 LED displays 00 (Second). Press the Search
button again and back to the
Year-Month-Date state. Press UP  or DOWN
  , the YEAR
  in the Temperature LED will be flashing. Press again UP or DOWN for year change. Long press for faster
change. Finally, press ENTER button
in the Temperature LED will be flashing. Press again UP or DOWN for year change. Long press for faster
change. Finally, press ENTER button  for save. Then the MONTH digits in the Humid LED will be flashing. Press UP
or DOWN to adjust the value. Press ENTER
for save. Same method to adjust the Date and Time adjustment.
for save. Then the MONTH digits in the Humid LED will be flashing. Press UP
or DOWN to adjust the value. Press ENTER
for save. Same method to adjust the Date and Time adjustment.
for two times, the Clock LED indicator
will blink and the Temperature LED displays 2017 (Year), Humidity LED displays 07 (Month) and the CO2 LED displays
01 (Date). Press
the Search button
for one time to convert into Hour-Minute-Second state. The Temperature LED displays 00 (Hour), Humidity LED
displays 00 (Minute) and the CO2 LED displays 00 (Second). Press the Search
button again and back to the
Year-Month-Date state. Press UP or DOWN , the YEAR
in the Temperature LED will be flashing. Press again UP or DOWN for year change. Long press for faster
change. Finally, press ENTER button
for save. Then the MONTH digits in the Humid LED will be flashing. Press UP
or DOWN to adjust the value. Press ENTER
for save. Same method to adjust the Date and Time adjustment.

READING MAX/MIN VALUE
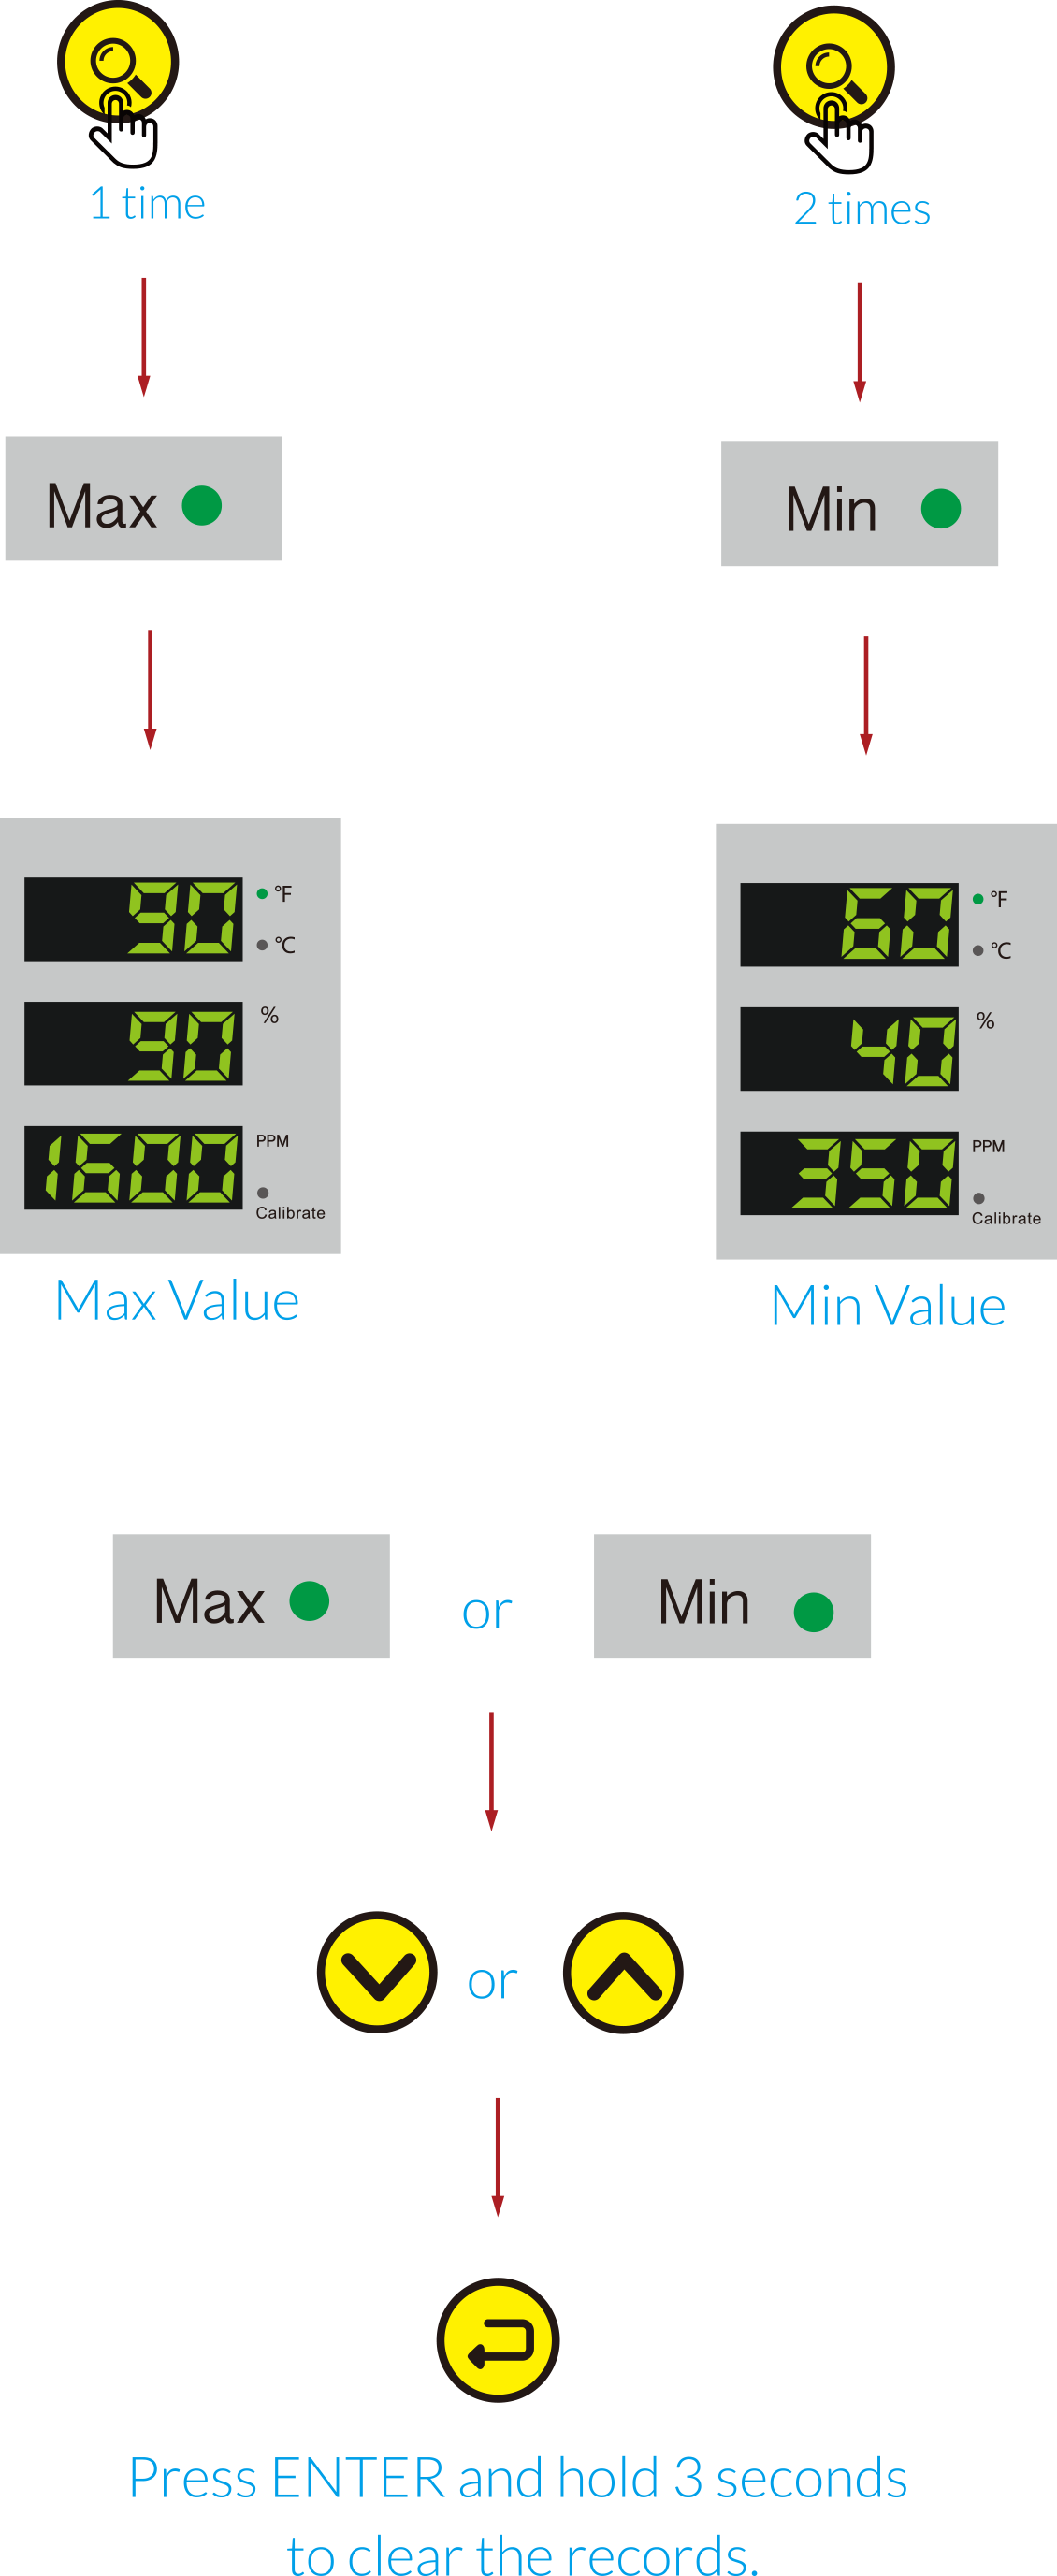
Press for one time, all Max LED
indicators  will be flashing. All
LED screens will display the
recorded maximum value. Press for
two times, all Min LED indicators
will be flashing. All
LED screens will display the
recorded maximum value. Press for
two times, all Min LED indicators  will
be flashing. All LED screen will display the recorded minimum value. While in the Max or Min status, press UP
or DOWN
to enter the clear record function. All LED screens will be flashing, press ENTER
button and hold 3 seconds to clear
the records.
will
be flashing. All LED screen will display the recorded minimum value. While in the Max or Min status, press UP
or DOWN
to enter the clear record function. All LED screens will be flashing, press ENTER
button and hold 3 seconds to clear
the records.
for one time, all Max LED
indicators will be flashing. All
LED screens will display the
recorded maximum value. Press for
two times, all Min LED indicators will
be flashing. All LED screen will display the recorded minimum value. While in the Max or Min status, press UP
or DOWN
to enter the clear record function. All LED screens will be flashing, press ENTER
button and hold 3 seconds to clear
the records.
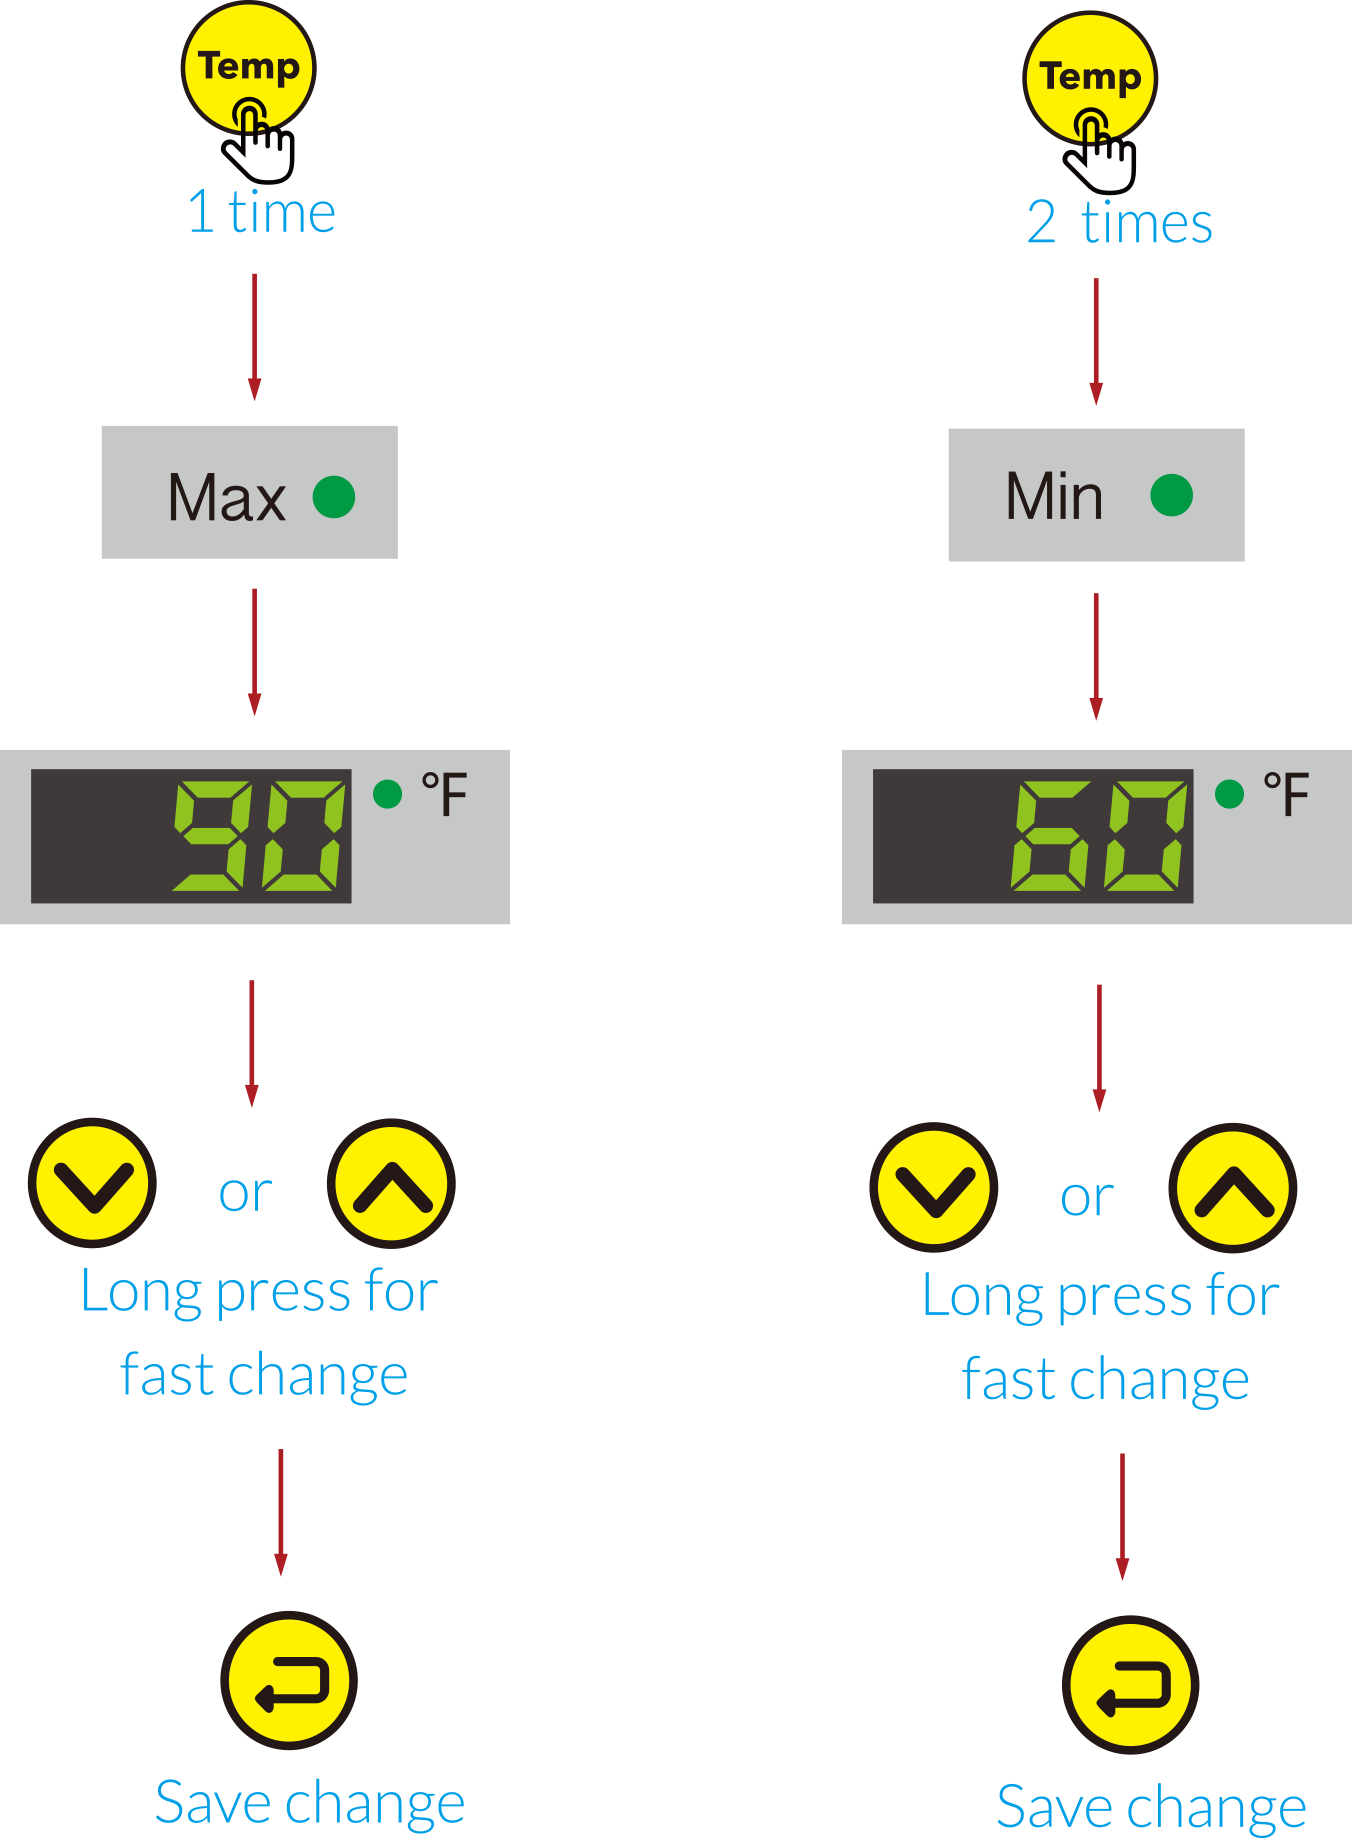
TEMP ALARM RANGE SETTINGS
Press the Temp button  for one time, the Max LED indicator
will blink. The LED displays the max value. Press UP or DOWN and the digits on the temperature
screen will be flashing. Press again UP or DOWN for temperature change. Long press
UP
or DOWN
for fast change. Press ENTER
for save and the LED display shows
the changed value. Press the Temp button for two times, the Min LED indicator will blink. The LED displays the min value. Press UP
or DOWN
and the digits on the temperature
screen will be flashing. Press again UP or DOWN for temperature change. Long press
UP
or DOWN
button for fast change. Press ENTER
for save and the LED display shows
the changed value.
for one time, the Max LED indicator
will blink. The LED displays the max value. Press UP or DOWN and the digits on the temperature
screen will be flashing. Press again UP or DOWN for temperature change. Long press
UP
or DOWN
for fast change. Press ENTER
for save and the LED display shows
the changed value. Press the Temp button for two times, the Min LED indicator will blink. The LED displays the min value. Press UP
or DOWN
and the digits on the temperature
screen will be flashing. Press again UP or DOWN for temperature change. Long press
UP
or DOWN
button for fast change. Press ENTER
for save and the LED display shows
the changed value.
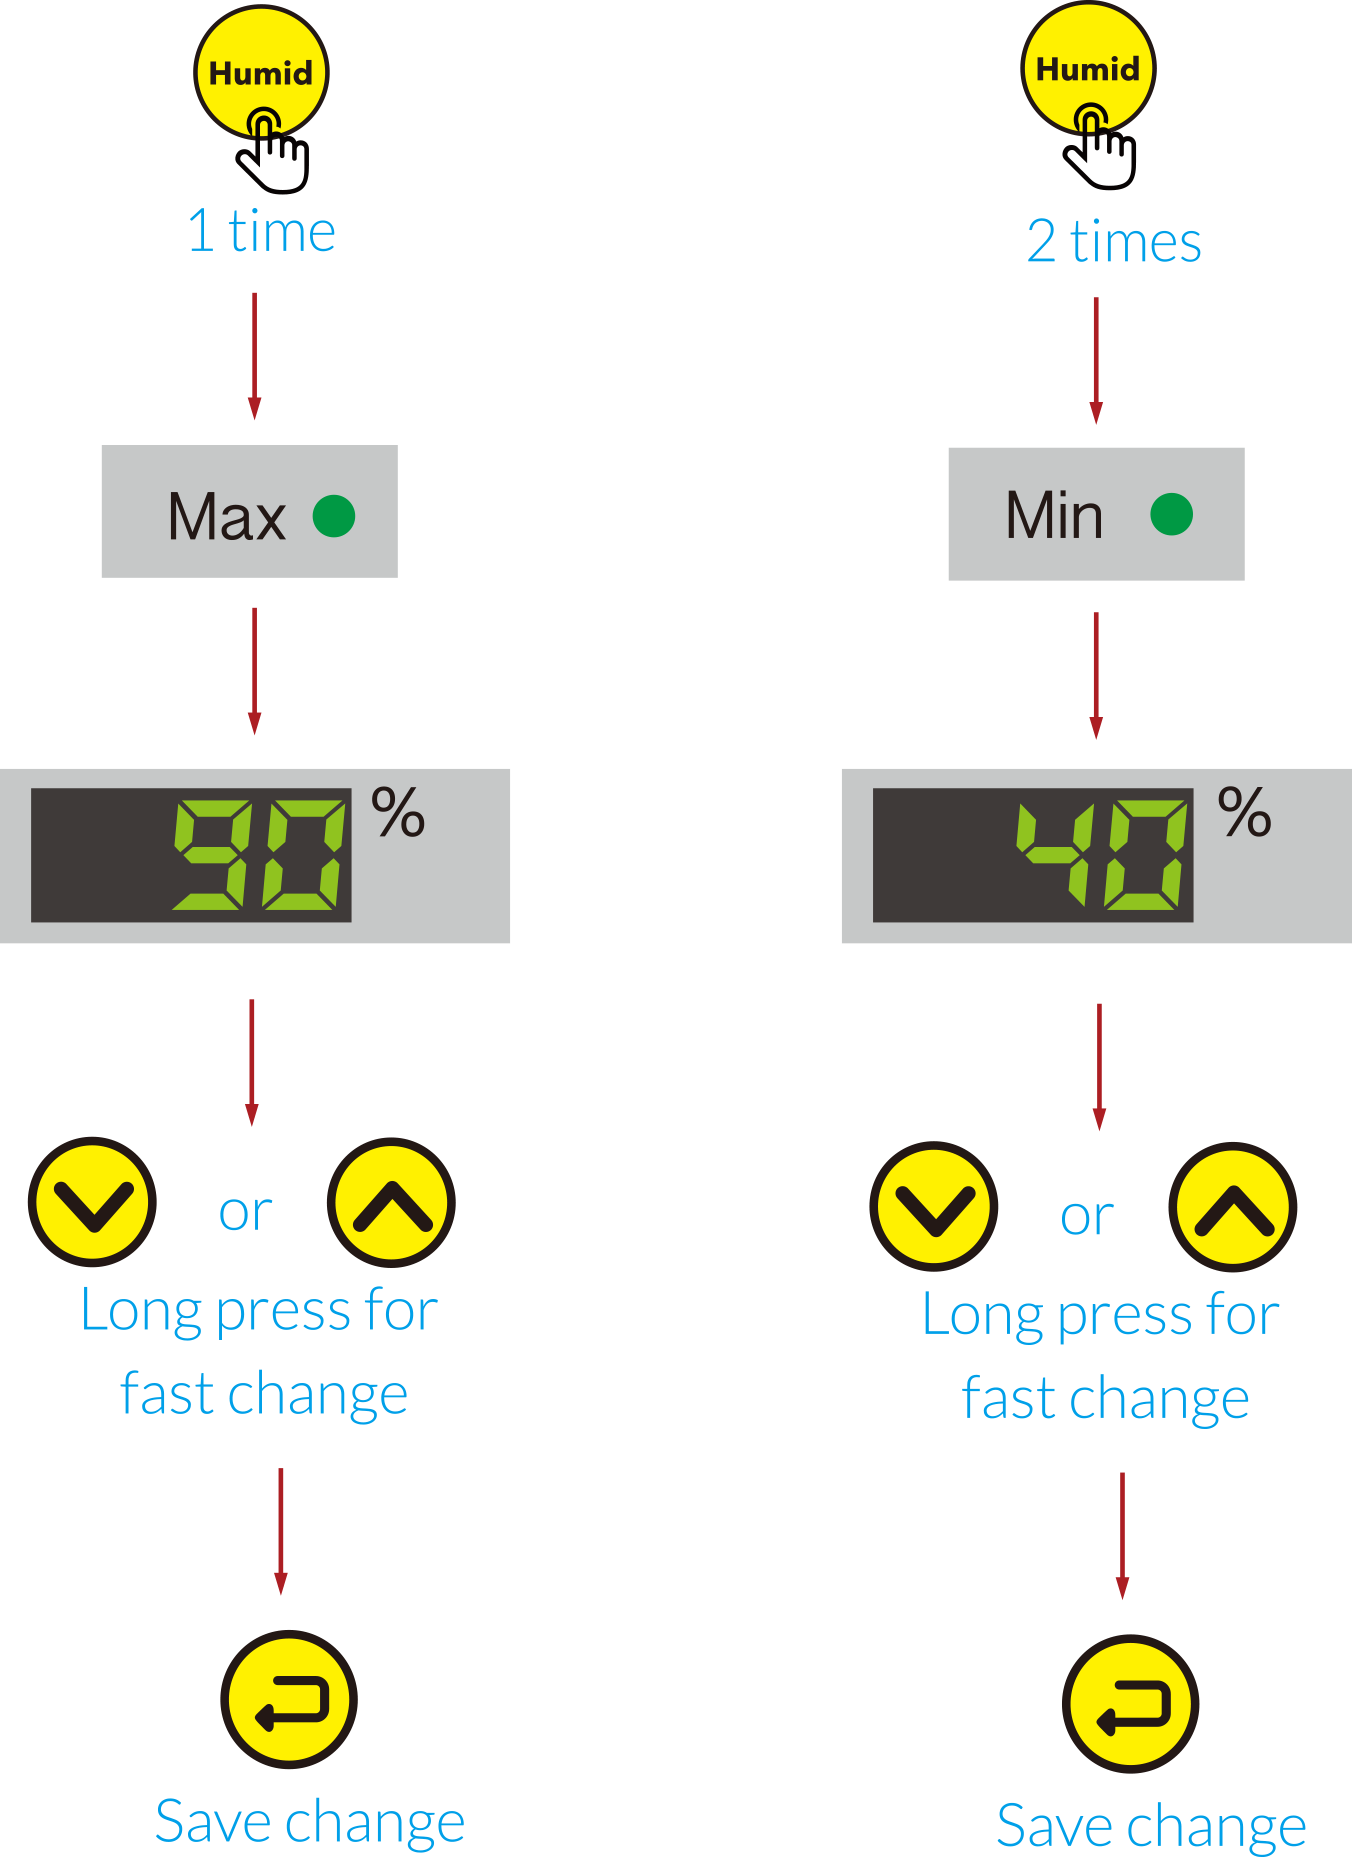
HUMIDITY ALARM RANGE SETTINGS
Press the Humid button  for one time, the Max LED indicator
will blink. The LED displays the max value. Press UP
or DOWN
and the digits on the humidity screen will be flashing. Press again UP
or DOWN
for humidity change. Long press UP
or DOWN
for fast change. Press ENTER
for save and the LED display shows
the changed value.
Press the Humid button
for two times, the Min LED indicator
will blink. The LED displays the min value. Press UP
or DOWN
and the digits on the temperature screen will be flashing. Press again UP
or DOWN
for temperature change. Long press UP
or DOWN
button for fast change. Press ENTER
for save and the LED display shows
the changed value.
for one time, the Max LED indicator
will blink. The LED displays the max value. Press UP
or DOWN
and the digits on the humidity screen will be flashing. Press again UP
or DOWN
for humidity change. Long press UP
or DOWN
for fast change. Press ENTER
for save and the LED display shows
the changed value.
Press the Humid button
for two times, the Min LED indicator
will blink. The LED displays the min value. Press UP
or DOWN
and the digits on the temperature screen will be flashing. Press again UP
or DOWN
for temperature change. Long press UP
or DOWN
button for fast change. Press ENTER
for save and the LED display shows
the changed value.
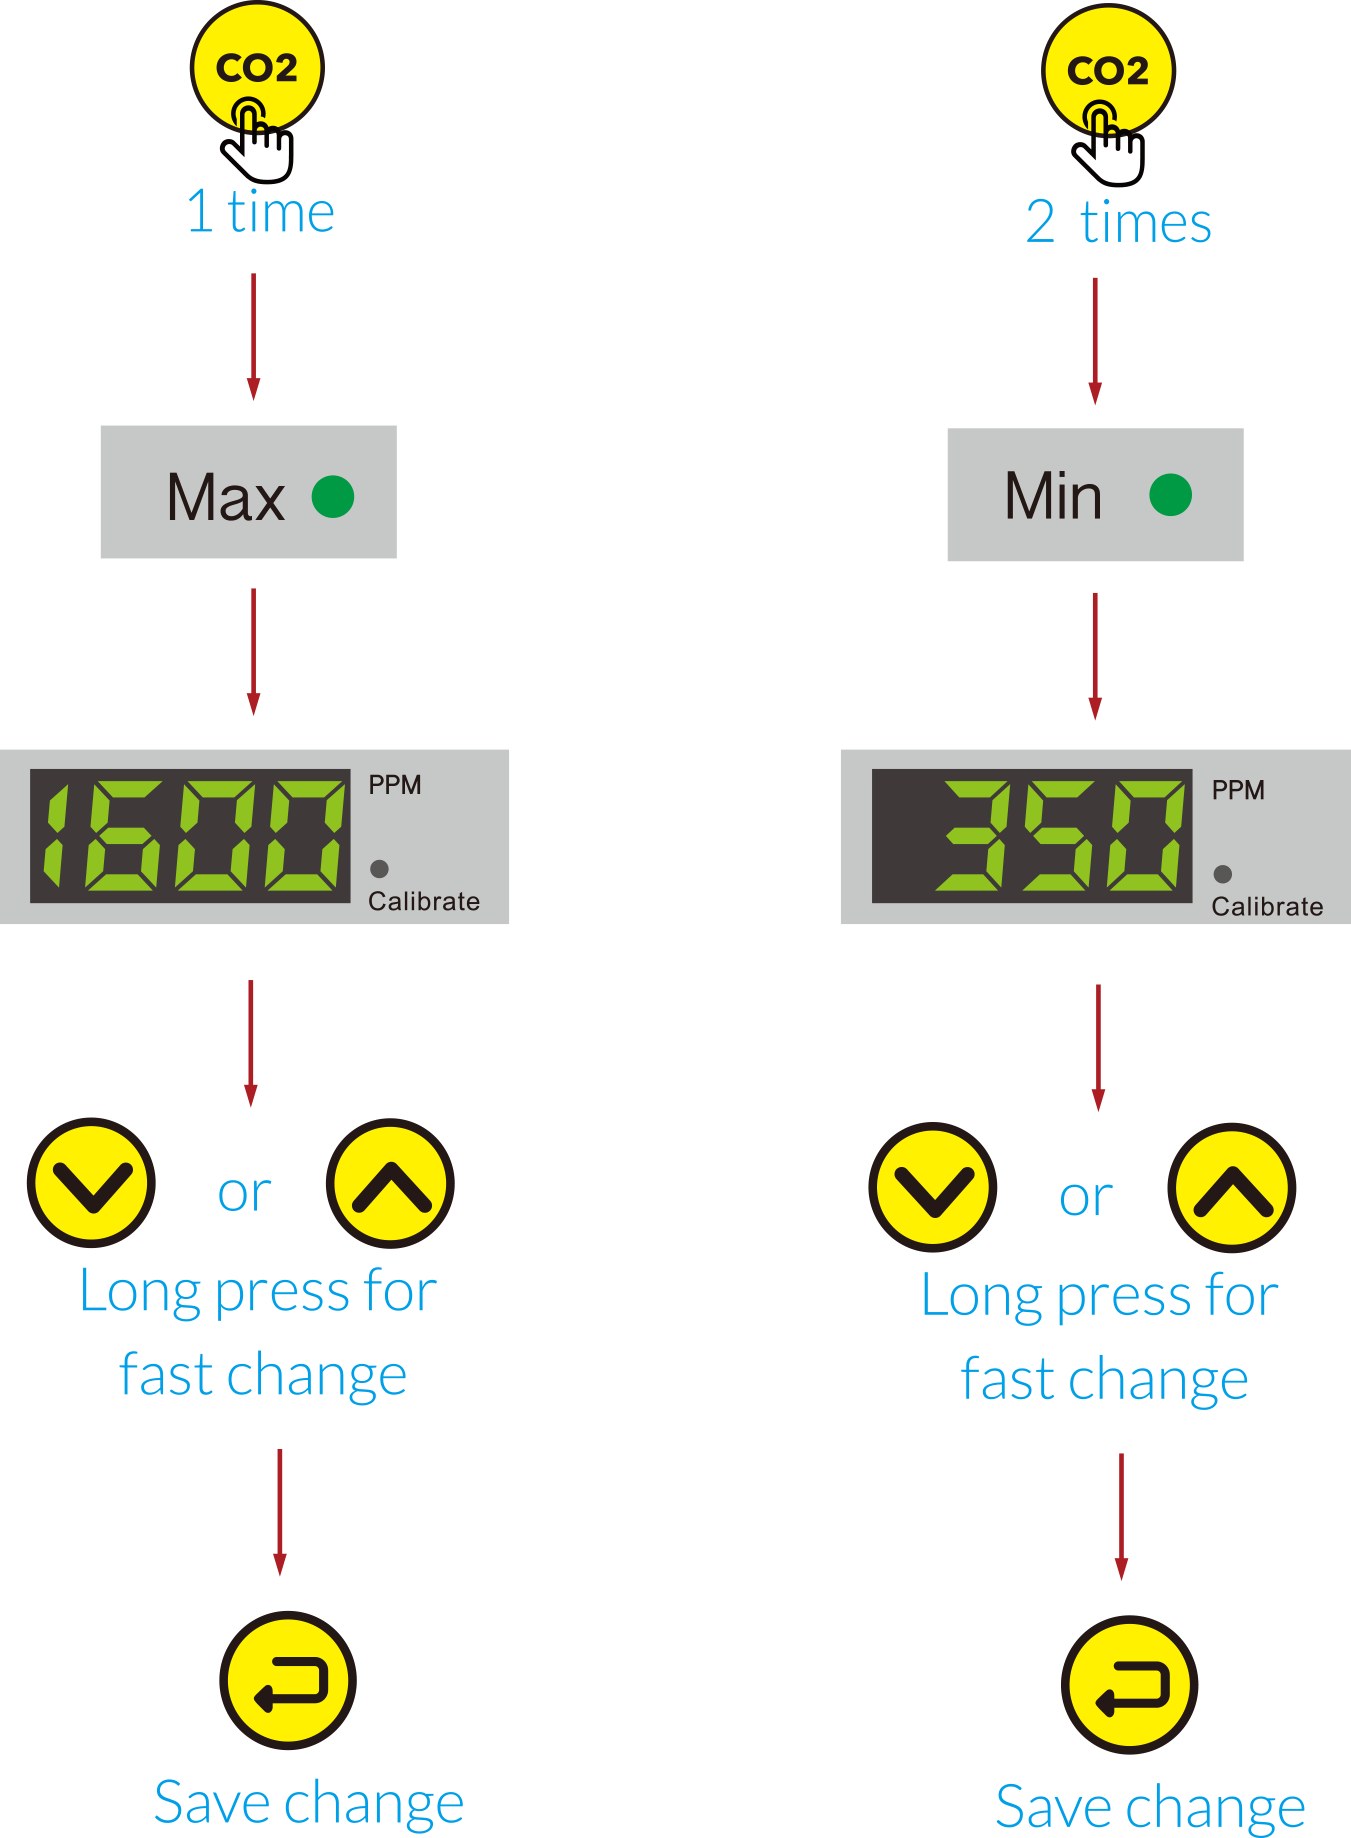
CO2 ALARM RANGE SETTINGS
Press the CO2 button  for one time, the Max LED indicator
  will blink. The LED displays the max value. Press UP
or DOWN
and the digits on the CO2 screen will be flashing. Press again UP
or DOWN
for CO2 PPM change. Long press UP
or DOWN
for fast change. Press Enter
for save and the LED displays shows the
canged value.
Press the CO2 button
for two times, the MIN indicator
will blink. The LED displays the max value. Press UP
or DOWN
and the digits on the CO2 screen will be flashing. Press again UP
or DOWN
for CO2 PPM change. Long press UP
or DOWN
for fast change. Press Enter
for save and the LED displays shows the
canged value.
Press the CO2 button
for two times, the MIN indicator  will
blink. The LED displays the min value. Press UP UP
or DOWN
and the digits on the CO2 screen will be flashing. Press again UP
or DOWN
for CO2 PPM change. Long press UP
or DOWN
button for fast change. Press Enter
for save and the LED display shows the
changed value.
will
blink. The LED displays the min value. Press UP UP
or DOWN
and the digits on the CO2 screen will be flashing. Press again UP
or DOWN
for CO2 PPM change. Long press UP
or DOWN
button for fast change. Press Enter
for save and the LED display shows the
changed value.
for one time, the Max LED indicator
will blink. The LED displays the max value. Press UP
or DOWN
and the digits on the CO2 screen will be flashing. Press again UP
or DOWN
for CO2 PPM change. Long press UP
or DOWN
for fast change. Press Enter
for save and the LED displays shows the
canged value.
Press the CO2 button
for two times, the MIN indicator will
blink. The LED displays the min value. Press UP UP
or DOWN
and the digits on the CO2 screen will be flashing. Press again UP
or DOWN
for CO2 PPM change. Long press UP
or DOWN
button for fast change. Press Enter
for save and the LED display shows the
changed value.
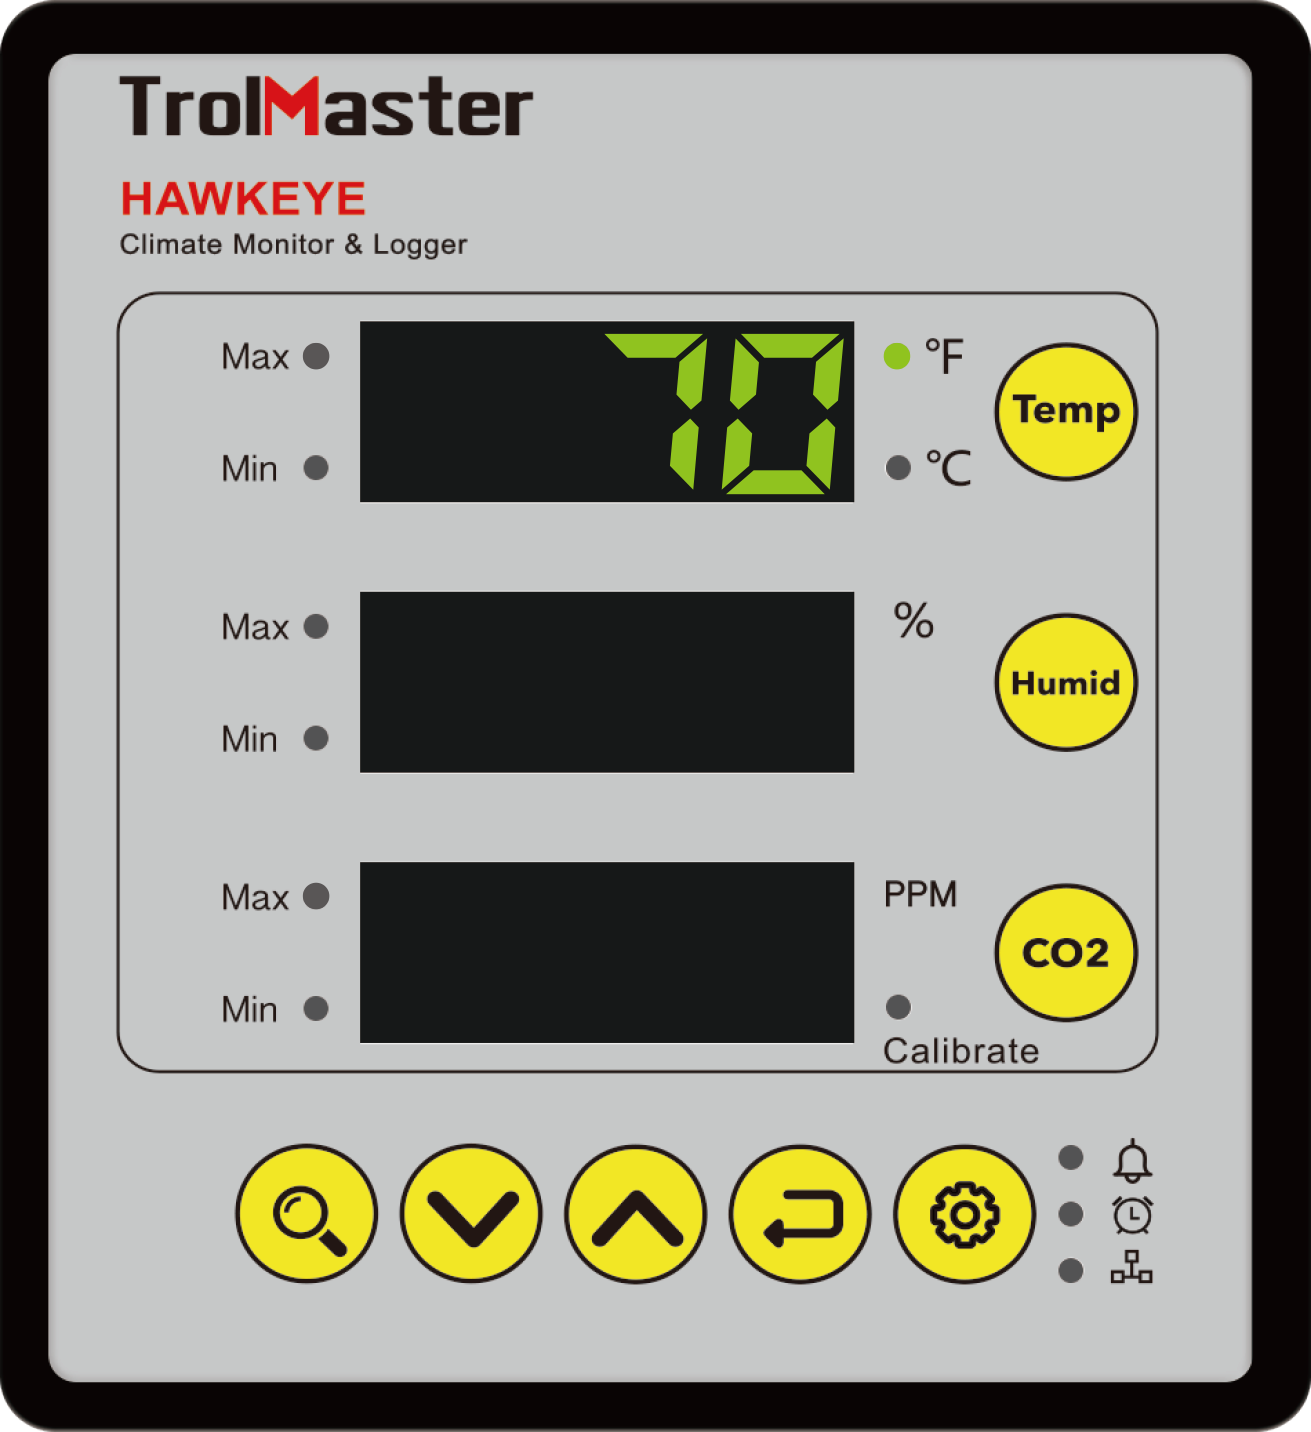
FAHRENEIT & CELSIUS CONVERSION
Fahrenheit & Celsius conversion
Factory default is based on Fahrenheit 0F and the LED indicator  turns on. Press Temp button
for three times, the LED indicator
will be flashing, press UP
or DOWN
for Fahrenheit and Celsius conversion. The Celsius LED indicator
turns on. Press Temp button
for three times, the LED indicator
will be flashing, press UP
or DOWN
for Fahrenheit and Celsius conversion. The Celsius LED indicator  will be flashing the temperature unit will be
chnaged into Celsius Press Enter
button within 5 seconds for confirmation and save.
will be flashing the temperature unit will be
chnaged into Celsius Press Enter
button within 5 seconds for confirmation and save.
turns on. Press Temp button
for three times, the LED indicator
will be flashing, press UP
or DOWN
for Fahrenheit and Celsius conversion. The Celsius LED indicator
will be flashing the temperature unit will be
chnaged into Celsius Press Enter
button within 5 seconds for confirmation and save.

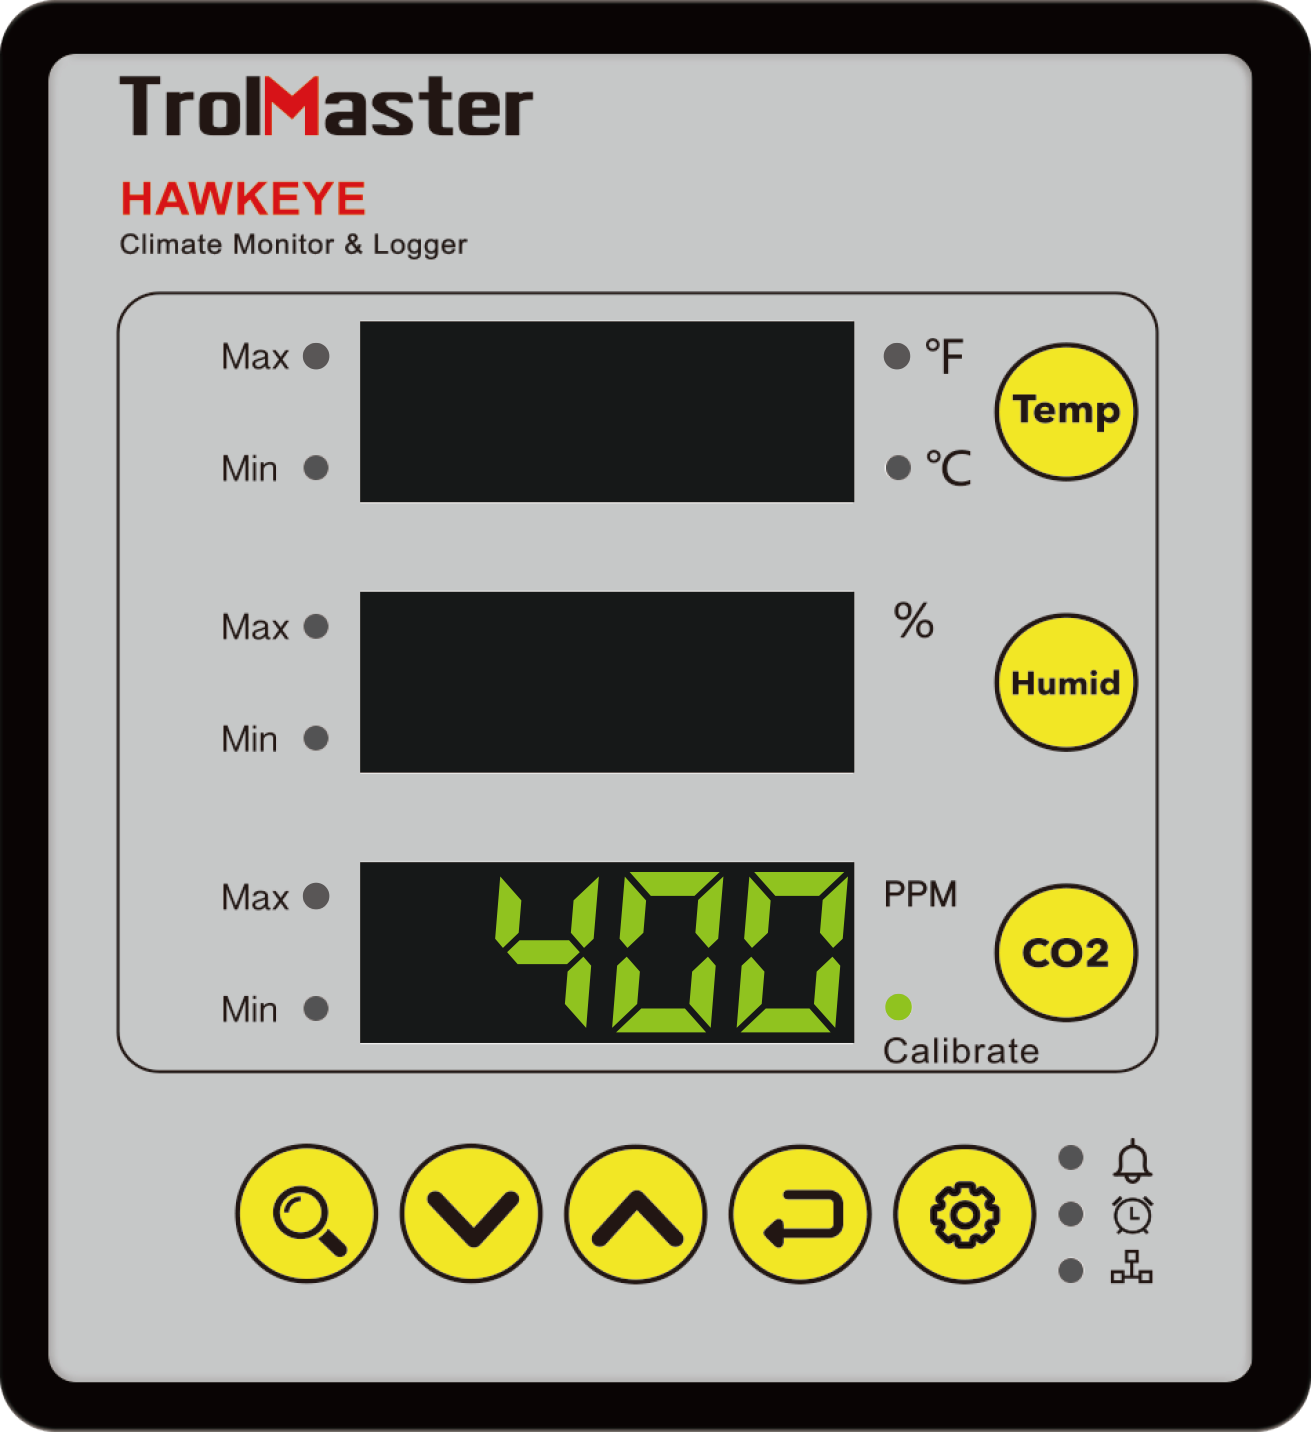
CO2 PPM CALIBRATION
Press CO2 button for three times, the Calibrate LED indicator  turns on and the LED will display 400. Press UP
or DOWN
, the digits 400 will be flashing at the same time. Press UP or
DOWN to adjust the calibration level if you
have an accurate reference. Otherwise, the recommended level will be 400. Press Enter
button and the Calibrat LED
indicator will be flashing. The
calibration process begins and it takes 90 seconds. The first 60 seconds for
preheating and later 30 seconds for average. The LED will display the current value automatically after completion
of the calibration process. During the calibration, place the sensor in an open area. Far away from people, animals
and biogas etc
turns on and the LED will display 400. Press UP
or DOWN
, the digits 400 will be flashing at the same time. Press UP or
DOWN to adjust the calibration level if you
have an accurate reference. Otherwise, the recommended level will be 400. Press Enter
button and the Calibrat LED
indicator will be flashing. The
calibration process begins and it takes 90 seconds. The first 60 seconds for
preheating and later 30 seconds for average. The LED will display the current value automatically after completion
of the calibration process. During the calibration, place the sensor in an open area. Far away from people, animals
and biogas etc

ALARM SETTING
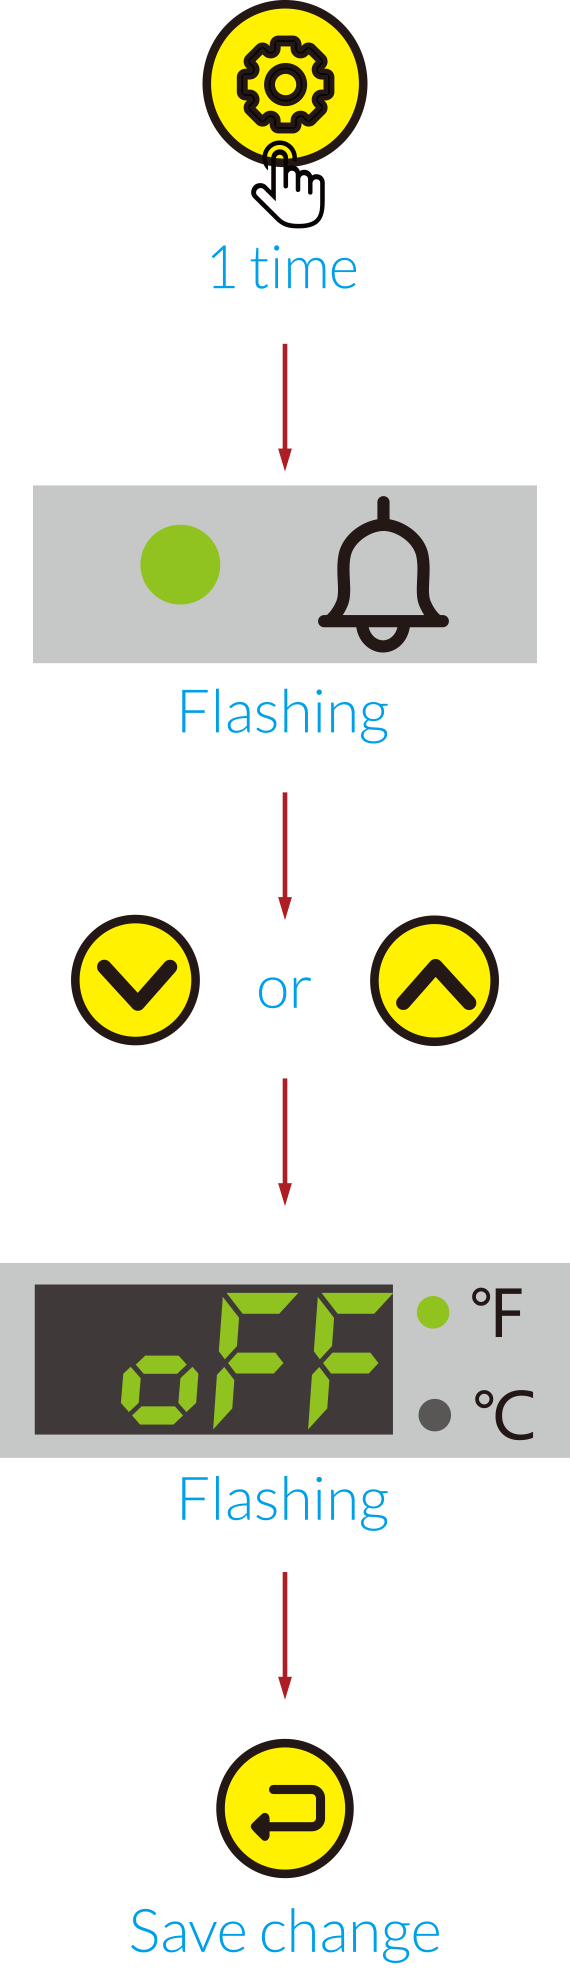
The factory default of the beeper is set to ON and the Alarm LED indicator  turns on. Press the Setting button
  for
one time, the Alarm LED indicator
will be flashing. The temperature LED displays ON while the humidity LED and CO2
LED will turn off. Press UP
or DOWN
, the temperature LED displays ON and flashing
for
one time, the Alarm LED indicator
will be flashing. The temperature LED displays ON while the humidity LED and CO2
LED will turn off. Press UP
or DOWN
, the temperature LED displays ON and flashing  . Press UP
or DOWN
the
temperature LED displays OFF and flashing
. Press UP
or DOWN
the
temperature LED displays OFF and flashing  . Press Enter
button to confirm and save the
change.
. Press Enter
button to confirm and save the
change.
turns on. Press the Setting button for
one time, the Alarm LED indicator
will be flashing. The temperature LED displays ON while the humidity LED and CO2
LED will turn off. Press UP
or DOWN
, the temperature LED displays ON and flashing
. Press UP
or DOWN
the
temperature LED displays OFF and flashing
. Press Enter
button to confirm and save the
change.
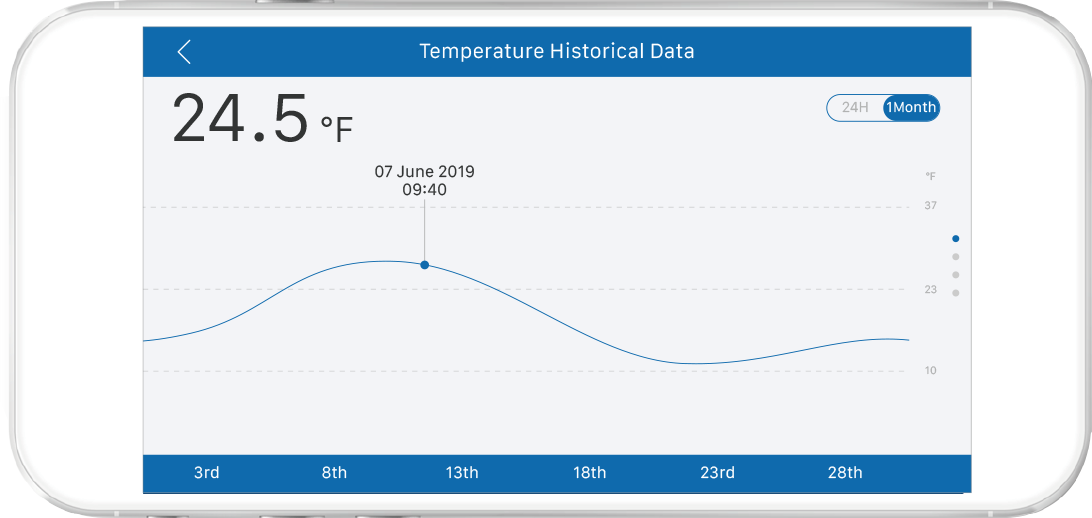
SMARTPHONE APP CONTROL
Download app to remotely monitor the temperature,humidity and CO2 levels and review all the
historical data and chart.
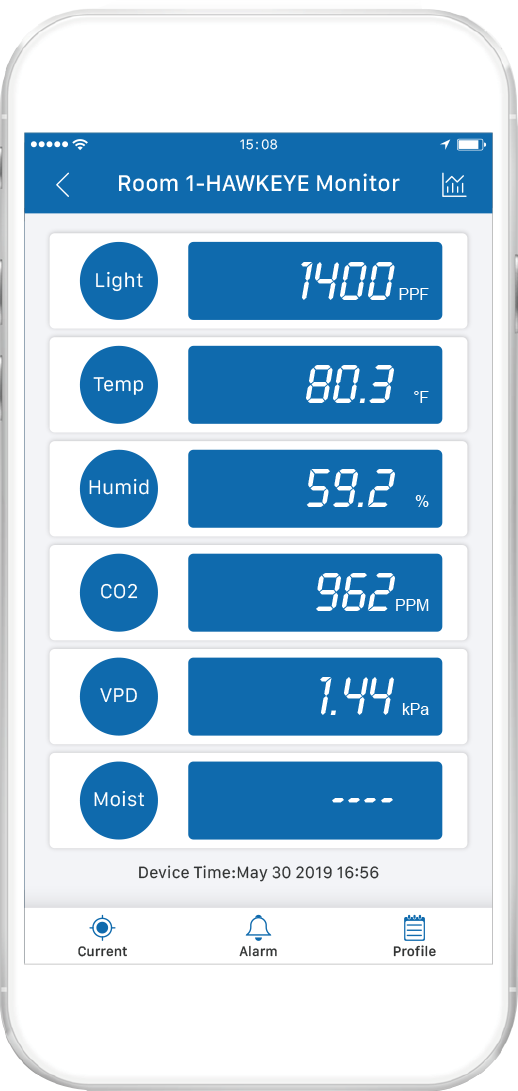
APP
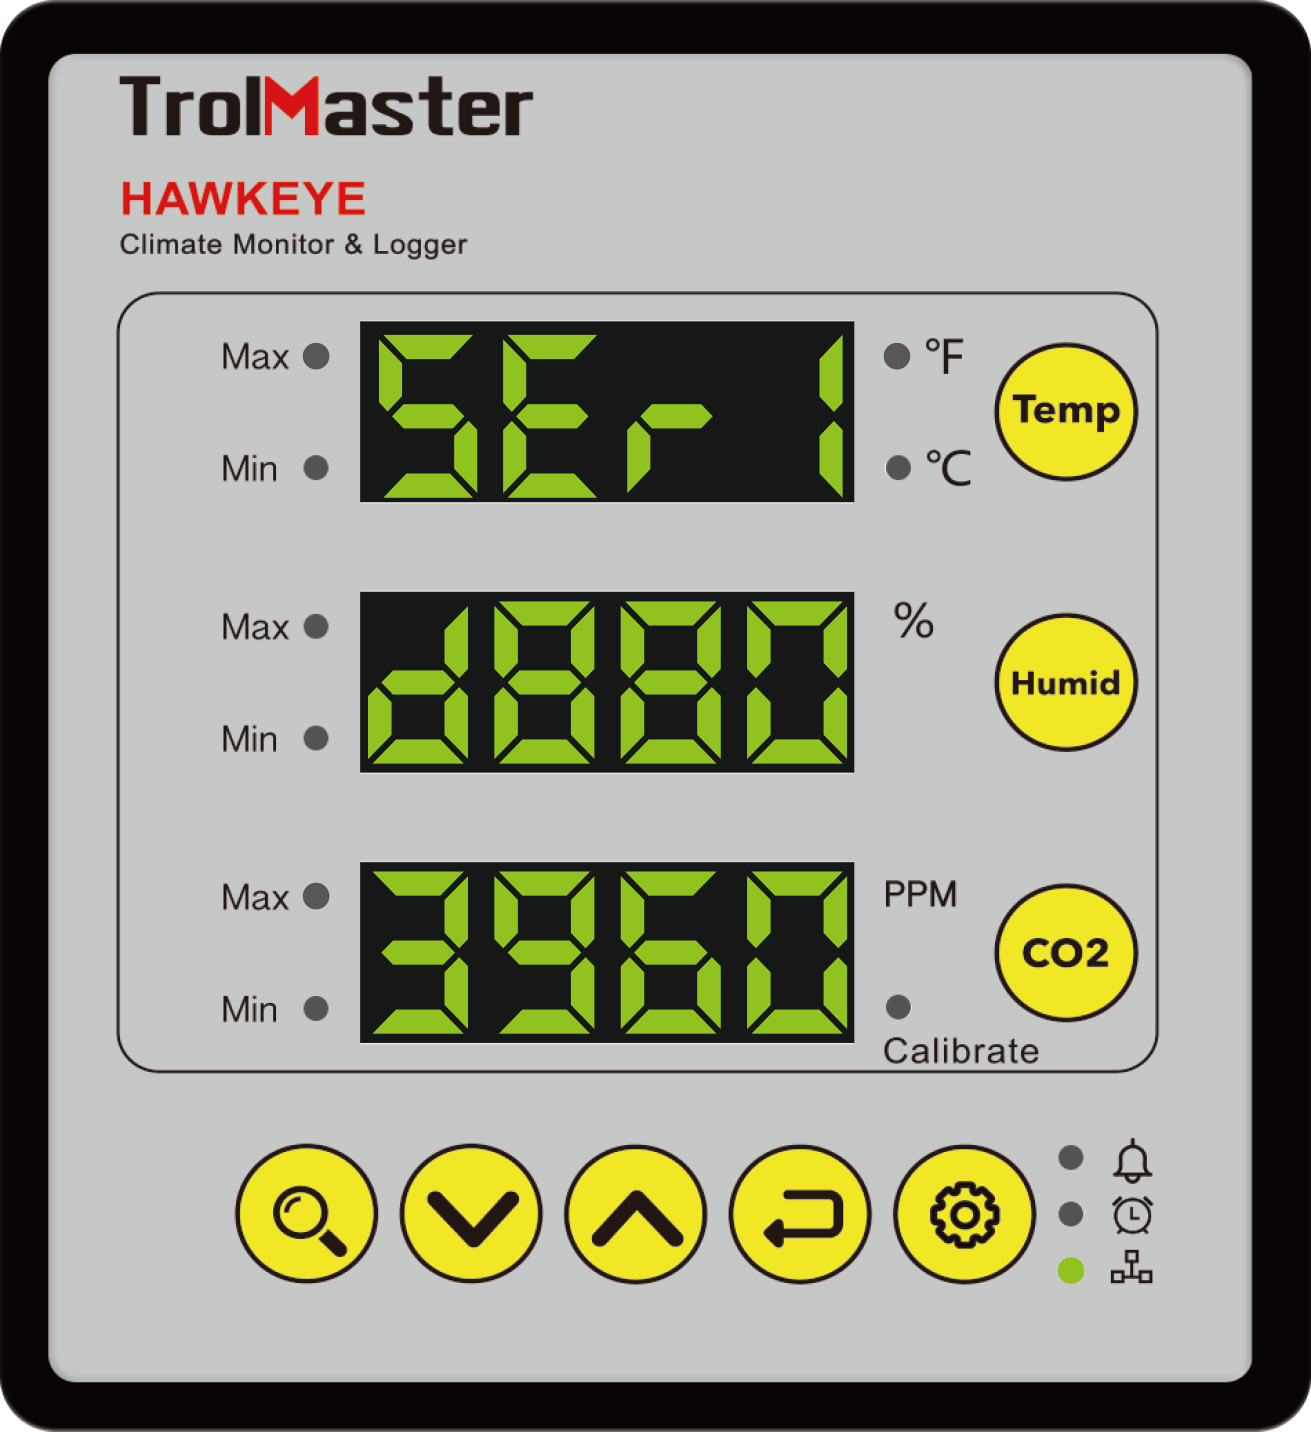
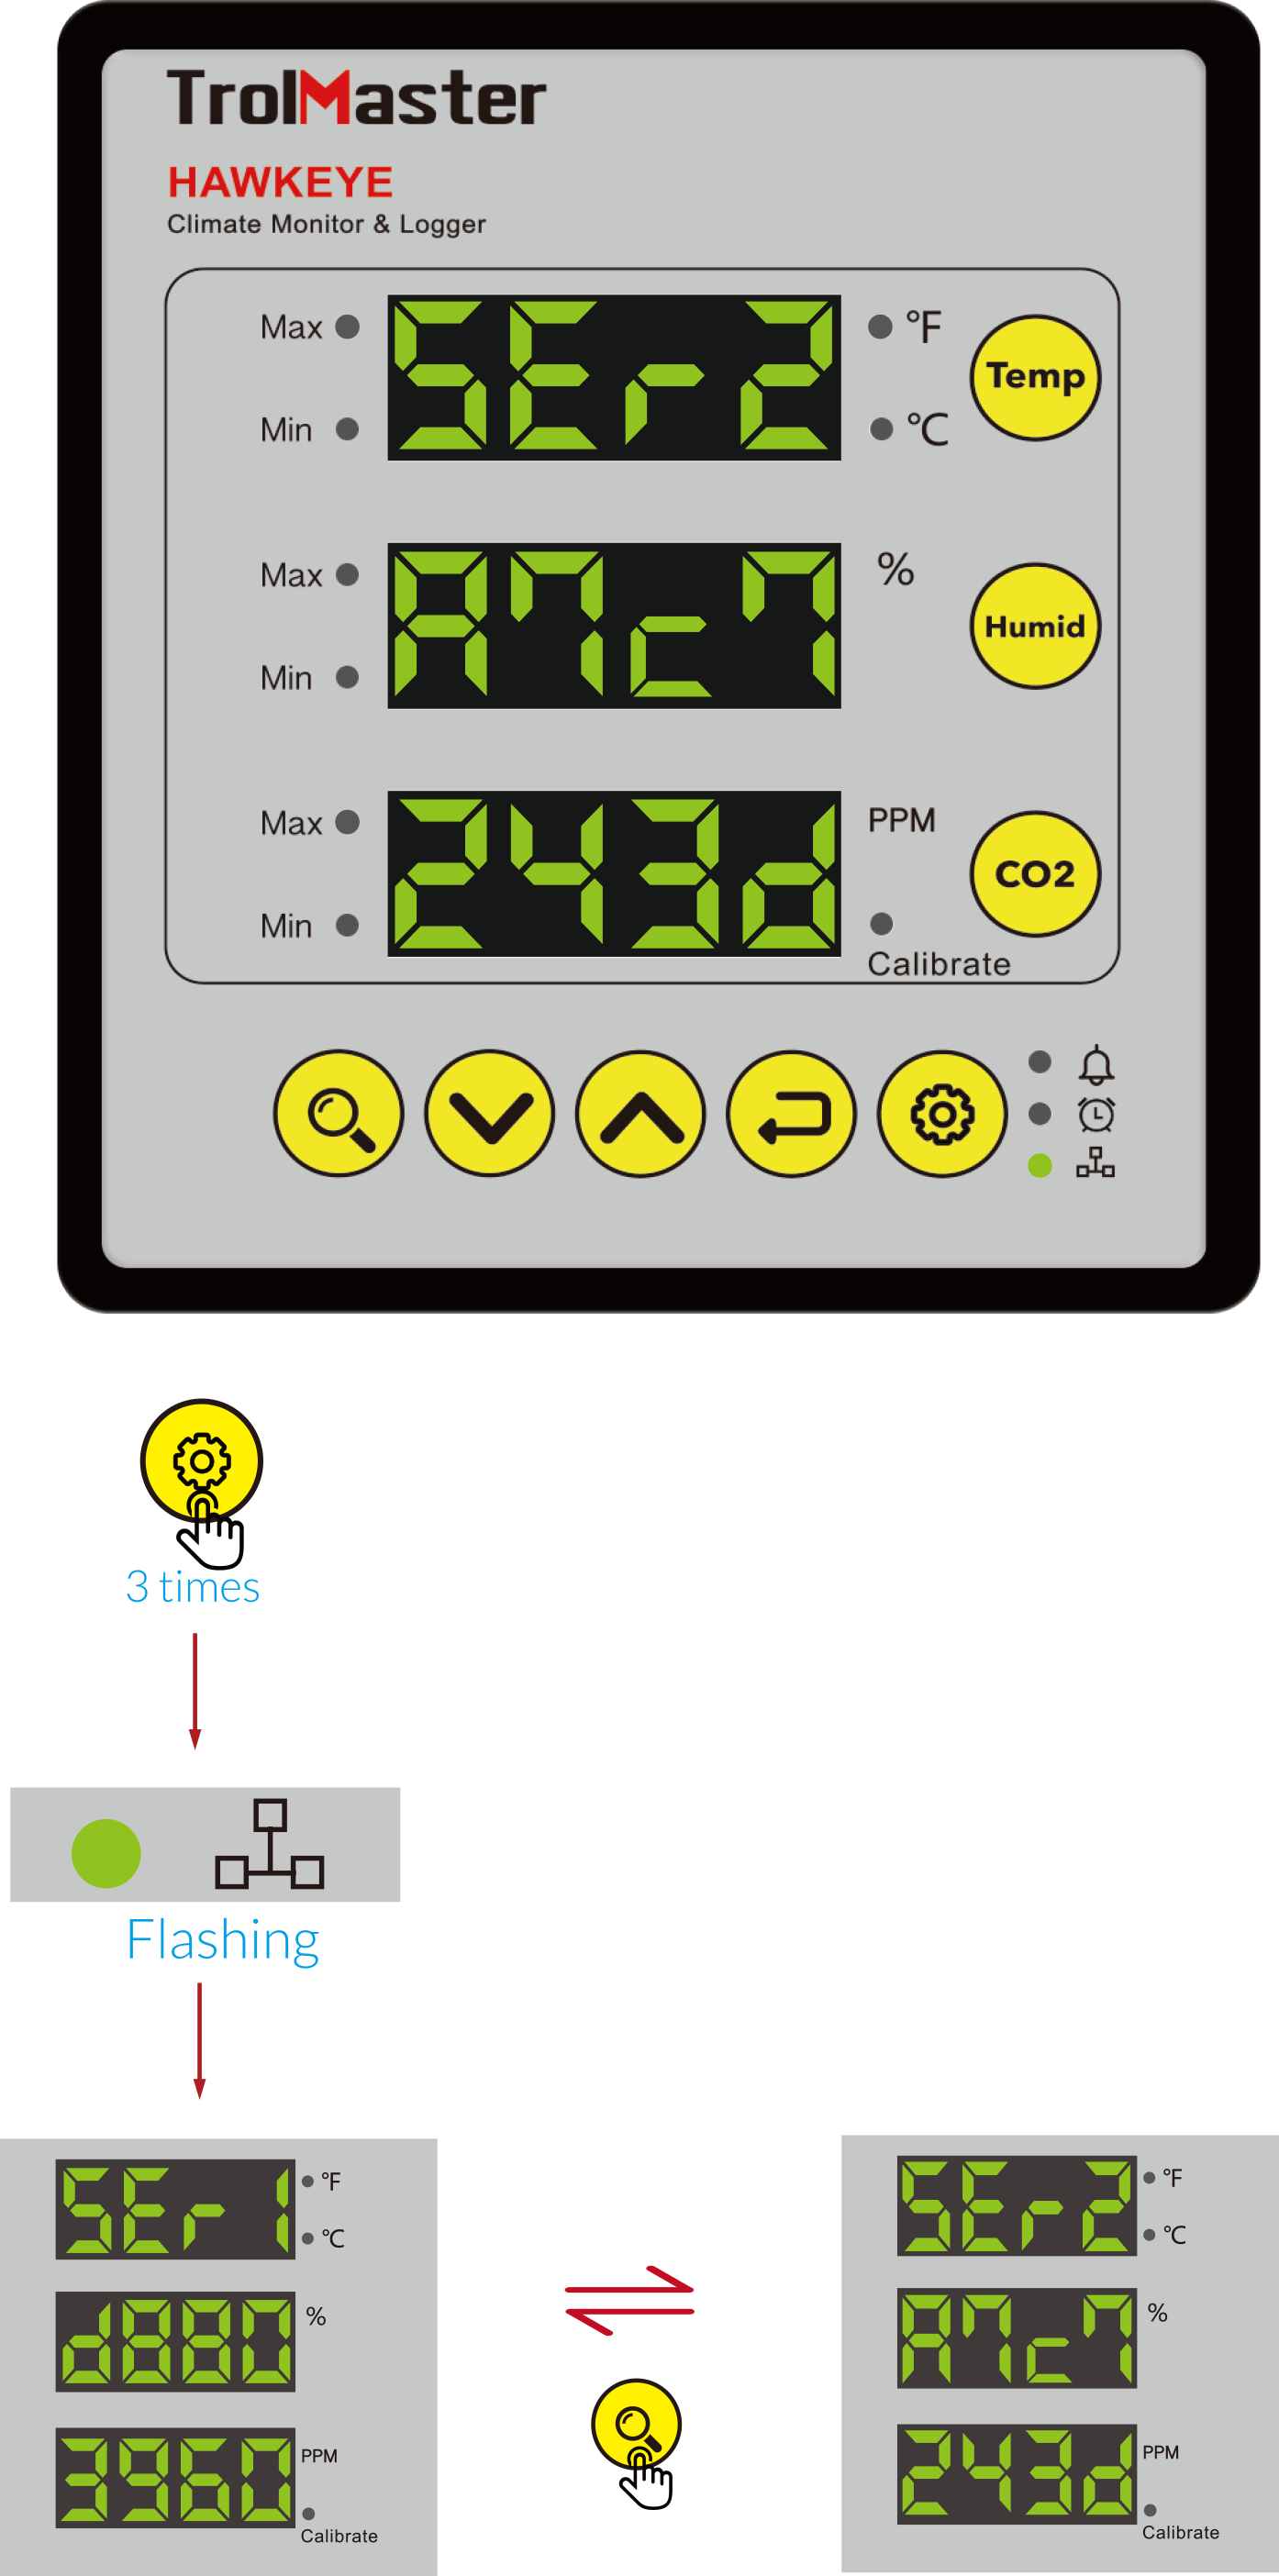
READING SEARIAL NUMBER
In normal display state, press Setting button  for three times, the Network Connection LED indicator
  will be
flashing and the LED screen displays the former 8 digits of serial number ( SEr1 ........ ). Press Search button
will be
flashing and the LED screen displays the former 8 digits of serial number ( SEr1 ........ ). Press Search button
 to display the latter 8 digits of
serial number (SEr2........) accordingly. There are total 16 digits for the serial number for example "D880 3960
A7C7 243D". The Network Connection LED indicator
will turn on when connected the unit with loT SPI-45Amz Ethernet Adpapter or smartphone module.
to display the latter 8 digits of
serial number (SEr2........) accordingly. There are total 16 digits for the serial number for example "D880 3960
A7C7 243D". The Network Connection LED indicator
will turn on when connected the unit with loT SPI-45Amz Ethernet Adpapter or smartphone module.
for three times, the Network Connection LED indicator will be
flashing and the LED screen displays the former 8 digits of serial number ( SEr1 ........ ). Press Search button
to display the latter 8 digits of
serial number (SEr2........) accordingly. There are total 16 digits for the serial number for example "D880 3960
A7C7 243D". The Network Connection LED indicator
will turn on when connected the unit with loT SPI-45Amz Ethernet Adpapter or smartphone module.
RESTORE FACTORY SETTING
To restore the factory Setting , press and hold Setting button
before plugging the HAWKEYE Monitor into wall outlet.
After power-on, the LED screen shows "RESET SETTING" and all the LED indicators will be flashing together. Keep
pressing Setting button for more than 5 seconds, all setting
parameters will restore to factory default setting
except for temperature unit and CO2 calibration value. When reset setting completed, the LED will show "RESET DONE"
and then turn back to normal display. Not press Setting button within 5 seconds, the unit will not restore factory
setting and back to normal display directly.
MICROSD DATA LOGGING
Insert MicroSD card ( maximum capacity 128G), the unit will record the current temperature value, humidity value
and CO2 value automatically. Save records every 15 seconds for one time in the fomat "MAC address+dated.txt" under
the folder HAWKEYE

Save in a txt file for one day. For example:
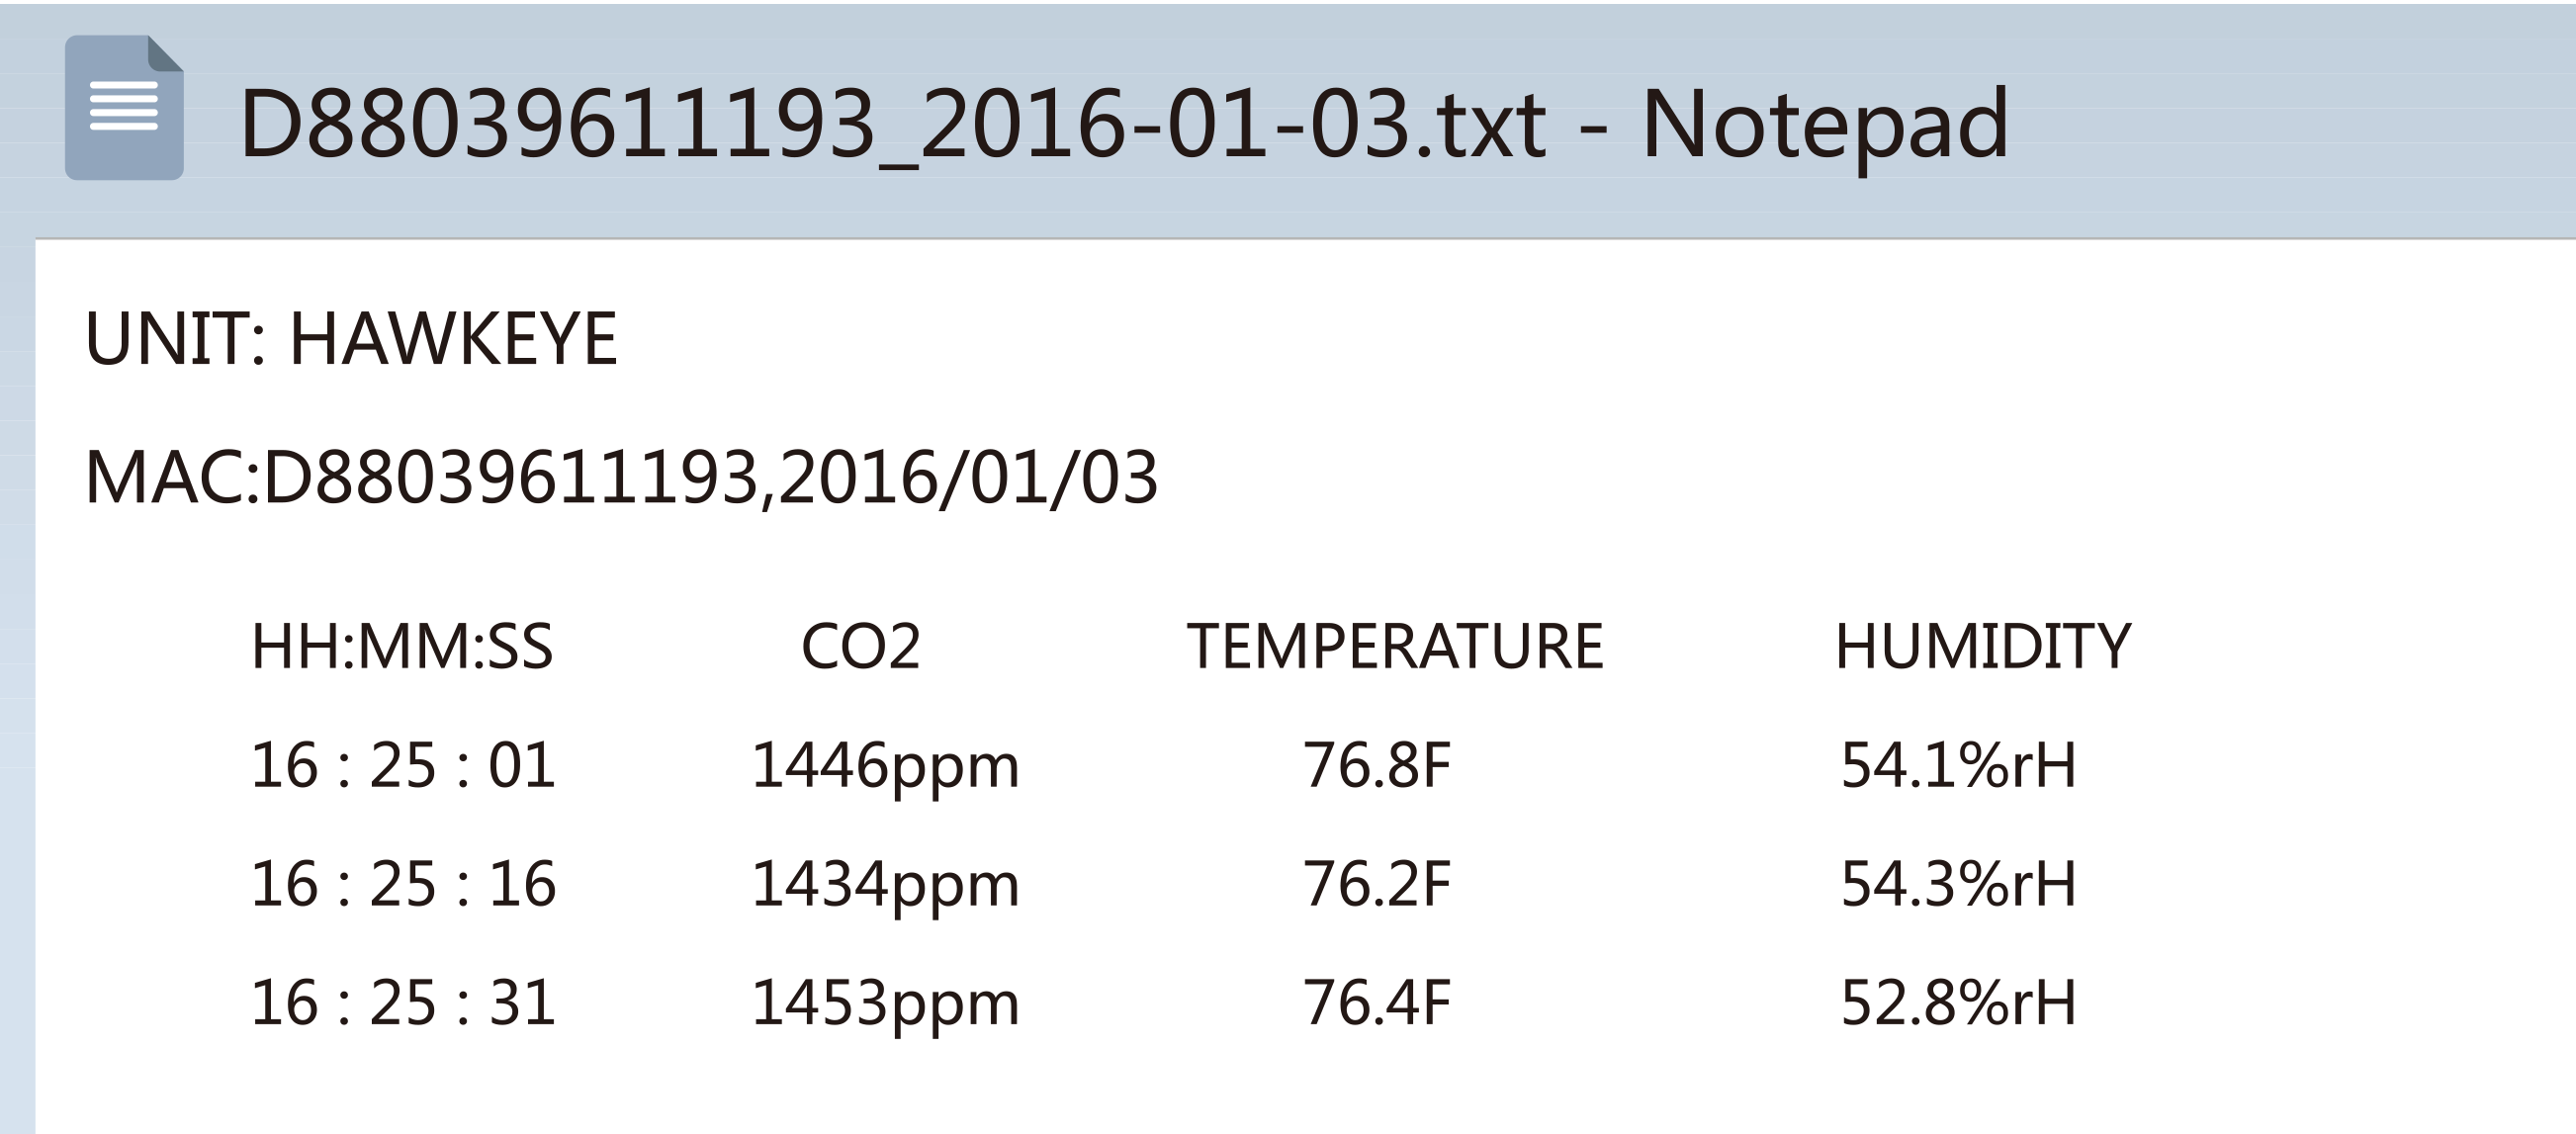
Note : hot-plug is not permitted for the MircroSD card , otherwise it will damage the files in the MicroSD card.
LED DIMMING FUNCTION
The LED display will be dimmed if the device has stayed inactive for one minute.The factory setting of LED diming
function is ON. Press and hold ENTER for 2 seconds to turn on or turn off this function.
for 2 seconds to turn on or turn off this function.
FACTORY DEFAULT SETTING
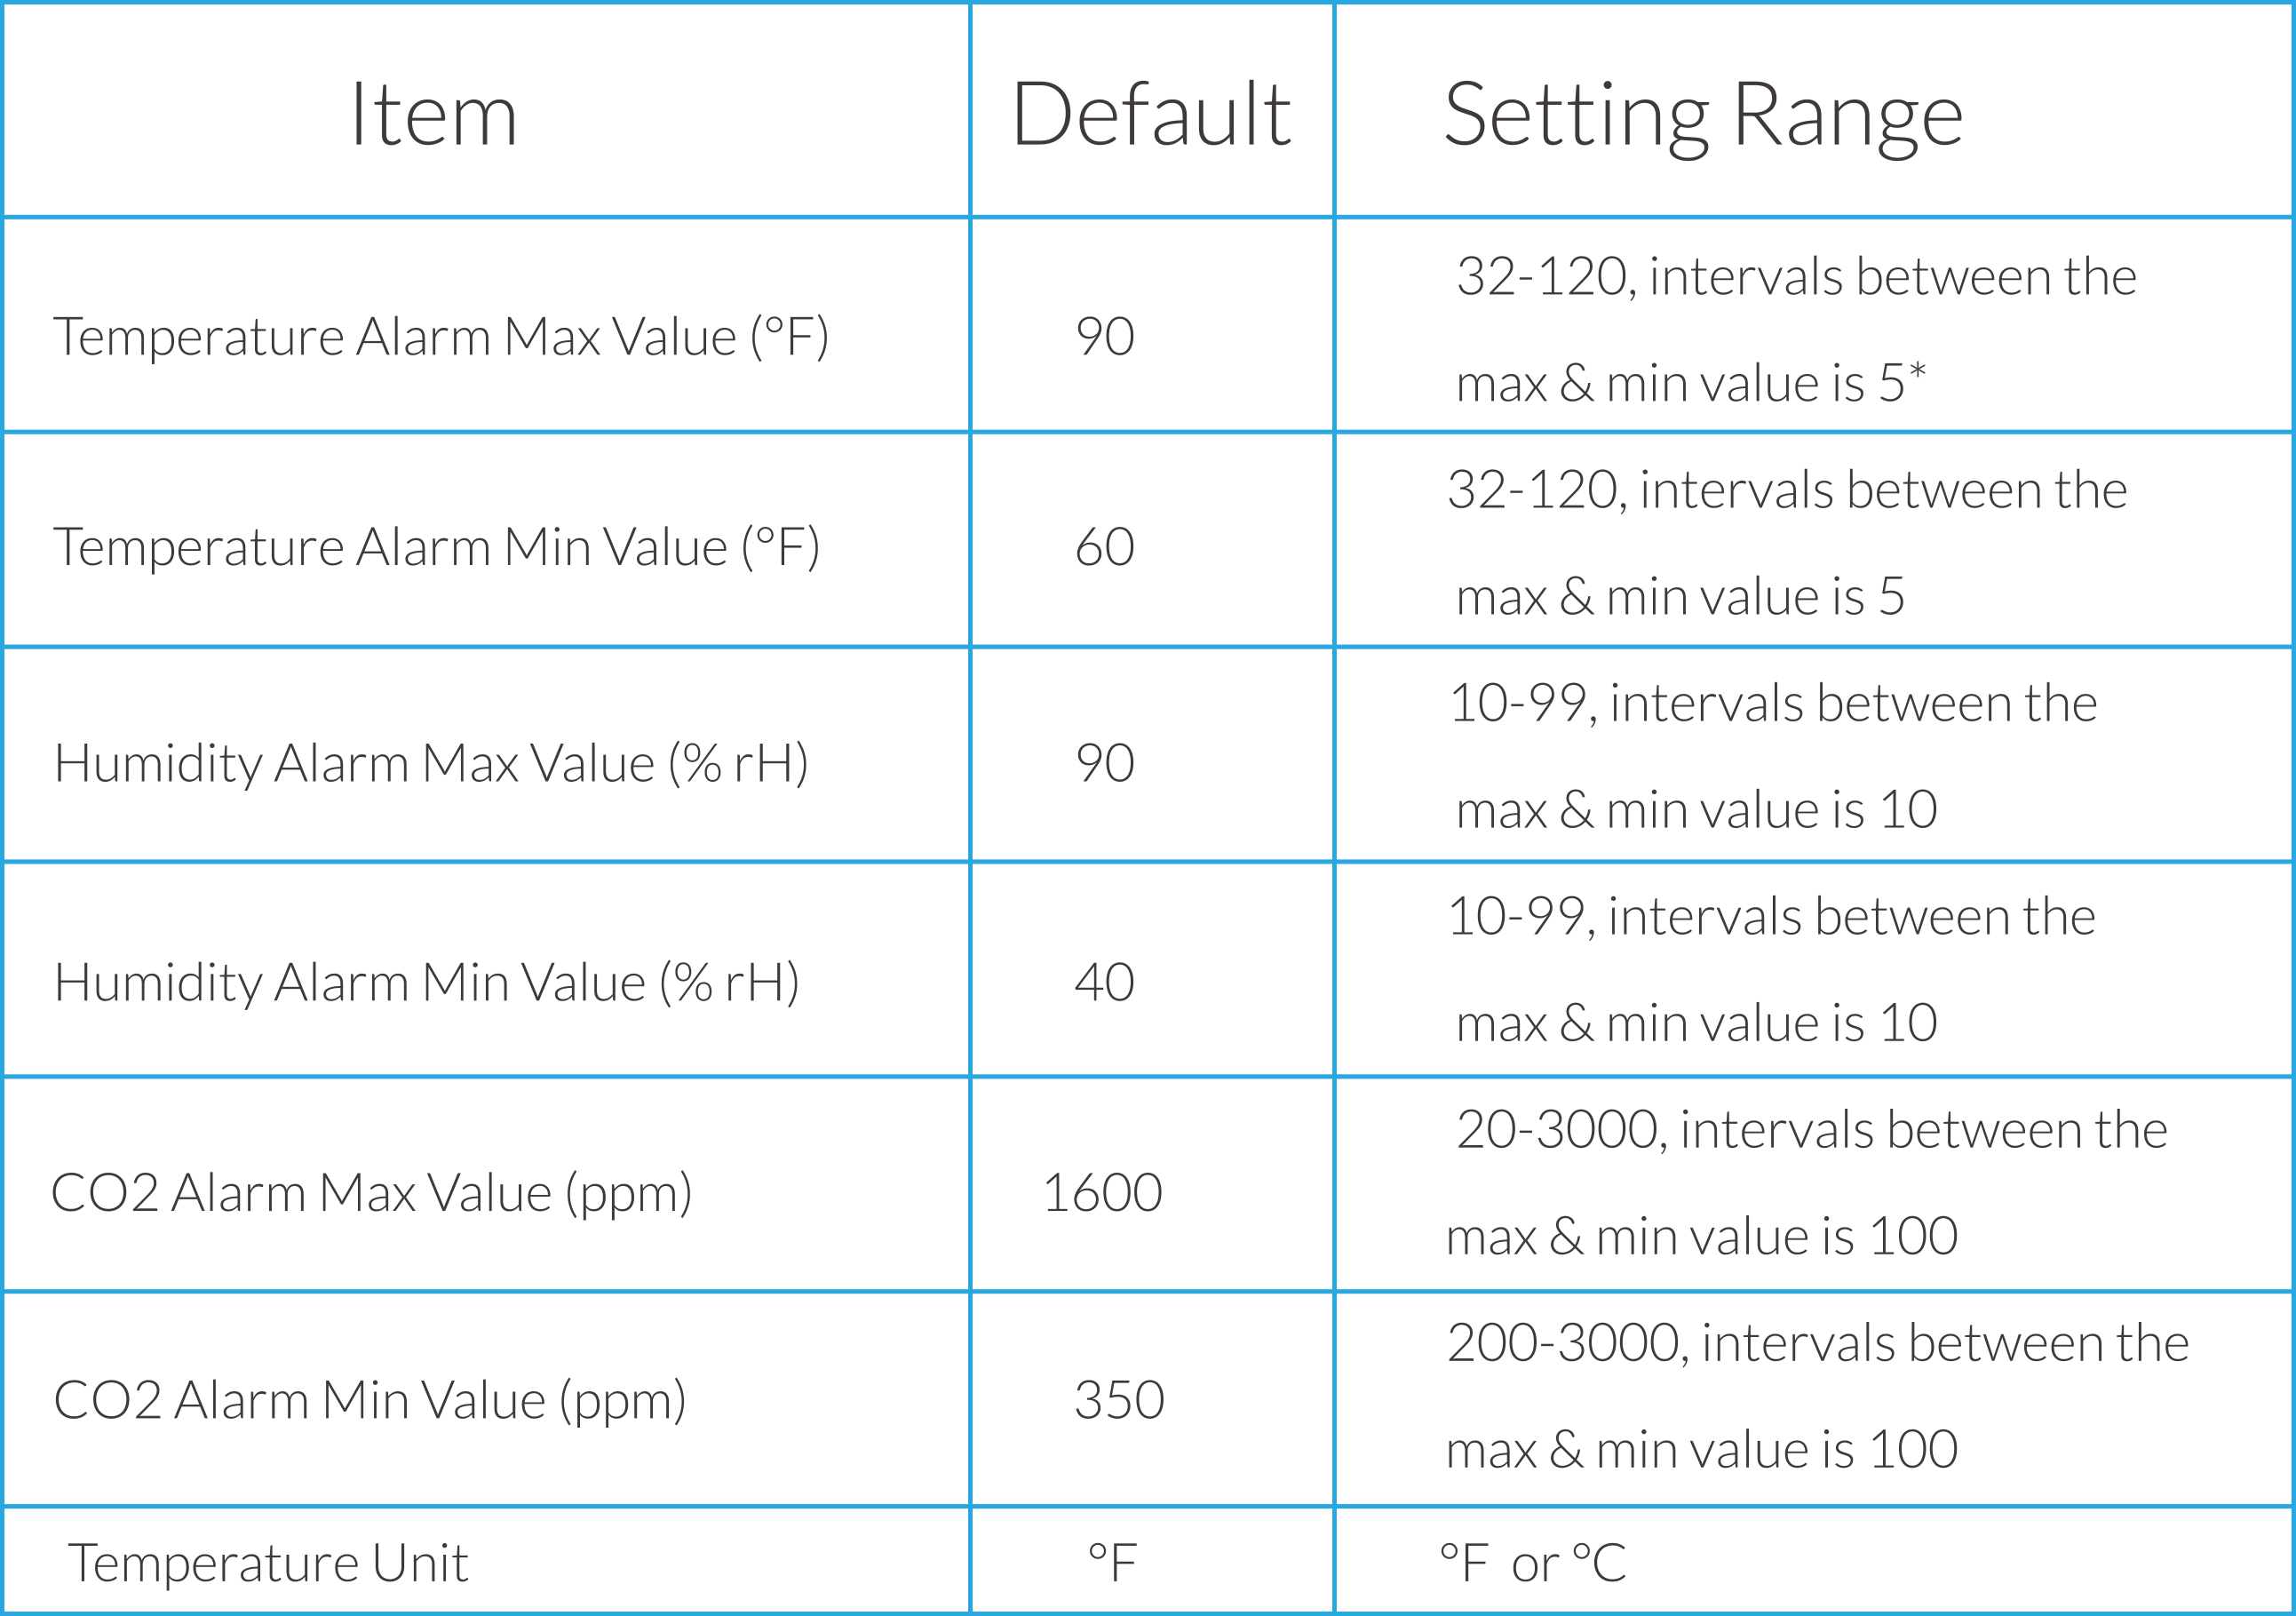
Remarks : * if the setting Min value is 50, then Max value must
be 55 or above, vice versa.
WARRANTY
TrolMaster Agro Instruments CO.,Ltd. only use high quality components. Under normal operating conditions, the
HAWKEYE Climate Monitor are covered by a three-year warranty from the original packaging to your shop with the
original sale receipt. Components that are excluded from warranty are components that have failed due to abnormal
usage. In the case of defects of the HAWKEYE Climate Monitor, the Monitor will either be replaced or repaired this
limited warranty shall apply to the replacement product for the remaining initial warranty period, i.e.(three) 3
years from the date of purchase of trhe original product.
RETURN
All returns need to be done in the original packaging in order to avoid damages of the product during the
transport.
Defective products need to be returned to your local store for replacement or repair. No-professionals DO not open
the cabinet to prevent electric shock or damage to the equipment.
TROUBLESHOORTING
Some of the most common issues or problems can be found within this section. Before returning the unit for service,
please consult the troubleshooting points below.

WARNING
DO NOT allow the HAWKEYE Climate Monitor to be exposed to water or excessive heat. DO NOT open or attempt to repair
or disassemble the Monitor, as there are no user-serviceable parts inside. Opening the Monitor will void the
warranty. If the HAWKEYE Climate Monitor is dirty, wipe it wiht a dry towel. The HAWKEYE operates under natural
ventilation conditions.