Thank you for purchasing TrolMaster’s TSH-1
Temp/Humidity Station for use with the Hydro-X
master controller. It is specifically designed to control
any temperature or humidity device that requires a
0-10vdc analog signal.
Simply select your desired temperature or humidity
stop point, the setpoints for the Day / Night, and the
TSH-1 will control that device’s variable speed or
opening % based on the stop point and Day / Night
setpoints.
There is no need to provide power supply for the
TSH-1 unit. It can be connected to the Hydro-X with
our standard RJ12 data cable.
The LCD screen of the TSH-1 will display the setpoint
for temperature or humidity, and the actual current
temperature or humidity level as well as the current % /
speed the device is operating at.
The TSH-1 can control any device that uses a 0-10 vdc
signal. In the instructions example we will be referring
to using it to control a fan.
The TSH-1 will control the temperature or humidity by
adjusting the variable speed fan or vents or other
devices that accept a 0-10VDC ANALOG SIGNAL.
Overview

The vertical X coordinate is the current temperature or
humidity level.
The horizontal Y coordinate represents the fan speed % / output voltage from 0-10vdc.
There are three settings within the TSH-1 module to be set by the user.
The horizontal Y coordinate represents the fan speed % / output voltage from 0-10vdc.
There are three settings within the TSH-1 module to be set by the user.
Stop Point: When the current measured temperature or humidity is
below the stop
point, the TSH-1 unit will
shut off the fan by reducing the voltage output to 0.0vdc.
Day & Night idle speeds: (Minimum Output) When the current measured temperature or humidity increases above the stop point, but remains below the setpoint, the TSH-1 unit will operate the fan at the idle speed setting.
There are also two settings within the Hydro-x controller to be set by the user.
Temperature/Humidity setpoint: The user will select the Day and Night setpoint within the Hydro-x settings for the TSH-1 module. The setpoint works with the Deadband setting within the Hydro-x to determine the range of speed control. The setpoint is where the TSH-1 will begin to modulate the speed of the fan being controlled.
Deadband: The Deadband setting is set on the Hydro-x. The difference between the set point and the full speed point is the Deadband setting. When the current measured temperature or humidity is above the setpoint selected on the Hydro-x, the fan speed will change proportionally with temperature/humidity. If the temperature/humidity increases, the TSH-1 unit will increase the fan speed by increasing the voltage output towards the 10v limit. If the temperature/humidity decrease, the TSH-1 unit will decrease the fan speed by reducing the voltage down towards to 0v limit.
Full speed point:The full speed point is the setting that combines the user setpoint, with the Deadband setting. In this example, if the user setpoint is 78’F and the Deadband is 4’F, the fan will operate at full speed when the temperature goes above 82’F (10v output from the TSH-1). When the current measured temperature/humidity is at or above the full speed point, the TSH-1 unit will operate the fan at maximum speed.
When the temperature/humidity goes back below the Full speed point, the TSH-1 will again start to modulate the speed output going to the fan.
Features
Installation
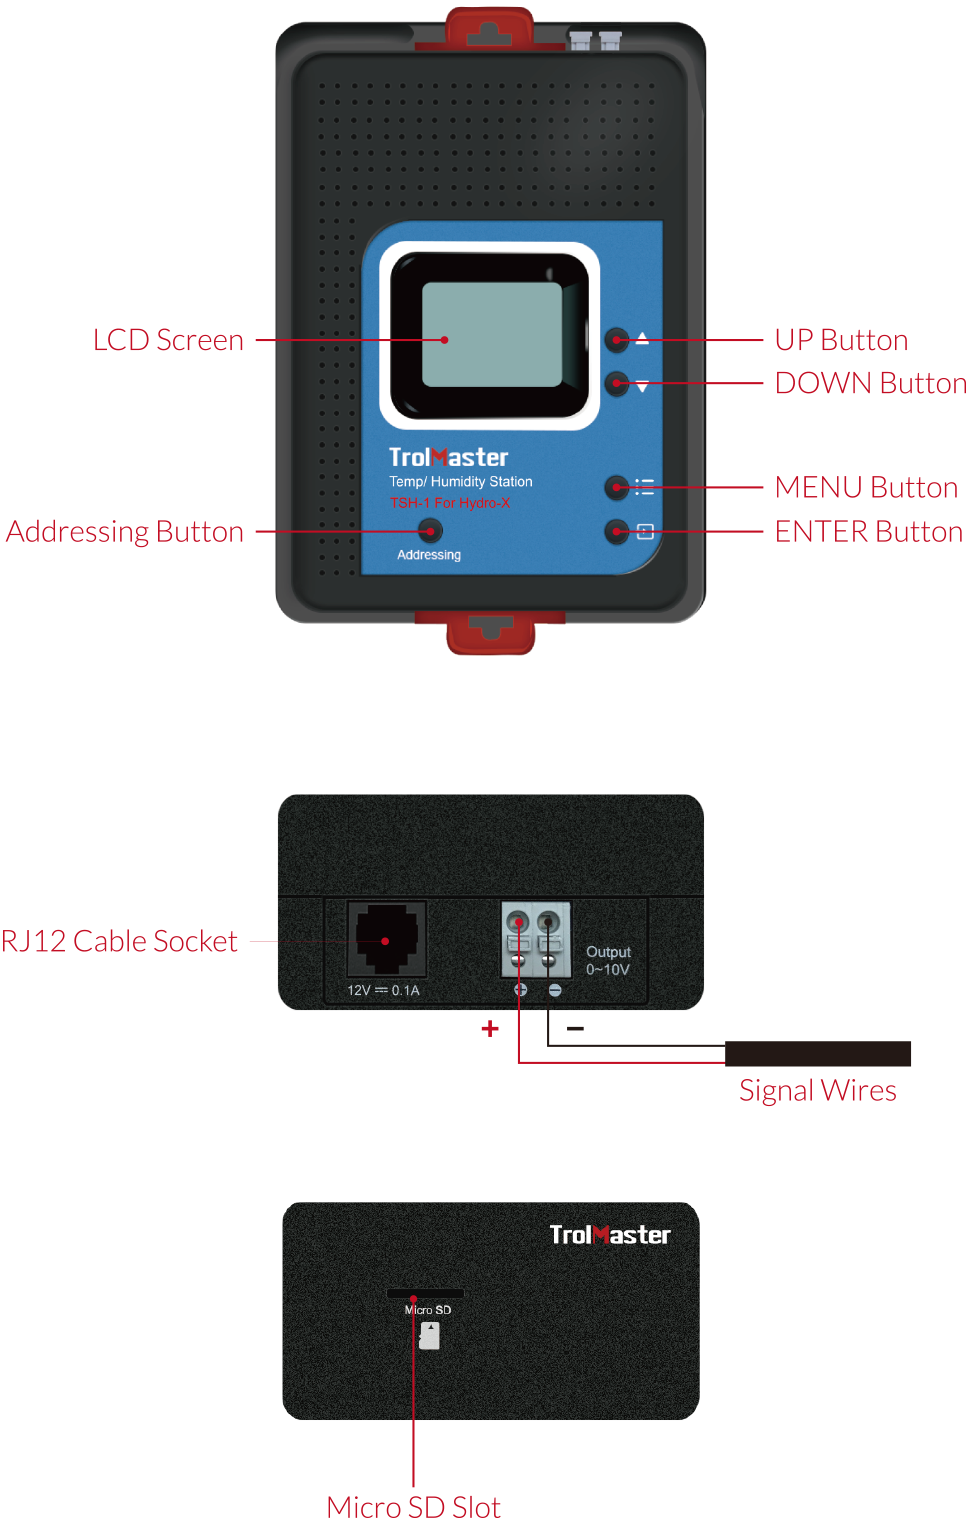
Pull the 2 tabs outward to release the bracket from the
unit, mount the bracket to wall or surface . Insert the
two 0-10v wires into the positive terminal and negative
terminal on the top of TSH-1 by pressing the small grey
tab on each terminal. Release the grey tab to clamp the
wire in each terminal. Verify wire is secured by gently
pulling on each wire. Finally, place the unit back on the
bracket and press the 2 tabs back in to lock the unit in
place.
NOTE: Make sure to insert the positive wire and negative wire of signal cable of the device you are controlling into the positive terminal and negative terminal correctly
NOTE: Make sure to insert the positive wire and negative wire of signal cable of the device you are controlling into the positive terminal and negative terminal correctly
Operation Instructions
1. Connection to Hydro-X
The TSH-1 is connected to the Hydro-X with a RJ12
cable through the DEVICES socket on the bottom of
Hydro-X. See below.
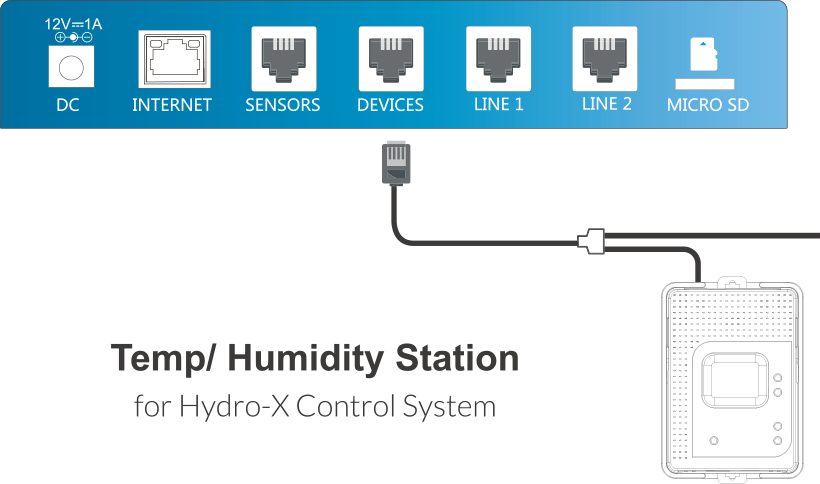
After power-on, the LCD screen of TSH-1 will show
“Device Type” accordingly when the TSH-1 is connected correctly. Otherwise, it will show “Offline” if the
RJ12 cable is not connected to the TSH-1.

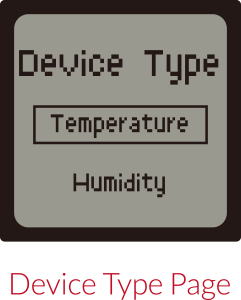
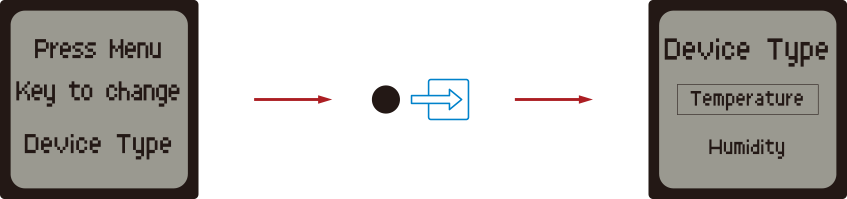
2. Select Device Type
If it is the first time you have used the TSH-1, when you
power on the TSH-1, the “Device Type” will be
displayed on the LCD screen. On the Device Type page,
The LCD will display 2 options, (Temperature/Humidity) as shown on the photo. You can move the cursor
(UP/DOWN) to select either option. Select Temperature or Humidity, and then press ENTER button to
 confirm your selection.
confirm your selection.
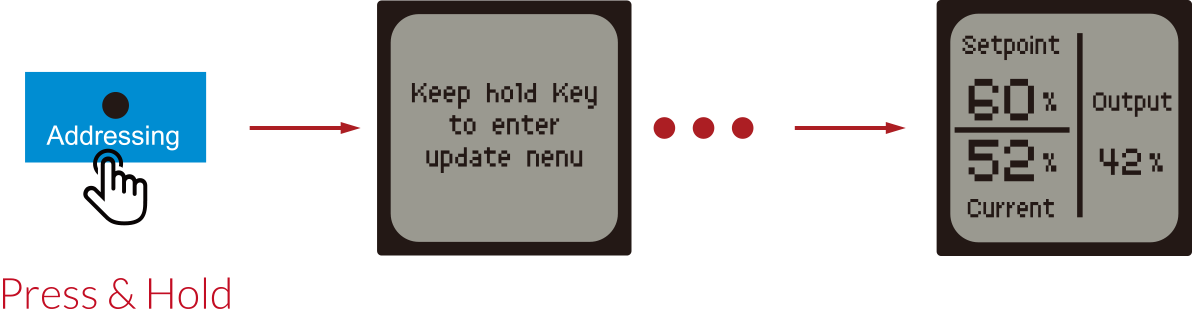
3. Address Assignment/Delete
After confirming your selection, the LCD screen of
TSH-1 will show “Please press Addressing Key” and
“Press Menu Key to change Device type” alternately
When the LCD screen show “Please press Addressing Key”, press the Addressing button on the TSH-1 unit so that the Hydro-X will assign an address such as T1/H1 to TSH-1 unit accordingly. The LCD screen of Hydro-X will display “Station T1/H1 has been added”. Please note T1/H1 may not be the actual address, it can be T2/H2 depending on the connection sequence. The first one is marked as T1/H1, the second one as T2/H2.
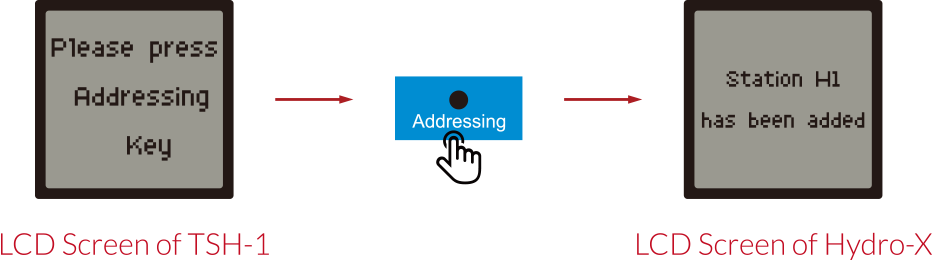
When the LCD screen show “Please press Addressing Key”, press the Addressing button on the TSH-1 unit so that the Hydro-X will assign an address such as T1/H1 to TSH-1 unit accordingly. The LCD screen of Hydro-X will display “Station T1/H1 has been added”. Please note T1/H1 may not be the actual address, it can be T2/H2 depending on the connection sequence. The first one is marked as T1/H1, the second one as T2/H2.
You can also check the address code on the Hydro-X as
shown below:

To change the type of module assignment on the
TSH-1, press and hold the Addressing button on the
TSH-1 unit so that the Hydro-X will delete the address
which assigned before accordingly. Then the TSH-1
unit will return to the Device Type Page where the user
can reselect the device type.
4. Settings on the TSH-1
The first settings on the TSH-1 to change are the Day
and Night Min Output. The user can select any output
level from 10 to 80% which will represent voltages
from 1 to 8vdc output from the TSH-1. Each 1%
increase will result in a voltage increase of 0.1vdc.
To change settings: Press the Menu button to set the minimum idle speed (output) for Day & Night mode and the Stop At point. Press the UP or DOWN button, the digits will be flashing. Then use the UP or DOWN button again to change settings. Press the ENTER button to enter the setting.
When you press Menu once, the LCD screen will display:“Day Min Output xx%”.
Day Min Output:
Select the Minimum output % that
you would like to operate the fan in increments 1%.

When you press Menu twice, the LCD screen will display: “Night Min Output xx%”.
When you press Menu twice, the LCD screen will display: “Night Min Output xx%”.
Night Min Output:
Select the Min output that you
would like to operate the fan in increment of 1%.

When you press Menu a third time, the LCD screen will display:“Stop At xx%”.
When you press Menu a third time, the LCD screen will display:“Stop At xx%”.
Stop at :
The Stop At setting is the minimum temperature or humidity that the growing area can get to
before shutting down the fan. When the current
measured temperature or humidity is lower than the
“Stop At” minimum temperature or humidity, the fan will turn off automatically (voltage will drop to 0.0vdc).
When the current measured temperature or humidity
is higher than the minimum temperature or humidity,
the fan will turn on and will operate at the “Min Day or
Night output” speed.

5. Firmware Upgrade
If the TSH-1 ever needs to have new firmware installed,
simply go to the TrolMaster website and download the
updated firmware file to a microSd card. *Card must be
less than 32GB capacity.
NOTE: Make sure the file name of the firmware upgrade reads: “tsh1_update.hex”
Insert the card into the slot at the bottom of the TSH-1 and press and hold the “Addressing” button while re-connecting the RJ12 cable. The upgrade process will be done automatically
NOTE: Make sure the file name of the firmware upgrade reads: “tsh1_update.hex”
Insert the card into the slot at the bottom of the TSH-1 and press and hold the “Addressing” button while re-connecting the RJ12 cable. The upgrade process will be done automatically
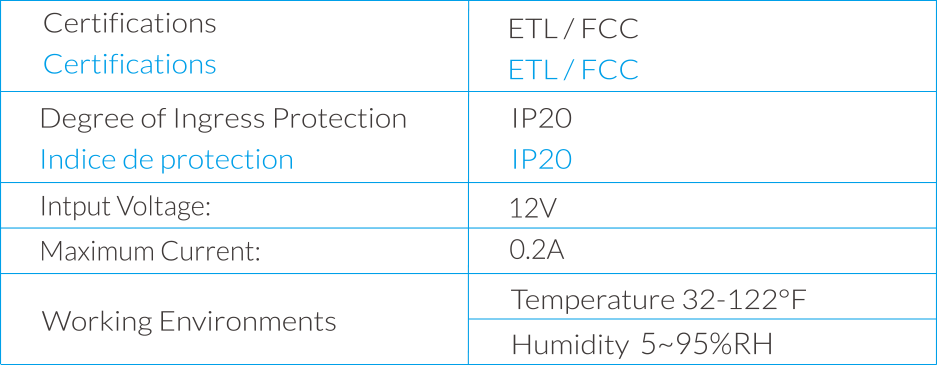
6. Specifications
7. GENERAL INFORMATION
a ) Please use TrolMaster’s cables and other components for best performance.
b ) If there are any defects of the TSH-1, TrolMaster will repair or replace using new or reconditioned products within three-years from the original date of purchase. For service, contact TrolMaster tech support for instructions, have the original sale receipt ready.
c ) DO NOT attempt to open the enclosure to prevent electric shock, and voiding of the warranty
1. If the surface of Temp/Humidity Station is dirty,
wipe it with a dry towel.
2. The Temp/Humidity Station is designed for
indoor use only, it should be operated under
natural ventilation conditions.
3. The Temp/Humidity Station should be positioned
in a place that easily serviceable. There are no
sensors inside the TSH-1.
 WARNING :
DO NOT allow the Temp/Humidity Station to be
exposed to water or excessive heat.
DO NOT open or attempt to repair or disassemble the Temp/Humidity Station, as there are no
user-serviceable parts inside. Opening the controller
will void the warranty.
WARNING :
DO NOT allow the Temp/Humidity Station to be
exposed to water or excessive heat.
DO NOT open or attempt to repair or disassemble the Temp/Humidity Station, as there are no
user-serviceable parts inside. Opening the controller
will void the warranty.